You have to hand it to EK. The watercooling specialist really knows how to think out of the box. The brand just announced its new EK Lignum lineup of products that are partially manufactured out of walnuts (Juglans Nigra).
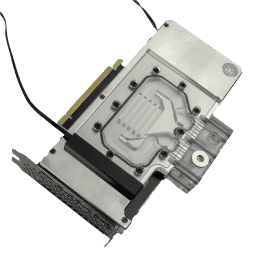
The waterblock itself is based on the company’s EK-Quantum Vector RE RTX 3080/3090 design that’s tailored towards Nvidia’s GeForce RTX 30-series (Ampere) graphics cards. The EK-Quantum Vector RTX 3080/3090 Lignum Edition is compatible with the majority of the GeForce RTX 3080 and GeForce RTX 3090 models that feature a reference design, including Zotac’s Trinit GeForce RTX 3080 and GeForce RTX 3090 SKUs. Do note, however, the waterblock isn’t compatible with the Founders Edition.
EK’s decision to use walnut in the waterblock’s construction was due to its properties to shrink and expand. The company handpicks and handcrafts each piece of wood. Its open-pore finish leaves the wood with a silky touch. Each waterblock features a distinctive wood pattern so no two Lignum waterblocks are the same.
The brand assures its customers that Lignum products are designed in such a way that the wood doesn’t come anywhere near the liquid. The wood is attached to an acetal tops that seals the waterblock so the wood only acts as eye candy.
Image 1 of 4
(Image credit: EK)
Image 2 of 4
(Image credit: EK)
Image 3 of 4
(Image credit: EK)
Image 4 of 4
(Image credit: EK)
The EK-Quantum Vector RTX 3080/3090 Lignum Edition features a thicker copper base in comparison to EK’s other waterblocks to provide headroom for tall capacitors on graphics cards with reference designs. The objective is to provide wide compatibility without compromising the flow of the coolant.
The waterblock comes equipped with an integrated solutioon that coolrs the GPU, memory chips and VRM (voltage regulation module) as the coolant flows right over each aforementioned component. The coolant also makes contact with the MOSFETs as well as the chokes so there is a minimum chance of hearing coil whine. The optimized flow paths aim to reduce hydrodynamic instabilities and dead spots.
The EK-Quantum Vector RTX 3080/3090 Lignum Edition commands a price tag of $359.99. EK expects to ship out orders in the middle of September 2021. If you’re looking for a complete wood theme, EK also sells matching EK-CPU Lignum waterblock and EK-HDC Lignum 12mm fittings for $189.99 and $17.99, respectively.
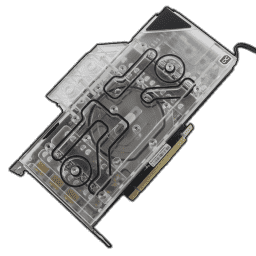
The TechPowerUp GPU roundup series continues today with Alphacool, after having examined entries from EKWB and CORSAIR to date. Alphacool is high up on the list of large, established DIY watercooling brands, and the company had sent two different takes on its cooling solution for the NVIDIA RTX 3080. We take a look at both today, and this article will cover the GPX Aurora version. Thanks to Alphacool for sending both review samples to TechPowerUp!
On the product page, the name is actually “Eisblock Aurora Acryl GPX-N,” before the GPU mention even enters the picture. But the product packaging and a few other references have used “Eisblock GPX Aurora,” which I am going to use for convenience. As the name suggests, this is a full-cover GPU water block that uses an acrylic top throughout. Alphacool is marketing this to users who prefer a mix of function and form, with the Eisblock ES Acetal, of which a review was published alongside this article, on the other end of the spectrum with an acetal top, side-mounted ports, and no lighting support. Be sure to read both reviews as the two designs share commonalities, but also differ in enough ways to merit the existence of both. I recommend starting with the other one since it was done first and has some extra detail that is applicable here, too.
Specifications
Alphacool Eisblock GPX Aurora RTX 3080 Reference
Top:
Acrylic
Cold Plate:
Nickel-plated copper
GPU Compatibility:
NVIDIA GeForce RTX 3080 / 3090 with reference layout
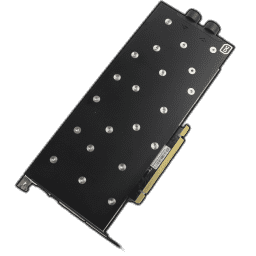
The TechPowerUp GPU roundup series continues today with Alphacool, after having examined entries from EKWB and CORSAIR. Alphacool is high up on the list of large, established DIY watercooling brands, and the company had sent two different takes on its cooling solution for the NVIDIA RTX 3080. We take a look at both today, and this article will cover the ES Acetal version. Thanks to Alphacool for sending both review samples to TechPowerUp!
As the name suggests, the Eisblock ES Acetal is a full-cover GPU water block that uses an acetal (POM) top throughout paired with side-mounted inlet and outlet ports, one of the new things to come out of this generation, with active backplates being the other major addition. Alphacool is marketing this for users who prefer function over form, with no RGB lighting and the I/O on the side enabling easier tube routing in horizontal or vertical GPU mounting. The Eisblock GPX Aurora with a review published alongside this article is on the other end of the spectrum, using a full acrylic top and plenty of lighting combined with the more traditional I/O terminal up top. Be sure to read both reviews as the two designs share commonalities but also differ enough to merit the existence of both.
Specifications
Alphacool Eisblock ES Acetal RTX 3080 Reference
Top:
Acetal
Cold Plate:
Nickel-plated copper
GPU Compatibility:
NVIDIA GeForce RTX 3080 / 3090 with reference layout
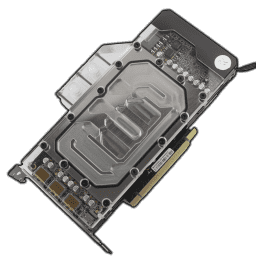
The first of our latest GPU water block reviews went up as a two-parter covering both the EK-Quantum Vector GPU block with the regular backplate and new-to-this-generation EK-Quantum Vector Active Backplate. Today, we take a look at the CORSAIR offering, which is part of the company’s Hydro X series of products that have massively shook up the DIY watercooling market within the ~2 years since launch. CORSAIR now takes up nearly a third of most market shares based on my discussions with vendors and is probably the biggest involved name brand here, too. Thanks to the company for sending a review sample to TechPowerUp!
We previously took a look at the CORSAIR GPU block for the NVIDIA GTX 1080 as well as the RTX 2080. As I did then, I will shorten the product name to CORSAIR Hydro XG7 block for the RTX 3080/3090 reference PCB for convenience. It received a few updates to the design, but is still easy to make out as a CORSAIR product. Some things surrounding a PR issue worked out in favor of CORSAIR, and we will go over everything in detail in the review beginning with a look at the specifications below.
Specifications
CORSAIR Hydro XG7 RGB RTX 30-Series Reference
Top:
Aluminium trim and polished acrylic
Cold Plate:
Nickel-plated copper
GPU Compatibility:
NVIDIA GeForce RTX 3080 / 3090 with reference layout
Ports:
Four, BSP G1/4″ threaded
Lighting:
Integrated d-RGB LEDs controlled by iCUE or standard 3-pin LED headers
Oh my gosh, is this real? Do I actually have an RTX 3080 and a reference PCB card at that? After what seemed like an eternity, not only do I have a compatible GPU but several GPU blocks as well to begin a full GPU water block roundup here on TechPowerUp. There are entries from EK, Alphacool, CORSAIR, Bitspower, and Watercool to begin with, and hopefully, Optimus Cooling, Bykski, and Aqua Computer will join the fray soon. We begin the series with EKWB, whose products came in first here, as well as the retail market more often than not. The company prides itself on extensive coverage coupled with early releases, too, so let’s thank EK for the samples that are being reviewed today!
Depending on when you read this review, there is (or hopefully was) a massive chip shortage causing lots of component shortages. But there is another issue compounding DIY watercooling with NVIDIA shifting away from the so-called reference PCB design for its Founders Edition products. This, coupled with the general confusion on some capacitor heights on the reference PCB, resulted in many custom watercooling companies being left in the dark. Indeed, some blocks had to be revised or delayed. What I am testing here is a fully working retail product, which is the case with the others, too. EK, as per usual, has a lot of different options to choose from, be it different top or cold-plate finishes, as well as the Quantum or Classic lineup. The subject of this review is the Quantum Vector GPU block in the nickel/plexi variant for the reference edition (RE) NVIDIA RTX 3080, which is the same PCB design as for the RTX 3090 aside from fewer VRAM modules.
Specifications
EK-Quantum Vector RE RTX 3080/3090
Top:
Full length acetal or plexi
Cold Plate:
Copper or nickel-plated copper
GPU Compatibility:
NVIDIA GeForce RTX 3080 / 3090 with reference layout
Ports:
Four, BSP G1/4″ threaded
Dimensions:
220 x1 24 x 20.5 mm
Lighting:
Yes, five D-RGB LEDs coupled with 50 cm long 3-pin cable
Did you know the RTX 3090 VRAM ran hot? It has become enough of a serious issue for some really novel takes on the backplate design and cooling to pop up. When it came to the DIY watercooling field, this meant bringing about more ways to remove the heat from the back of the PCB than merely a regular aluminium backplate. There have been takes on active backplates in the past, with Aqua Computer first doing so with a heatpipe that I would argue is semi-active at most. Indeed, the company itself realized there is an opportunity for a coolant flow path on the back and put out some renders for interest checks in the community. A few enterprising community members developed mods to do the same, even making one a retail product that clips onto an existing backplate. That wasn’t the most elegant of solutions, however, and Aqua Computer was since been beat to the market by EK.
First announced at its CES 2021 media event, the EK-Quantum Vector Active Backplate was the subject of many a discussion. Remember the dual PCB GPU sandwiches from a few generations ago? We can now have a water block sandwich with the GPU in the middle. I definitely had to put together a dedicated review for this despite it clearly not being as beneficial on my RTX 3080 relative to the RTX 3090. Thanks again to EK for sending a review sample to TechPowerUp, and be sure to read this review alongside my review of the EK-Quantum Vector GPU block and “regular” backplate.
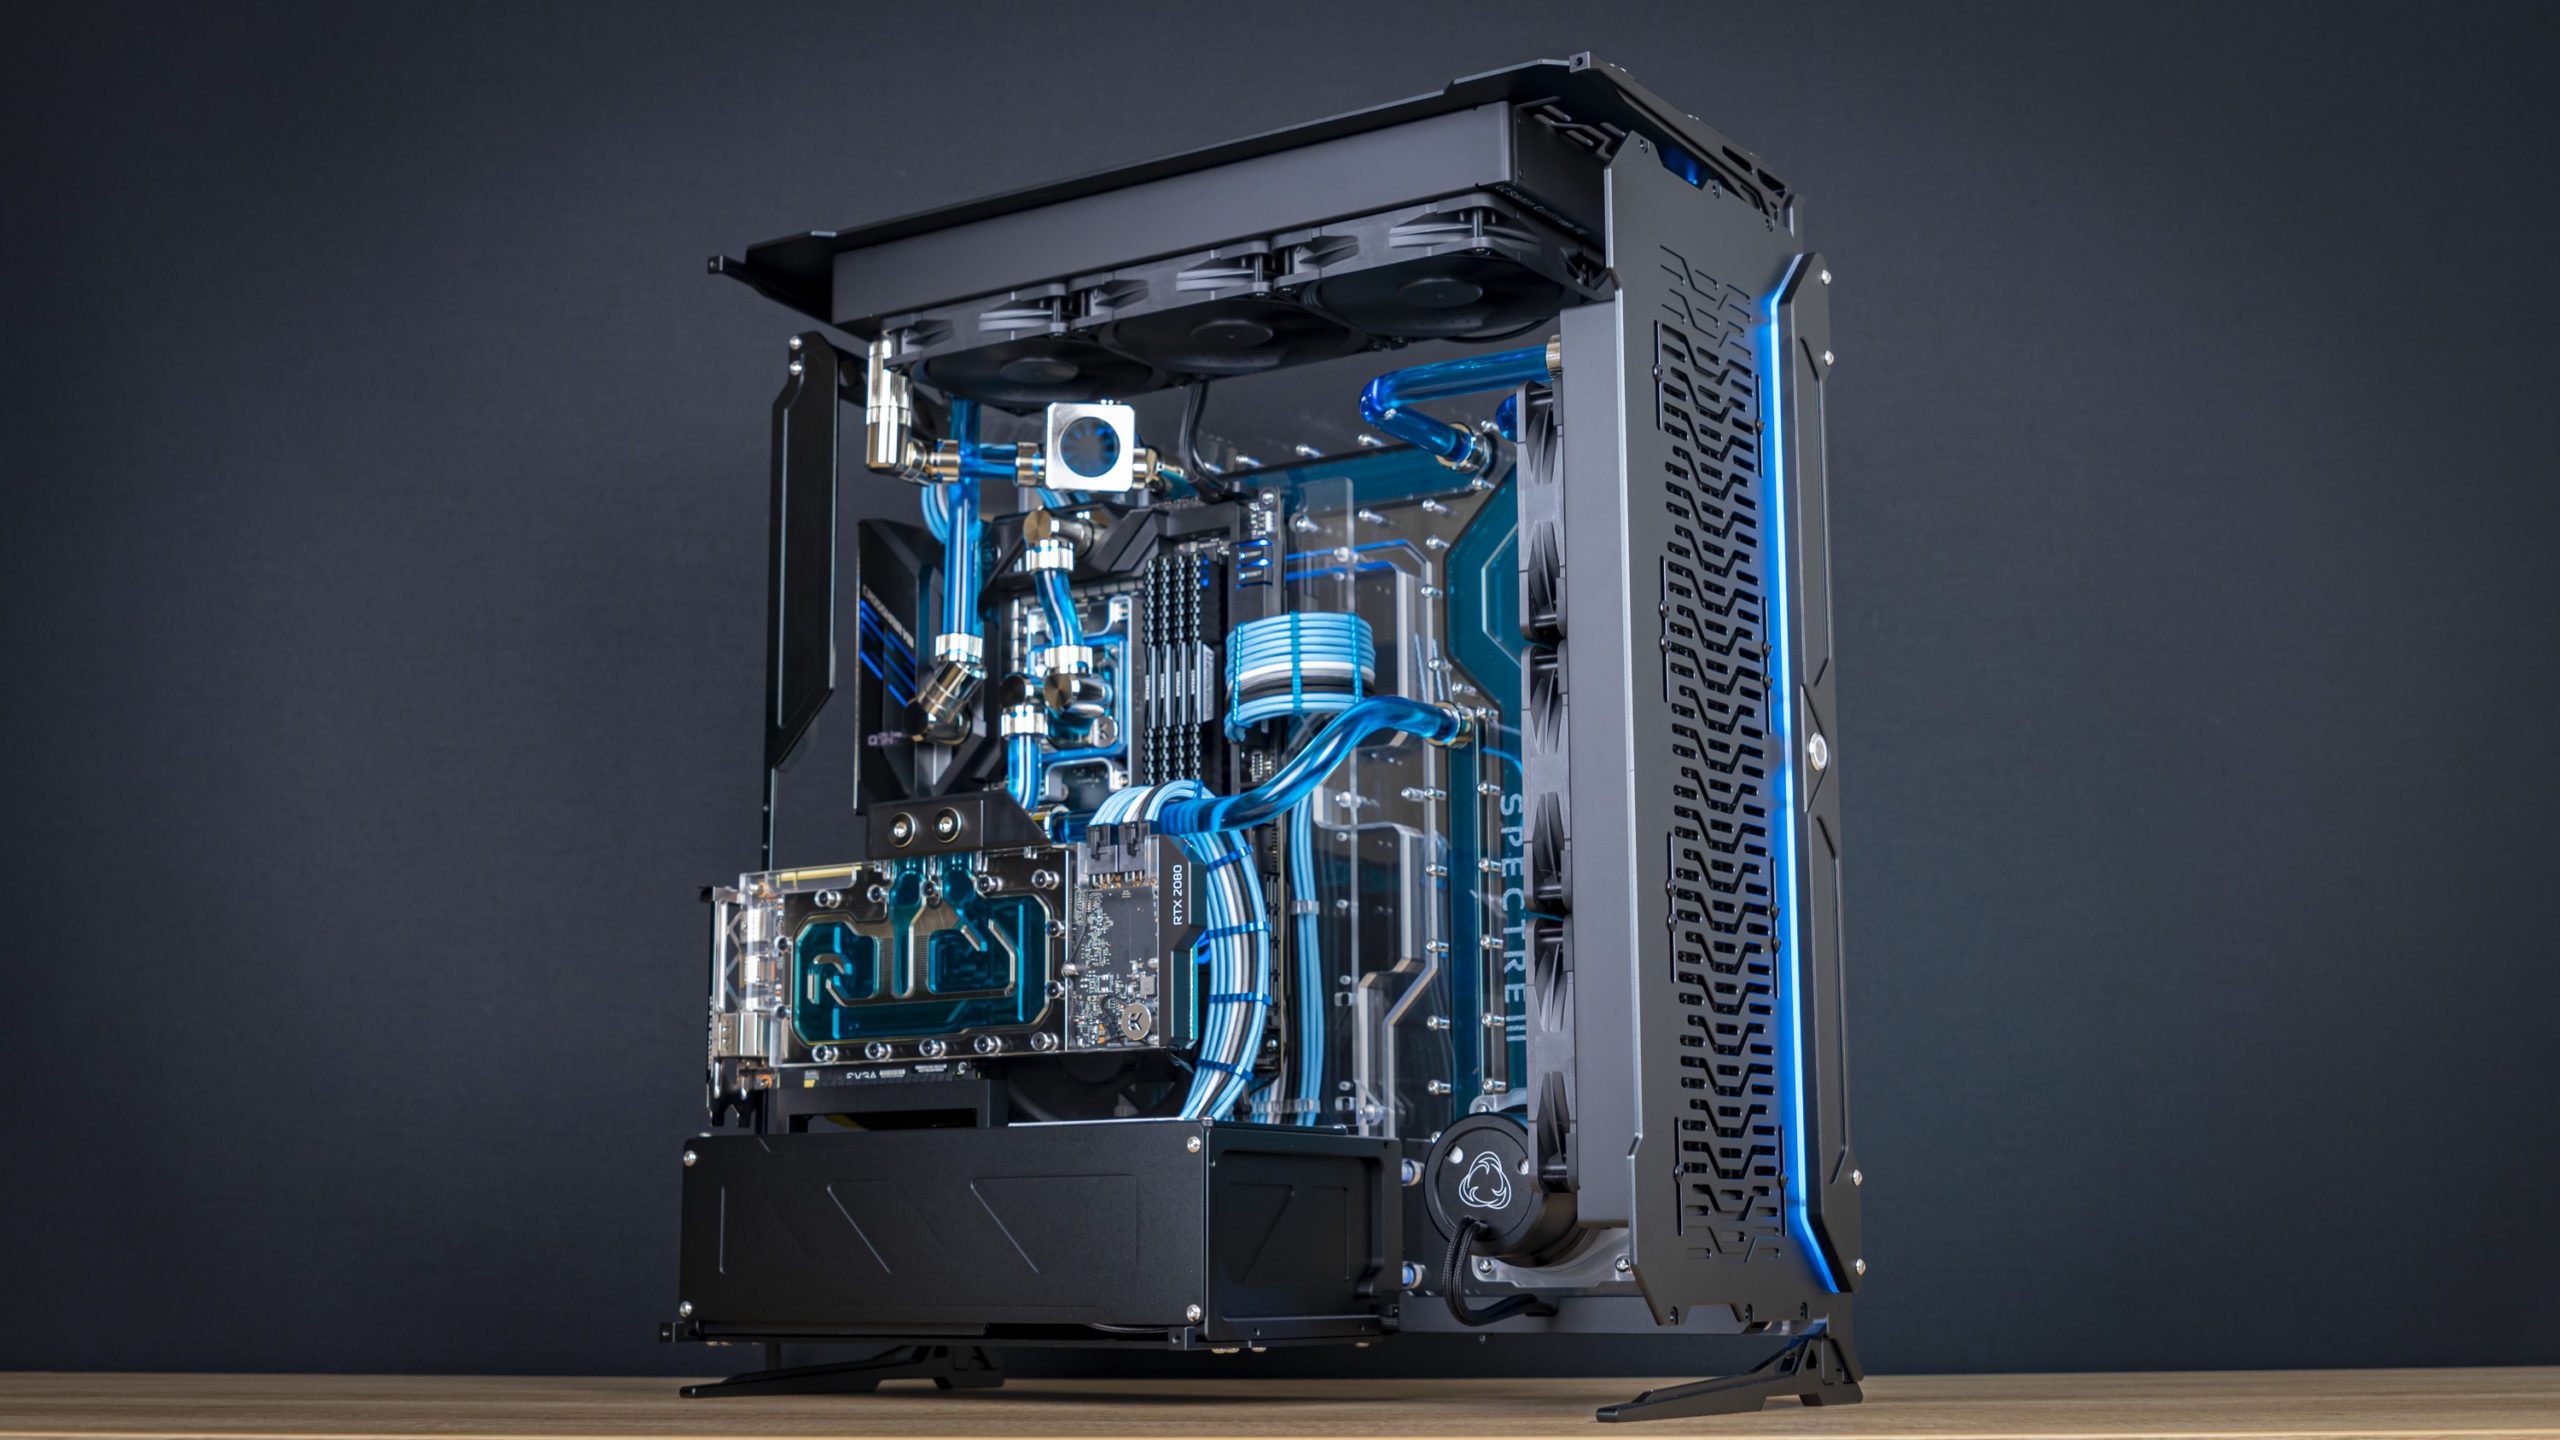
After putting the Mirror Maze system together last fall, I needed a break from all the work that goes into a high-end custom build. Plus, I had plenty of PC cases to review. So when Singularity Computers reached asking if we were interested in checking out its Spectre III chassis, I didn’t immediately jump at the chance. But the more I thought about the case, the more I envisioned just what a system in this stunning case could look like, and the itch to build just wouldn’t go away. So I agreed to take on the case, started getting together a list of other parts I’d need and, well, here we are.
I’ve been planning ‘Blue Shift’ for the last few months, and in contrast to what we would usually do, this build doesn’t use the latest next-gen hardware. I don’t have a Ryzen 5000 CPU or an RTX 3000 GPU, and I’d rather the limited stock of those parts go to one of our readers. With everything going under waterblocks in this build anyway, does it really matter if the silicon is hiding underneath is the absolute latest and greatest?
Because this is a more fun (and far more complex) build than we typically do for case reviews, I’ll slow the pace down and look at each step in detail. I’m also leaving the full parts list till the end, because it’s last-generation hardware, and regardless, this build is all about cooling and aesthetics. So without further ado, lets dig in.
Most cases cost about $100, stepping up to $200 if you’re shopping premium, and $300 if you’re shopping for a premium ITX case. But Singularity Computers’ Spectre III is a jaw-dropping $1400.
That’s expensive. Really expensive. But the Spectre III is also unlike most other cases out there. For one, it’s designed solely for custom liquid cooling. And instead of being a sealed box for your parts, it’s an open chassis meant to show off your hardware as attractively as possible. Featuring CNC-machined, anodized aluminum and an absolutely massive acrylic reservoir/distribution plate, this case really is unlike anything else that’s out there.
The case also comes flat packed. For details on what that looks like and how to assemble the chassis, check out our Assembling Singularity Computers’ Spectre III feature.
Theme Reveal
If you haven’t guessed already from the build’s name (Blue Shift), the central color theme for this build is going to be blue. Red is a color that I feel is overused in gaming product design. I could have chosen green, but settled on blue as a classic choice with oddly calming qualities.
Of course, I could have chosen any number of other colors, or gone with opaque or exotic cooling fluids, but out of respect for the Spectre III’s absolutely stunning, material-focused design I decided to dial the unconventional styling of the Mirror Maze build back and go for a more classic and timeless theme. Because of this, I’ll be sticking to EKWB’s Nickel-plated Torque fittings, paired with transparent blue fluid – a classic color combination that you simply cannot go wrong with.
Yep, you read that right. We have to prepare the CPU block. Not because there’s anything inherently wrong with EKWB’s Magnitude CPU block, but in service of the Blue Shift theme. So, I popped off the top of the block so that I could swap the accent plate from the pre-installed silver color, to blue.
This plate sits below the acrylic cover, which makes it perhaps a bit scary to replace as it requires not only breaking the factory-tested seal of the CPU block’s internal gasket, but also re-tightening the acrylic afterwards. Acrylic can crack easily, so I was careful not to overtighten the block’s top upon re-installation. But you shouldn’t be getting into custom watercooling with this amount of acrylic if you’re aren’t prepared to take things slow and steady.
I already had the 12-Core AMD Ryzen 9 3900X, 32GB of Corsair memory, and two 1 TB Samsung SSDs installed onto the Asus ROG Crosshair VIII Formula motherboard, but I had two other things I still needed to do here: install the CPU block and disconnect the chipset fan.
You see, as this is an open system, I wanted it to be as quiet as possible. The chipset fan, which sadly shows up on nearly all AMD X570 motherboards, generally isn’t very loud compared to most systems, but I found that in the Mirror Maze system, it was the loudest component, and that was in a closed chassis. So naturally, I did the only sensible thing: tear the board apart so that I could disconnect it. Whether this is wise with regards to thermals remains to be seen, but I’ll be sure to touch on that again in the testing section later on.
Meanwhile, while I had the motherboard’s shroud off anyway, I also routed the EKWB Magnitude CPU block’s D-RGB cable underneath it for a tidier end result.
Dropping the motherboard into the Spectre III case was simple. First, I had to install the standoffs. The holes for these are pre-threaded in the acrylic, so I had no fear of having to work these in. Then, I placed the case on its back, laid the motherboard in place, and fastened it with the required screws. I also connected up the GPU riser cable.
Installation of the GPU was a breeze too. It simply slotted right into the GPU riser I had installed earlier and fastened with a spacer and two screws on the IO bracket. I already had the waterblock installed on the GPU from the last build, but if you’re curious how to go about that, check out our how to install a GPU waterblock feature using this specific card.
I then proceeded to install the radiators. First, I installed the Noctua NF-A12 Chromax.Black.Swap fans onto them, using four black anti-vibration grommets per fan. I made sure to pay careful attention to where I wanted to route my cables: behind the radiators.
Then, I dropped the radiators into place. For the front radiator, I aligned its height to have its ports match the height of the ports on the distribution plate so that I could easily achieve clean tubing runs here later. The top radiator I simply placed in the middle, where I liked it most aesthetically, though I did have to move this later in the build to line up with ports.
Of course, at this point I also had to tidy up the cables for the fans. Luckily, the Spectre III comes with a neat little fan and RGB hub, which has D-RGB and PWM fan inputs, with outputs for six PWM fans and three D-RGB devices. I connected up all six fans here, along with the three RGB strips of the Spectre III.
Then, I shoved all the cables neatly behind the radiators, using zip ties where necessary to keep things in place and looking tidy. These zip ties can be fixed in place using the long screws the fans use to attach to the radiator.
For power, I went with the new be quiet! Dark Power 12 power supply. On-hand we have a 750W unit, which isn’t overly powerful, but it’s perfectly enough for powering our Ryzen 9 3900X and RTX 2080 Super, along with the six fans and RGB devices in our system.
Because I’m planning on using an external power supply when filling time comes, I’m happy to get all the cables installed at this stage already. So, I removed the cover on the rear and got to work.
First, I test-fit the cable combs to ensure I was using the correct ones. They come with an adhesive backing, which I removed to stick them in place. Then, I proceeded to install the custom Cablemod ModFlex cables with Pro aluminum combs, which was an oddly meditative task. It was time-consuming, but with a beautiful end result.
That said, although I’m pleased with the end result, in hindsight I would get cables with more combs. For this set of Cablemod cables, I got three aluminum combs on the 24-pin ATX cable, two on the EPS cable, and five on the PCIe power cable. I’d bump those numbers up by one more just so you can chuck a comb at the bottom of the cable, after the Spectre III’s cable management system near the power supply, as it’s quite a messy view going into there, and one comb on each cable could do wonders to tidy it up without making a lot more work of it.
I also connected up the D-RGB cables of the CPU and GPU blocks using an EKWB D-RGB splitter, connecting it to the bottom D-RGB header of the motherboard. I also hooked up the power button, power LED, and water pump headers at the bottom of the motherboard. The case does not have any front IO, so there was none of that to worry about.
At this point, the system was looking great, and I decided to call it a day. Building the custom loop would have to wait for the next day. But for you, that’s just a click away to the next page.
See that logo above? I had to manually upload it as part of this review instead of taking it from an older product review, which makes this one of a first set of two Watercool reviews on TechPowerUp—surprising considering there have nearly been 100 reviews in this category since I joined the team. Watercool, which might be better known as Heatkiller in some realms, is a small German outfit that is still growing to meet the needs of the DIY watercooling community. To give you a better idea of how small the outfit is, it deliberately does not send out product samples to larger media outfits since it would not be able to meet the production demands that would arise as a result. The company has added additional manufacturing over the past few months however, so be on the lookout for more Watercool coverage on TechPowerUp!
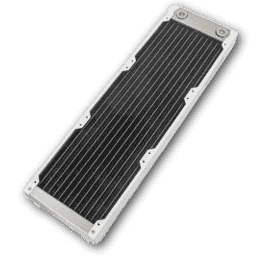
This review is of the thicker Heatkiller Rad 360-L, which, as the name suggests, is the 360 mm (triple 120) version. This series comes in 120/240/360/480 mm versions and is a completely new radiator lineup from Watercool, which otherwise used the round cylindrical tubes and straight fins in radiators models, including with the massive MORA and boxy HTSF lines from before. This article is meant to be read alongside our accompanying Heatkiller Rad 360-S review, which is a thinner radiator in the same 360 mm size. The two share a lot of common DNA, but are intended for different use cases. The Heatkiller Rad 360-L is 50 mm thick, which has it fall into the 50–60 mm thickness range that requires cases designed with custom watercooling in mind. As always, we begin the review with a look at the specifications below, but let’s not forget to thank Watercool for sending review samples to TechPowerUp.
Specifications
Watercool Heatkiller Rad 360-L
Color:
Black, white, or stainless steel frame with a black core
Material:
Copper and brass core, steel frame
Radiator Size:
3×120 mm
Dimensions:
398 (L) x 119 (W) x 50 (H) mm
Fan Compatibility:
Square frame 120 mm
Fin Type:
Copper with paint coat, ~14–15 FPI serpentine and louvered type fins
See that logo above? I had to manually upload it as part of this review instead of taking it from an older product review, which makes this one of a first set of two Watercool reviews on TechPowerUp—surprising considering there have nearly been 100 reviews in this category since I joined the team. Watercool, which might be better known as Heatkiller in some realms, is a small German outfit that is still growing to meet the needs of the DIY watercooling community. To give you a better idea of how small the outfit is, it deliberately does not send out product samples to larger media outfits since it would not be able to meet the production demands that would arise as a result. The company has added additional manufacturing over the past few months however, so be on the lookout for more Watercool coverage on TechPowerUp!
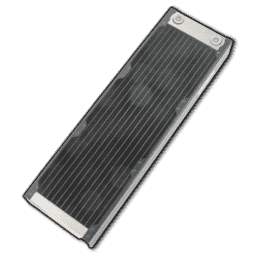
This review is of the thicker Heatkiller Rad 360-L, which, as the name suggests, is the 360 mm (triple 120) version. This series comes in 120/240/360/480 mm versions and is a completely new radiator lineup from Watercool, which otherwise used the round cylindrical tubes and straight fins in radiators models, including with the massive MORA and boxy HTSF lines from before. This article is meant to be read alongside our accompanying Heatkiller Rad 360-L review, which is a thicker radiator in the same 360 mm size. The two share a lot of DNA, but are intended for different use cases. The Heatkiller Rad 360-S series is 30 mm thick, which has it fall into the 25–30 mm thickness range that makes it generally compatible with even cases that can fit your average closed-loop AIO cooler. As always, we begin the review with a look at the specifications below, but let’s not forget to thank Watercool for sending review samples to TechPowerUp.
Specifications
Watercool Heatkiller Rad 360-S
Color:
Black, white, or stainless steel frame with a black core
Material:
Copper and brass core, steel frame
Radiator Size:
3×120 mm
Dimensions:
398 (L) x 119 (W) x 30 (H) mm
Fan Compatibility:
Square frame 120 mm
Fin Type:
Copper with paint coat, ~14–15 FPI serpentine and louvered type fins
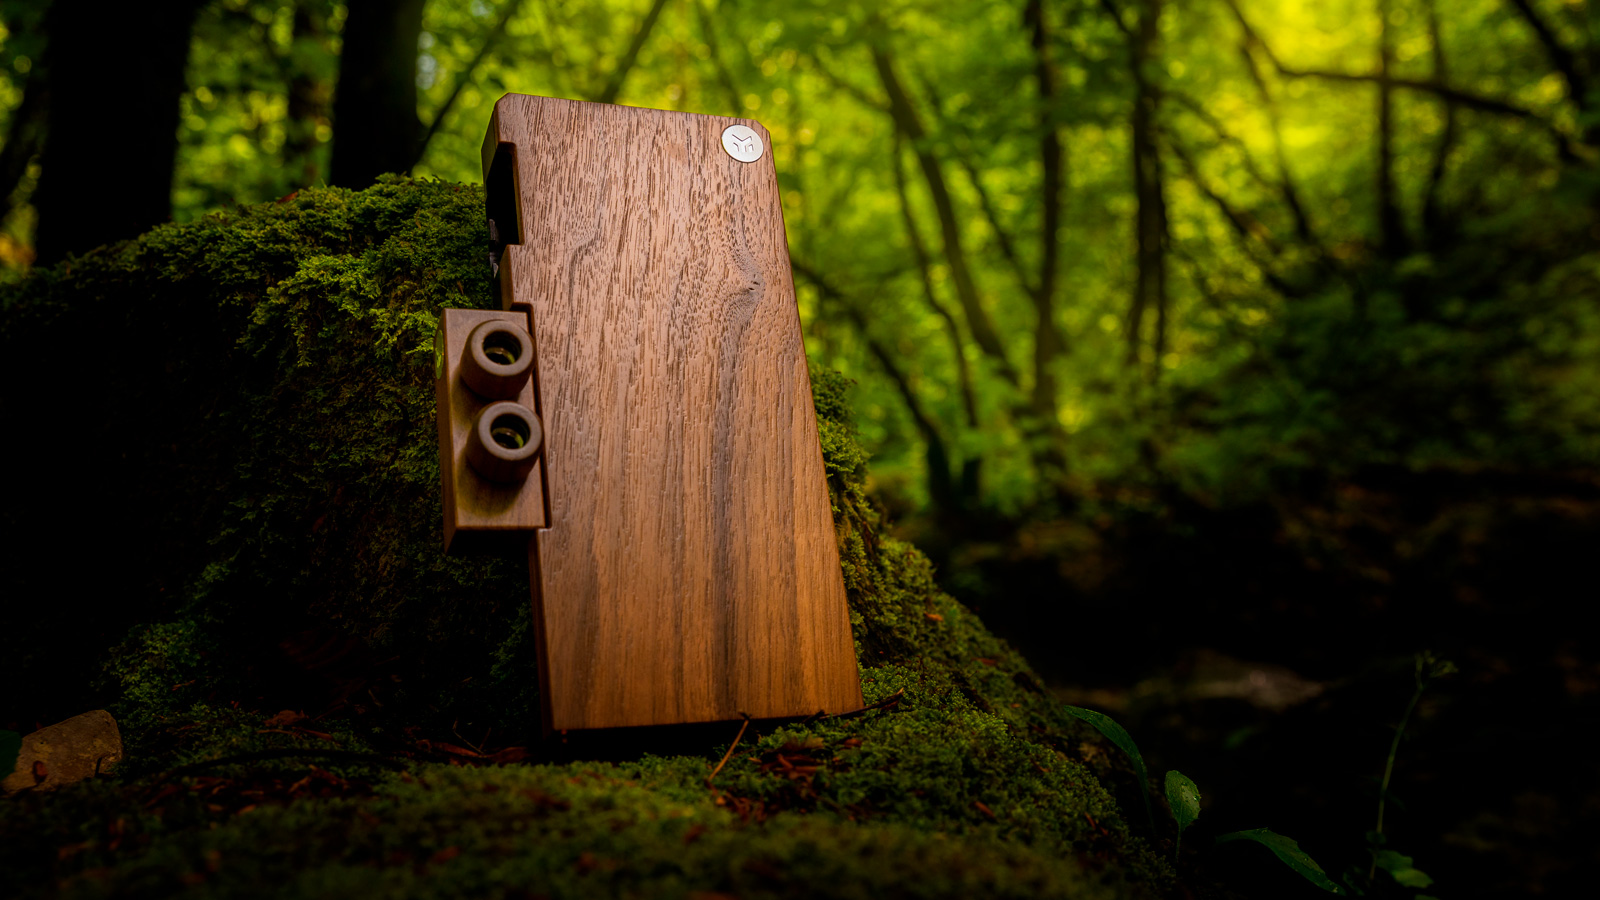
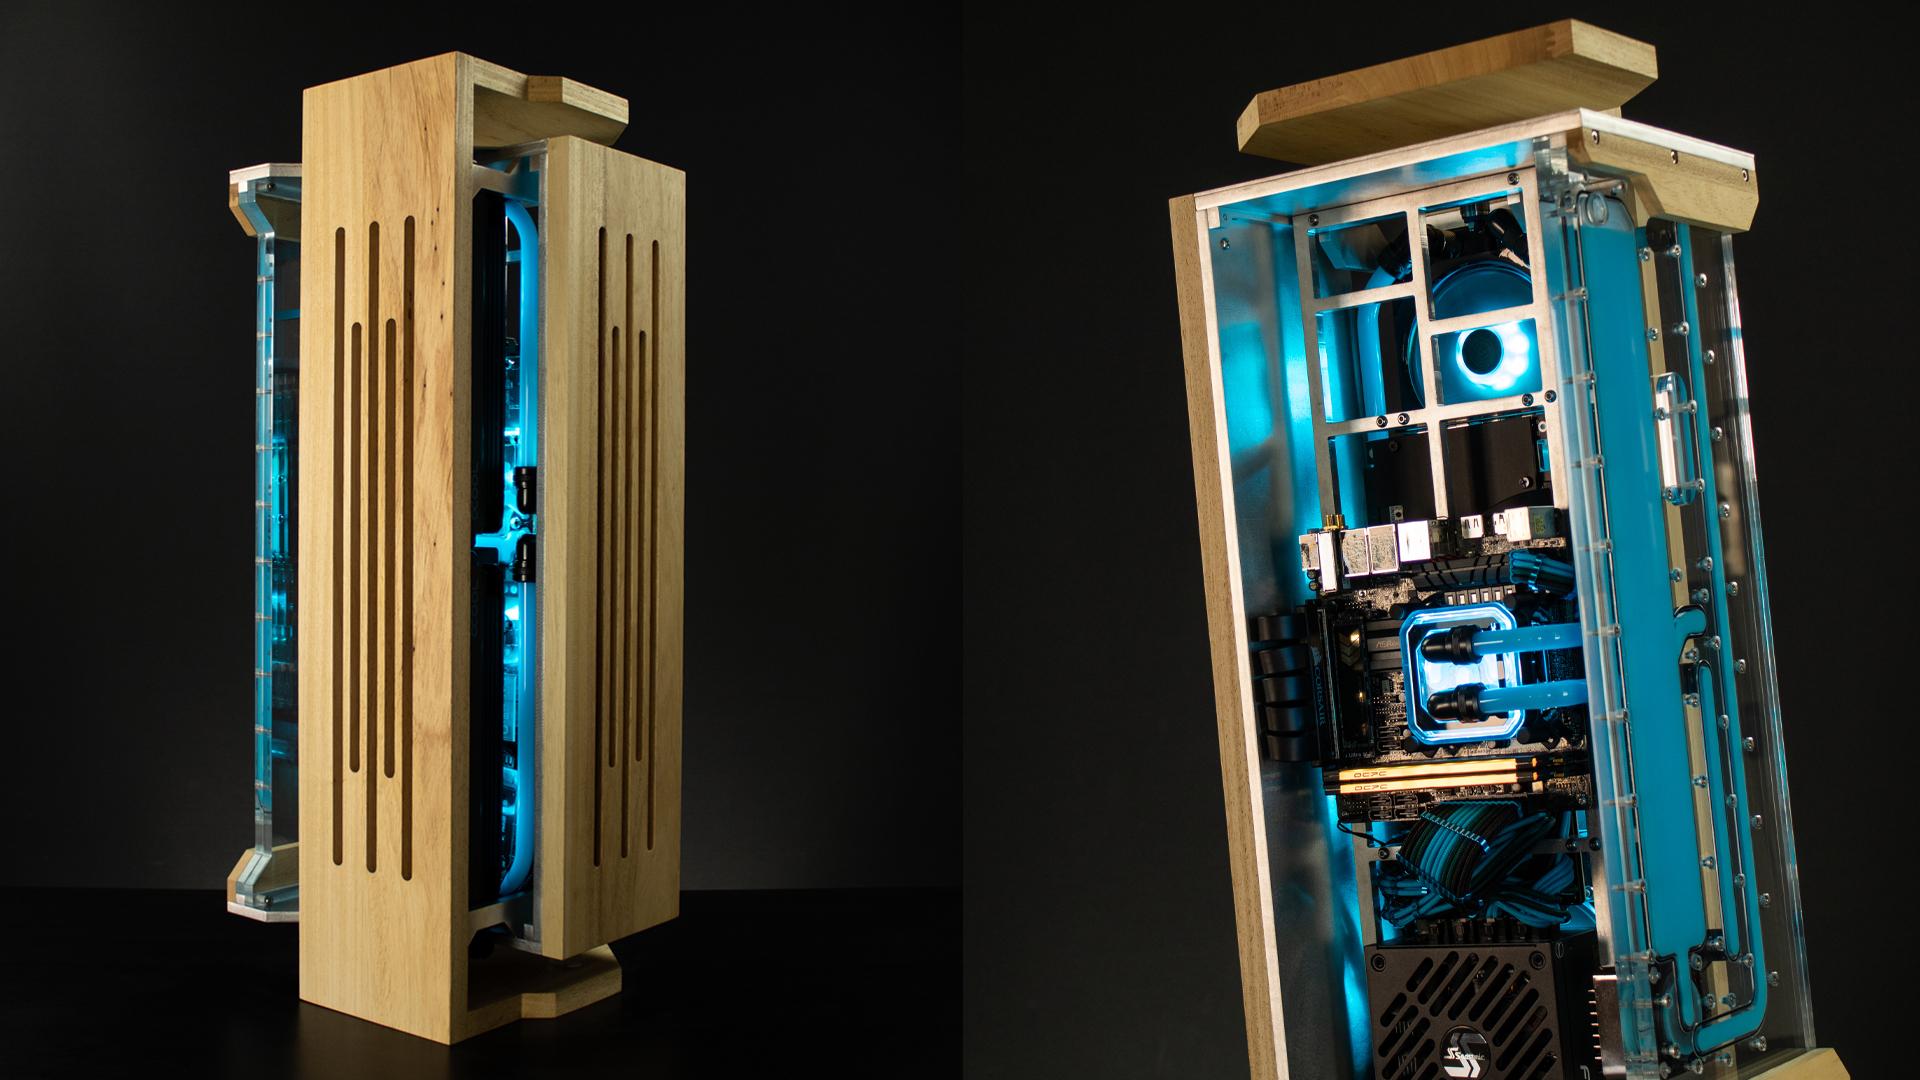
A so-called scratch build is one that’s been designed and built from the ground up, without the use of a pre-existing case. That’s what Menhir is: a scratch build made of 8mm sheet aluminum and Ayous wood.
As the name suggests, my source of inspiration while designing this were the vertical monoliths called Menhir, thanks to their peculiar shape.
(Image credit: Shutterstock)
The idea was to make a mini-ITX case with a compact footprint, that could house a big graphics card (RTX 2070 Super Strix) and a capable watercooling loop (dual 240mm radiators), and the vertical design was the best fit for the feat, since I also wanted to have an exotic looking build. Another goal was to achieve a design that may very well go in a home environment, hence the choice of using wood to give it a warmer feel.
In this article I’ll show the whole process behind the making of Menhir. Let’s get started!
Making the 3D Model
Since I started using a CNC router for my projects, I had to learn how to use Fusion 360 to come up with my designs and custom parts. So now the first step into any new project is actually brainstorming various ideas and trying to model them in 3D.
Designing Menhir was quite challenging because I wanted a very tall build, but still have something that wouldn’t feel out of place as a mini-ITX build, so the compact footprint was a very important factor. Moreover, vertical designs aren’t a super popular option yet, so it’s easy to overdo it and make something that feels out of place. Balance is key!
The first iteration of Menhir’s design was a pretty boxy case, just very tall. That’s not what I wanted.
Image 1 of 2
(Image credit: Tom’s Hardware)
Image 2 of 2
(Image credit: Tom’s Hardware)
So I started playing around with angles and the wooden outer shell, until I came up with the final shape, which has the outer shell rotated 90 degrees from the aluminum enclosure. The footprint had to be made just a bit larger in this final version, but it was worth it to allow for a more unique design.
Image 1 of 3
(Image credit: Tom’s Hardware)
Image 2 of 3
(Image credit: Tom’s Hardware)
Image 3 of 3
(Image credit: Tom’s Hardware)
Making the Aluminum Parts
Once all the parts were designed and set up into Fusion 360, I went ahead and fixed the 8mm aluminum sheet on the CNC.
(Image credit: Tom’s Hardware)
Most of the parts of this case will be cut from this single 500 x 1000mm sheet, so it will start taking shape pretty quickly. In addition to all the big panels of the case, I had to cut a bunch of small brackets to be able to assemble everything together.
(Image credit: Tom’s Hardware)
And here’s every 8mm panel cut and ready to be finished.
(Image credit: Tom’s Hardware)
For finishing these plates, I wanted to leave the aluminum pretty raw, so I sanded them down with 180 grit and an orbital sander, in order to get that rough and textured look.
Image 1 of 2
(Image credit: Tom’s Hardware)
Image 2 of 2
(Image credit: Tom’s Hardware)
The little mounting brackets I cut at the CNC earlier, had to be given a few extra threaded holes on the edges, so I did that on the drill press and then assembled the first few parts for a test fit.
Image 1 of 2
(Image credit: Tom’s Hardware)
Image 2 of 2
(Image credit: Tom’s Hardware)
Here it is next to A.R.E.S., another one of my PC builds, for a quick size comparison. A.R.E.S. is about 75cm/29.5in tall.
Custom watercooling has always been a popular topic in the enthusiast community, and hard tubing has made it a lot more appealing for people who want cool temps as well as cool looks. It goes without saying that using hard tubing is a real challenge compared to the easier soft tubing approach.
So, in this article, I’m going to show you some of the basics needed to work with hard tubing and the steps I go through when planning an entire hardline custom loop. Let’s get started!
Choosing the Right Tubing
There are a few options available when choosing the type of hard tubing, both for materials and size. The available sizes are 12mm, 13mm, 14mm and 16mm. You should choose based on your tastes in looks, as well as the size of the case, since bigger tubing looks better in bigger cases and vice versa. I have never detected a difference in terms of performance and water flow.
The most common materials are acrylic and PETG, followed by brass, copper, glass and carbon fiber. We will be looking at the first two options here.
So, how do you choose between acrylic and PETG? The main difference is the ease of use: acrylic is more heat-resistant, so it’s a little harder to bend than PETG; acrylic is also harder to cut because you will need some sort of toothed saw, while almost any type of pipe cutter will work on PETG.
That said, I will always recommend choosing acrylic, because a custom loop that runs hot can be enough to warp PETG, causing the tube to pop out of the fitting and casue a disaster. This happened to me in the past with one of my builds. This is what PETG tubing looks like when it deforms under the pressure of the fittings:
(Image credit: Tom’s Hardware)
It’s not super-warped because I replaced it before coolant flooded the case, but the potential for disaster is definitely there. On the other hand, acrylic won’t ever get hot enough to deform, even in the hottest build.
The difference when bending it isn’t even very noticeable. It will just take a little longer to heat the acrylic compared to the PETG. The fact that PETG is softer than acrylic also makes it more prone to give lower-quality bends.
Acrylic is admittedly harder to cut than PETG, but it’s still worth it to have a safer end result. More on the cutting process later.
Some people argue about acrylic being brittle, while PETG is basically indestructible, but that’s only a difference when hammering both. In real scenarios, acrylic tubing will never crack unless you put way too much force on it, which would likely damage other parts of the loop as well, like the threaded ports on acrylic waterblocks.
Acrylic is clearer than PETG, so it also looks slightly better. It actually depends on the various brands and production lines, but this is generally the case. The following photo has 13mm acrylic tubing on the left and 16mm PETG tubing on the right.
(Image credit: Tom’s Hardware)
While soft tubing will only require you to have a pair of scissors at hand, hard tubing is more demanding in terms of needed tools.
The first important tool to have is a silicone insert, which will need to be the same diameter as the inner diameter of the tube. I suggest getting it in the same brand as the tube, since size tolerances often change slightly between brands.
(Image credit: Tom’s Hardware)
A heat gun is needed to bend the tubing, preferably one with different levels of temperature, and some kind of saw together with a deburring tool will serve you well when cutting it to length and cleaning the edges.
(Image credit: Tom’s Hardware)
If you decide to go with PETG, a pipe cutter like the one in the photo will suffice to cut it.
(Image credit: Tom’s Hardware)
If you have access to fancier tools, a scroll saw works great to cut the tubing, and a belt/disc sander to clean up the cut. That’s what I use most of the time.
Image 1 of 2
(Image credit: Tom’s Hardware)
Image 2 of 2
(Image credit: Tom’s Hardware)
There are a few additions you can make to your tool library if you want, like bending and cutting guides such as these ones:
(Image credit: Tom’s Hardware)
They make the job easier for starters, even though I personally don’t use any of these because I find them useless and too fiddly, especially the bending guides.
Bending the Tubes
Wet the silicone insert with soapy water before putting it in the tube; this will make it easier to pull it out after the bend is done.
To mark the spot where the bend needs to be, I draw two marks and set the distance between the two based on the length of tubing I want to bend. So for a standard 90-degree bend I will do about double the diameter of the tube, for example 26mm spacing for 13mm tubing.
(Image credit: Tom’s Hardware)
When doing more exotic bends that are closer to 180 degrees, you will need to heat up a larger area, but it really depends on the specific case or bend, and some trial and error might be needed to get the right result.
Having done that, it’s time to take out the heat gun. Put it on the table facing upwards, and hold the tube above it, constantly turning it and moving it left and right, always staying within the two marks you did.
(Image credit: Tom’s Hardware)
If you did it right, the two marks will be at both ends of the corner radius, or just about there. This will also help you get a wider or tighter radius on the same 90-degreebend, once you get more confident with the process.
(Image credit: Tom’s Hardware)
When do you know the tube is ready to be bent? There are a few signs that can prevent you from wasting a perfectly good piece of tubing. When you bend a tube that’s not hot enough, you will potentially stress the area and cause stretching, which will leave a kink in the inner corner and slightly deform the outer corner, as in the photo:
(Image credit: Tom’s Hardware)
On the other hand, if too much heat is added, the tube will develop bubbles that could potentially be harmful to the integrity of the tube, which is worse than just looking ugly.
(Image credit: Tom’s Hardware)
You know it’s time to go ahead and bend it when it will tend to bend under its own weight, so no force should be needed to shape it. Here’s how a proper bend looks:
(Image credit: Tom’s Hardware)
Compared with the previous one:
(Image credit: Tom’s Hardware)
Cutting the Tubes
Go through the bending process before the cutting one, because it will give you more room for error. A longer tube will be usable when trimmed down to the right length, while a tube that’s too short will be useless.
When I make the bends, I always leave extra length on both ends of the tube, so that I can then go ahead and trim them down.
After having marked the cut, proceed with your preferred method.
(Image credit: Tom’s Hardware)
If adjustment is needed, you can use a rasp or a file.
(Image credit: Tom’s Hardware)
The deburring tool is very useful to clean up the edges and add a small chamfer to the outer edge, which will prevent the o-ring on the fittings from getting damaged. I don’t suggest you use this tool with PETG tubing as it leaves a very rough finish. Instead, just use a file or sandpaper to remove the sharp edges (which kind of defeats the ease of cut with the pipe cutter, but still, just don’t use PETG).
Image 1 of 3
(Image credit: Tom’s Hardware)
Image 2 of 3
(Image credit: Tom’s Hardware)
Image 3 of 3
(Image credit: Tom’s Hardware)
Inserting the Tube in the Fitting
Every fitting has its unique way of holding the tube and securing it. For this guide, I’m using Alphacool Eiszapfen Pro fittings, which have a really strong and secure system, thanks to the big rubber ring.
(Image credit: Tom’s Hardware)
Start by sliding the compression ring together with the rubber ring or o-ring in the tube, then insert it in the fitting, making sure it goes all the way through.
(Image credit: Tom’s Hardware)
Then proceed to put the o-ring/rubber ring in place and tighten the compression ring.
Image 1 of 2
(Image credit: Tom’s Hardware)
Image 2 of 2
(Image credit: Tom’s Hardware)
It’s important to note that during this process, you will need to make sure the tube is as perpendicular to the fitting as possible, because if not, you will most likely scratch the tube while tightening the compression ring. And in extreme cases, this might cause a leak because the seal provided by the o-rings is not even.
(Image credit: Tom’s Hardware)
This should be a good starting point for you to start practicing on your first hardline custom loop. Now let’s see how I usually plan my loops!
Planning the Loop
After having assembled all of the main hardware in the case, I start testing out a few options for positioning the reservoir, which is often the part that needs the most fiddling with. This varies a lot, depending on the type of case and reservoir.
Image 1 of 3
(Image credit: Tom’s Hardware)
Image 2 of 3
(Image credit: Tom’s Hardware)
Image 3 of 3
(Image credit: Tom’s Hardware)
Once I’m happy with the placement of every part, I start playing with fittings to see what kind of setup works best. I always try to usea combination that will allow me to do only one bend on a tube, two at max, because it makes life easier and should look cleaner.
(Image credit: Tom’s Hardware)
The secret to a good-looking tube routing is trying to use the same exact bend radius on all of the tubes in the loop. You can go classic with all 90-degree bends, or you can do something a little more unique like I did in this case, with about 25-degree bends.
(Image credit: Tom’s Hardware)
Taking your time to plan the routing to optimize every tube run will help you get a really professional-looking result. Also, always take into consideration the fact that waterblocks, especially CPU ones (and pumps) have the inlet and outlet specified, so make sure you plan your loop with the right order in mind, otherwise you will get poor performance and poor water flow.
(Image credit: Tom’s Hardware)
Another really fundamental thing in a custom loop with hard tubing is the drain valve, because while you can get away with not using one with soft tubing (because it’s easy to move) hard tubing can’t be moved once it’s in place and full of coolant. So being able to drain the system using a valve will make your life so much easier. Remember to put it at the lowest point in your loop, to help drain as much coolant as possible. In my case, I put it on the bottom-right fitting of the reservoir, so that I could also hide it from sight and maintain a cleaner look.
Filling the Loop
A few years ago, it was perfectly normal to fill your case with paper towels and leak-test the loop by just putting the coolant in and running it for a few hours.
Nowadays we have air leak testers, like the EK one in the photo below. It uses compressed air to find leaks in the loops, although I still find myself just filling the system whenever I detect a leak with the tester, because it’s faster to actually find and fix it.
Remember to run the pump alone with all of the other hardware unplugged, to prevent any damage in case of major leaks.
(Image credit: Tom’s Hardware)
DISCLAIMER: a lot of users are thrown off by the colours in the indicator of this specific tester model. The right pressure to leak-test a full custom loop is around 0.3 bars, so well below the green zone. EKWB is reportedly working on a fix to have clearer indications, although all the info needed is already provided in the manual.
Here’s the build once filled with coolant. Now it’s time to install the OS and RGB software and shoot a few cool photos!
(Image credit: Tom’s Hardware)
Hope you enjoyed this guide, and I hope this will help you with your future endeavors in custom watercooling!
I have been in the modding scene since 2005, creating mostly scratch build projects out of wood, acrylic and aluminum. The most notable of these have been Sangaku, Yuugou and Chiaroscuro with Chiaroscuro having been completed back in 2008. After a long hiatus, I completed Morphosis for the Cooler Master World Series 2019 and, for the Cooler Master World Series 2020 contest, which just announced winners in March 2021, I built something really special.
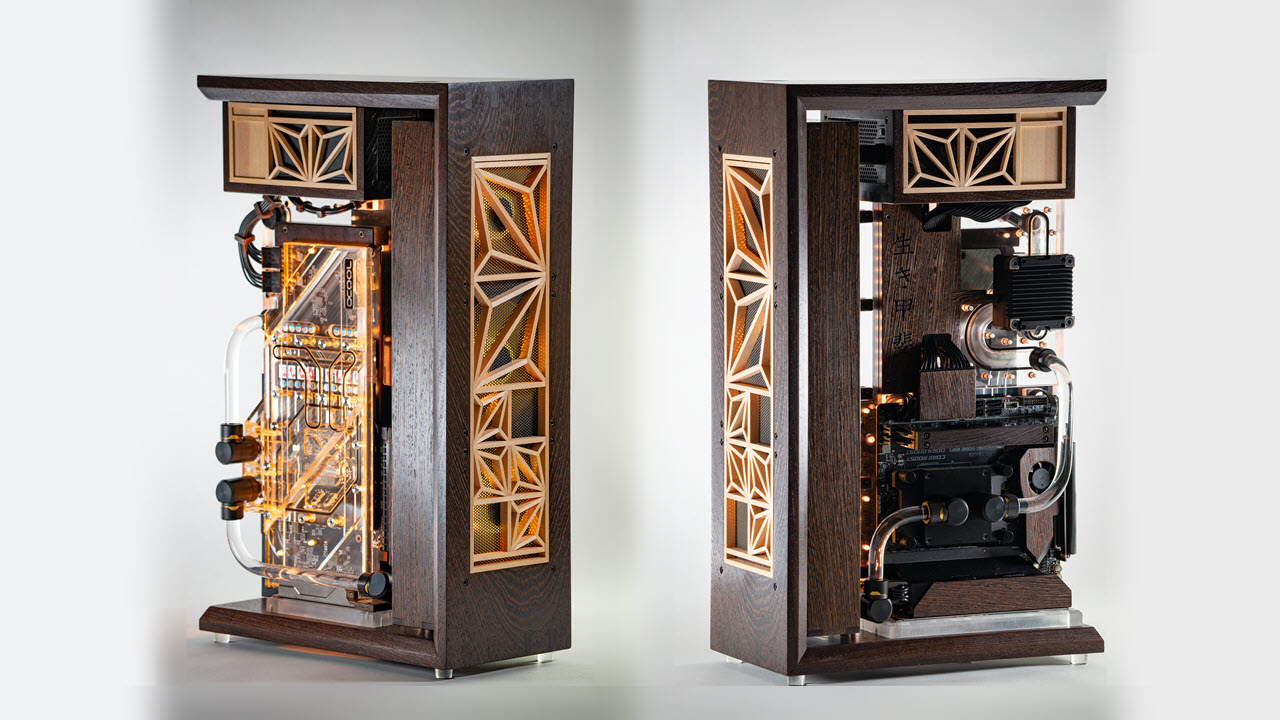
Meet Ikigai (生き甲斐) a Japanese concept meaning “a reason for being”, my latest case mod project. The word refers to having a meaningful direction or purpose in life, constituting the sense of one’s life being made worthwhile, with actions (spontaneous and willing) taken towards achieving one’s ikigai resulting in satisfaction and sense of meaning to life. In other words, It means I really enjoy building computer cases and I devoted four months of my life to bringing this case to fruition working most nights and weekends. It’s a passion project in every sense.
The case started as a simple concept, like most of my cases. I wanted a vertical tower style case with less than 20 liters of volume that would take up little space on my desk, one that is water cooled and combines my love of handmade wood joinery, and Japanese design aesthetics. It also uses CNC machining techniques and integrates the water cooling and electrical systems. Like I said, simple. I also wanted to keep the case open to show off every component, making sure that every angle of the case was aesthetically pleasing.
Components
Motherboard
MSI B550I Gaming Edge Wifi
CPU
AMD 5600X
GPU
MSI AMD Radeon 5700 Gaming X
PSU
Cooler Master 650 SFX
Memory
G Skill Ripjaws V 3600mhz 32GB
Storage
Western Digital SN750 1 TB, SN550 1 TB
Watercooling
Alphacool GPU Block
Radiator Optiumus CPU Block
EKWB fittings and tubing
Fans
Cooler Master SF360R
Proof of Concept Models
Before I began my build, I prototyped with some basic, non-functional wooden models. While the models might not be functional, they are to scale. I wanted to stay under 20L so I needed to be sure to make use of every mm of space. I decided on a central acrylic panel which would contain the watercooling distribution panel, hide the cabling, and allow the components to be attached. The top section would hold a SFX power supply and the back would have room for a 360mm radiator with full size fans to provide ample cooling power. I went through several iterations of these wood models because, even though I was modeling in cad, things change once you have the real hardware, in the real world and it’s all part of my design process.
Image 1 of 2
(Image credit: Tom’s Hardware)
Image 2 of 2
(Image credit: Tom’s Hardware)
With some of the final components arriving, I could mock up the case more accurately. Here I have the radiator and fan assembly in along with the motherboard and graphics card to check for clearances in the watercooling. This would all be hard piped PETG tubing and I was trying to avoid any surprises later on by planning ahead.
Image 1 of 3
(Image credit: Tom’s Hardware)
Image 2 of 3
(Image credit: Tom’s Hardware)
Image 3 of 3
(Image credit: Tom’s Hardware)
Wenge Dovetail Joints
After at least 3 practice mockup cases, I finally had my final dimensions nailed down and it was time to start the final case design. I wanted a wood that was beautiful in its own right with a modern-looking grain that didn’t distract from the clean lines of the case design. I decided on Wenge as my wood of choice, a very hard, dense, and brittle wood which seems to be a cross between charcoal and concrete. It was difficult to work with by hand but sharp tools plus perseverance made it happen.
Case Joinery
I started with the main mitered dovetails of the case by first making a practice joint out of cherry. By doing this, I not only made a visual reference that I could use later to avoid confusion but I dusted off the mental cobwebs; it’s been a long time since I’ve done a joint like this.
I wanted the grain to flow around the case so I cut the entire frame out of one piece of wood, matching the grain around the case as it went along. This also meant my joints would need to be good the first time around or the grain wouldn’t match up.
Image 1 of 2
(Image credit: Tom’s Hardware)
Image 2 of 2
(Image credit: Tom’s Hardware)
I used a dovetail guide by Lee Valley to make the dovetail cutting easier. Here I am cutting the tails first.
Image 1 of 2
(Image credit: Tom’s Hardware)
Image 2 of 2
(Image credit: Tom’s Hardware)
With the first side cut, I transferred the lines to the next piece with a marking knife. By using the kerf of the joint as a guide, I can be sure the knife marks will be exact.
(Image credit: Tom’s Hardware)
Next, I repeated this process to make the pins of the dovetail joint, making sure I am cutting on the correct side of the line. A little pencil marking helps with this also.
(Image credit: Tom’s Hardware)
Once all of the cuts were made, I used a coping saw to remove the bulk of the waste. Then I used a guide block and chisels to creep up to my marking knife lines.
(Image credit: Tom’s Hardware)
Once the main part of the joinery was done, I cut the miters on all four corners with a crosscut handsaw.
(Image credit: Tom’s Hardware)
To ensure the accuracy of the miters I made a guide block and used a chisel to sneak up on my lines, ensuring a perfect 45 degree angle. Given how hard this wood was, I had to resharpen my chisels multiple times for this to work well.
(Image credit: Tom’s Hardware)
After quite a bit of time spent cleaning up the joints, testing and refitting as I went, while trying not to break them, I ended up with tight fitting joints. This process took about two days and a lot of patience.
Although Louqe’s Raw S1 lacks a few basic amenities, it’s a stunning display of ITX minimalism, design, and craftsmanship.
For
+ Stunning minimalist design
+ Excellent Thermal Performance
+ Very compact, even by Mini-ITX standards
+ Oozes quality from every corner
+ Easy Mini-ITX
+ PCIe 4.0-Capable Riser Cable
+ No RGB
Against
– No front IO or air filtration
– Expensive
Features and Specifications
Easy mini-ITX? Who would ever have thought you’d hear those words strung together? Not me, that’s for sure, and a lot of the PC building community would be inclined to agree. But despite that, the folks from a small Swedish company called Louqe have just conjured a new chassis that is unlike anything I’ve ever seen before. It is, above all else, minimalist, elegant, beautiful, and to my surprise, possibly the easiest Mini-ITX case the world has ever seen, all while also being incredibly compact and thermally capable.
But there’s a lot missing in this equation for simple perfection too. For example, there’s no watercooling or radiator support, and nor air filtration. Heck, there’s not even any front IO beyond a USB Type-C port – and that’s at one of the back corners of the chassis. And it’s expensive, carrying an MSRP of $329.
The Louqe Raw S1 is, in that way, not a versatile case. There’s only one layout. But in not trying to be everything at once, I believe the Louqe Raw S1 may have come close to mini ITX perfection, fitting for our Best PC Cases list. Let’s get to know it, shall we?
As you tour around the Louqe Raw S1, it’s immediately obvious that there’s not much to this chassis. It’s incredibly compact at just 14.9 inches tall, 6.8 inches wide and 7.5 inches deep. In ITX terms, this chassis has a volume of 12 liters, which is indeed very small – for context, very, very few cases achieve a volume below 10 liters, and any that do have to make significant sacrifices to pull it off. Even the small Meshlicious case from Lian Li spinoff Ssupd is noticeably larger at 14.67 liters.
Coming back to the Raw S1’s outer shell: It’s made from a single piece of milled, bead-blasted, etched and anodized aluminum in a classy ‘Rhodium Gray’ color. Along its sides are large cutouts from the milling process, creating a mesh-like intake with a playful, yet strong industrial look.
This design, paired with the thick shell makes the Raw S1 ooze quality like few other cases do. It might not come with filtration, but the ‘Raw’ part of its name is very appropriate. It’s aggressively open on the sides, allowing for plenty of fresh air intake.
Circle to the rear of the chassis, and you’ll spot the same mesh pattern, but only at the top. This is the exhaust location. The top of the chassis is almost entirely closed off, but with an assisted exhaust at the rear, I don’t think this will be a problem.
You’ll notice that there is no immediately visible front IO. This is because the Raw S1 basically doesn’t come with any, other than the Type-C port at the back. Of course, this isn’t really an issue, as the system is light and it’s easy to tip over to access the full-glory IO at the bottom, but it’s something to keep in mind when planning a desk setup.
Placing the Raw S1 between my trusty first-gen NCase M1 (I know it looks a little worse for wear, it has served me well) and the Phanteks Evolv Shift 2, it’s clear that the footprint of the Raw S1 is smaller than both these cases. It’s also significantly more expensive than the other two, with the NCase M1 currently costing about $210 and the Evolv Shift 2 just $100. But the materials quality of the Raw S1 is miles ahead of both these alternatives, so I wouldn’t say that the $330 price is unjust for what it is.
To open up the chassis, you start by laying it upside down on a cloth. Then, you undo four securing screws on the outside of the chassis and undo the locking mechanisms on the USB Type-C port and power button and budge these out of place.
Then, using the handle in the middle, you simply pull the core out from its outer shell.
The case’s core is built with a red spine to house the sandwiched layout system. On its left side you’ll spot room for an ITX motherboard and the SFX power supply at the top, and the right of the spine is where you’ll install the graphics card.
But there’s room for a little more. At the top, behind the power supply, you’ll be able to install a cooling fan, and underneath the PSU there’s room for a 2.5-inch drive – though chances are you’ll want to use an M.2 drive, as space is a scarce commodity here. You can install a 140mm fan at the top exhaust, but it will require taking apart the top of the outer shell to reach the mounts. And connecting the cable will be challenging, as it would be the only component that’s not fixed to the main core of the chassis itself.
In designing this chassis, Louqe also wanted to ensure native PCI-Express 4.0 support, which is why that blue ‘ribbon’ cable looks as funky as it does. Traditional PCIe Riser cables generally have a lot of issues with PCIe 4.0, and even those claiming to support Gen 4 often don’t. Louqe claims that this is one that really does support PCIe Gen 4, but because I don’t have a Gen 4 GPU nor a Gen4 ITX motherboard & CPU on-site to test with, the best we can do is take their word on it.
What you see here is the entirety of the box and contents of the accessory bag. You get the chassis, four screws to secure the PSU, and eight (mine included one too many) more general-use screws for securing the motherboard is all you get. But chances are you won’t need even half of them – I only needed four.
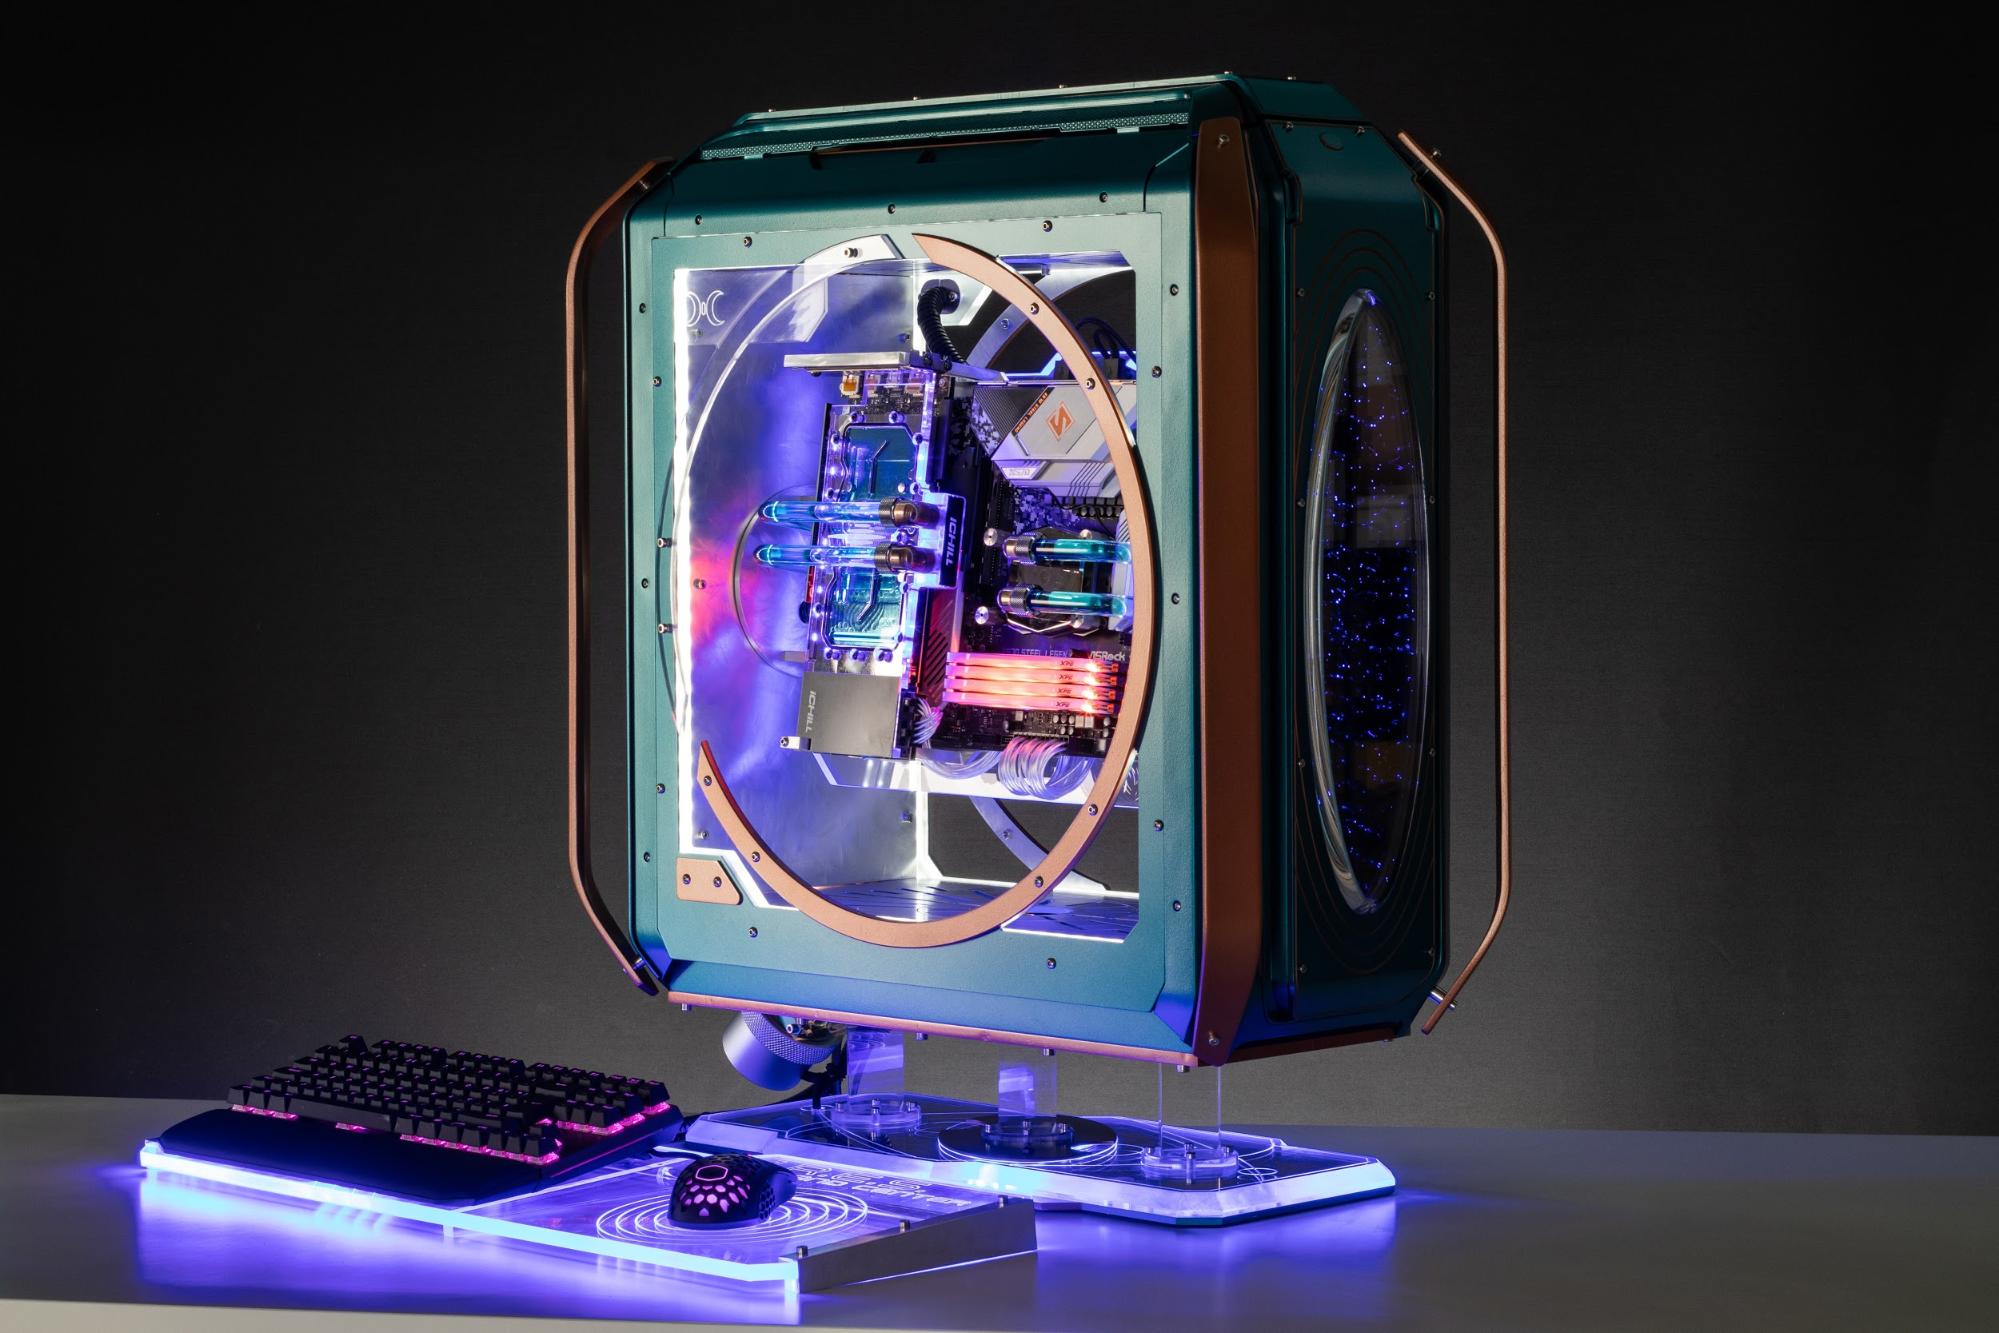
Project A.R.E.S. (Astral Robot Enclosure Systems) tells a story:
Starship Copper Nebula, named so for its peculiar color, is tapped for space program A.R.E.S. The starship comes in contact with some sort of organic alien technology, which starts to merge with it, covering the external structure and contaminating the propellant.
This story continues through colors and lines, from the blue and copper shades and curved lines representing alien technology, to the aluminum and silver shades and straight lines embodying human technology. Three astronauts at the back, impersonated by the hex-shaped reservoirs, look into the void while trying to communicate with the alien being. Up front is a mirror, which reflects Copper Nebula’s destination
Eventually, the humans and aliens succeed in communicating and join each other in a common cause: survival.
When I built Project A.R.E.S. for the latest Cooler Master Case Mod World Series. My goal was to take the Cooler Master Cosmos C700M, (which we list in our Best PC Cases list) and re-think it from the ground up, following this sci-fi design language. My biggest inspiration — mainly for the mod’s color scheme and the starry face at the front of the case — came from Robot in Netflix’s Lost in Space show.
The finished product took about six months and ultimately won Best Tower of the Year in Cooler Master’s contest, is usually what matters most. But I take a lot of pride in how I actually accomplish this kind of work and in inspiring people to start pushing boundaries. By detailing the making of Project A.R.E.S., I hope to do just that. Let’s get started!
Case and Components
Here are the PC components I recruited for Project A.R.E.S.:
Case: Cooler Master Cosmos C700M
CPU: AMD Ryzen 7 3700X
Graphics Card: Inno3D iChill Frostbite RTX 2070 Super
As mentioned, the base of this project is the Cooler Master’s Cosmos C700M. You’re seeing two of those because I actually replaced the bottom panel of one with a second top panel (taken from the second case), for symmetry purposes.
The first step in making such an intricate mod is tearing the case apart, particularly the internals, which will be completely reworked. After that, I flipped the case 90 degrees in order to have the handle bars at both the front and back instead of at the top and bottom, where they were originally.
(Image credit: Tom’s Hardware)
The C700M case has an amazing feature that helped a lot with these extreme modifications: threaded holes on all sides of the frame. This allows you to easily mount any kind of custom panel or bracket.
Next, I took some aluminum L-profiles and cut them to length to fit all around the case’s frame. This made it easier to add internal panels to close up all sides.
Image 1 of 2
(Image credit: Tom’s Hardware)
Image 2 of 2
(Image credit: Tom’s Hardware)
Custom Back Panel
Since the internals were still in the design phase at this point, I proceeded to cut the first custom panel for A.R.E.S., the back panel. I used 5mm acrylic, cut and engraved on my CNC router. The peculiar shape created a challenge, as I had a lot of curved corners and, simply, weird angles to replicate. To tackle this, I first cut an MDF (medium density fiberboard) prototype to trace down the measurements and ensure their accuracy.
(Image credit: Tom’s Hardware)
After that, I went to cut the real thing.
Image 1 of 1
(Image credit: Tom’s Hardware)
Due to the unique shape of the C700M, I had to bend the back panel’s top and bottom using a heat gun. For accuracy, I used the original panels from the C700M as a template.
Image 1 of 2
(Image credit: Tom’s Hardware)
Image 2 of 2
(Image credit: Tom’s Hardware)
You might be wondering about the three circles in the panel. Those are there to show off the Bitspower Water Tank Hexagon reservoirs and to provide a sort of space helmet look. Ultimately, I used ornaments to complete the look.
Image 1 of 2
(Image credit: Tom’s Hardware)
Image 2 of 2
(Image credit: Tom’s Hardware)
Going back to the internals, I cut the two top and bottom grills out of 5mm acrylic to allow airflow to the pair of 360mm radiators and fans. I tried to keep Project A.R.E.S.’ insides as clean as possible to let enough air through. The final design is basically open-air though, and there are other entry points for air as well, so it wasn’t a big issue to begin with.
Image 1 of 2
(Image credit: Tom’s Hardware)
Image 2 of 2
(Image credit: Tom’s Hardware)
Rotating Hardware Panel
One of the most eye-popping features of Project A.R.E.S. is undoubtedly the rotating system for its main components. Below is an early 3D concept:
(Image credit: Tom’s Hardware)
The central design was so difficult to work out, and I went through tens of attempts before landing on one that actually worked. I eventually made the rotating hardware panel’s side wall and rotating bracket out of 5mm aluminum.
Image 1 of 2
(Image credit: Tom’s Hardware)
Image 2 of 2
(Image credit: Tom’s Hardware)
To fix the central acrylic panel, I made four brackets out of 8mm aluminum and screwed them onto the two rotating discs.
Image 1 of 2
(Image credit: Tom’s Hardware)
Image 2 of 2
(Image credit: Tom’s Hardware)
Next, I added a small pocket to the side walls, so I could insert two small ball bearings.
This is how it looks without the central piece:
(Image credit: Tom’s Hardware)
The Floating Effect
On to more aluminum milling. I started making the base and pedestal so that I could start having a clearer look on the final shape of the whole thing.
(Image credit: Tom’s Hardware)
First was the 8mm aluminum panel, which attached to the bottom of the case, thanks to two other strips that I cut, drilled and threaded.
Image 1 of 3
(Image credit: Tom’s Hardware)
Image 2 of 3
(Image credit: Tom’s Hardware)
Image 3 of 3
(Image credit: Tom’s Hardware)
In order for the pedestal to give Project A.R.E.S. the illusion that it’s floating I called in three 40 x 40mm acrylic blocks. But to avoid having to drill holes in them and ruin the magic, I made six acrylic discs that I glued to the blocks and had them serve as mounting holes.
Image 1 of 2
(Image credit: Tom’s Hardware)
Image 2 of 2
(Image credit: Tom’s Hardware)
The main part of the pedestal is made out of 15mm acrylic. The trickiest part about constructing this piece was definitely creating the huge chamfered edges. I was able to create the look by using a tridimensional toolpath on the CNC router.
(Image credit: Tom’s Hardware)
Since my machine isn’t very sturdy, it tends to chutter and leave undesirable finishes on the surface. So I took my orbital sander and got to work with some elbow grease to finish up that big chamfer.
Image 1 of 2
(Image credit: Tom’s Hardware)
Image 2 of 2
(Image credit: Tom’s Hardware)
I left a frosted finish so that the edges could catch some light coming from the central LED strip.
(Image credit: Tom’s Hardware)
Since I didn’t really trust the acrylic to hold all the weight, I added a 5mm aluminum plate under it and a small channel to route the cable from the RGB strip to the back of the pedestal.
(Image credit: Tom’s Hardware)
At this stage, here’s what Project A.R.E.S. looked like:
(Image credit: Tom’s Hardware)
Current page:
Project A.R.E.S. (Astral Robot Enclosure Systems)
It’s been a while since I last tested fans—in fact, nearly a year ago owing to a move across oceans that seemingly took forever. I am still setting up my full system for fan reviews, including a long overdue audio measurement, but CORSAIR decided it waits for no man and marches on relentlessly with a fervent pace of product releases this month. Today, we take a look at their latest addition to the popular SP series of airflow-optimized fans, and thanks again to CORSAIR for sending review samples to TechPowerUP!
The CORSAIR iCUE SP RGB ELITE fans come in both 120 and 140 mm size offerings, and CORSAIR sent over both for me to check out. The performance section of this review will stick to only the 120 mm fans to fit in with the rest of the test database, but given how these fans are going to be all about looks over performance, it made sense to showcase them together. These are the same fans that shipped as part of some of their cases recently, and there has clearly been enough demand from customers about buying replacement fans for there to now finally be a retail solution available for purchase. The SP RGB PRO fans are nearly identical in having the same eight addressable RGB LEDs per fan, but these are 3-pin voltage-controlled fans that are even more airflow-optimized. It may seem unfair that we are going to test these as radiator fans for watercooling, but it was that or nothing, so let’s forge ahead with that caveat in mind by starting with a look at the specifications for both fans in the tables below.
Specifications
CORSAIR iCUE SP120 RGB ELITE Fan
Dimensions:
120 x 120 x 25 mm
Rated Speed:
1500 (+/- 10%) RPM
Max Airflow:
47.7 CFM (81 m³/h)
Max Static Pressure:
1.46 mm H2O
Noise:
18 dBA
Fan Control:
4-pin/PWM control
Current Draw:
0.3 A peak
Warranty:
Two years
CORSAIR iCUE SP140 RGB ELITE Fan
Dimensions:
140 x 140 x 25 mm
Rated Speed:
1200 (+/- 10%) RPM
Max Airflow:
68.1 CFM (115.7 m³/h)
Max Static Pressure:
1.66 mm H2O
Noise:
18 dBA
Fan Control:
4-pin/PWM control
Current Draw:
0.3 A peak
Warranty:
Two years
We use cookies on our website to give you the most relevant experience. By clicking “Accept”, you consent to the use of ALL the cookies.
This website uses cookies to improve your experience while you navigate through the website. Out of these, the cookies that are categorized as necessary are stored on your browser as they are essential for the working of basic functionalities of the website. We also use third-party cookies that help us analyze and understand how you use this website. These cookies will be stored in your browser only with your consent. You also have the option to opt-out of these cookies. But opting out of some of these cookies may affect your browsing experience.
Necessary cookies are absolutely essential for the website to function properly. This category only includes cookies that ensures basic functionalities and security features of the website. These cookies do not store any personal information.
Any cookies that may not be particularly necessary for the website to function and is used specifically to collect user personal data via analytics, ads, other embedded contents are termed as non-necessary cookies. It is mandatory to procure user consent prior to running these cookies on your website.