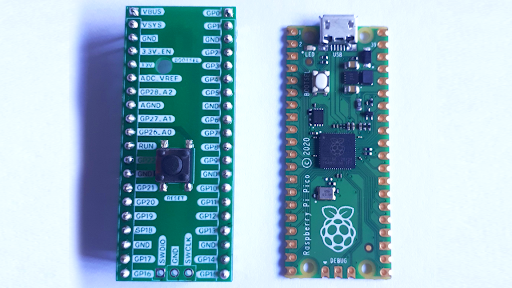
Tinkering on the Raspberry Pi Pico is always fun but it can be tricky to make sure you’re using the right pin. The Raspberry Pi Foundation was definitely on the right track when deciding to print the GPIO labels on the Pico board but, unfortunately, their choice to place the labels on the underside has become a problem for developers when using a breadboard. Luckily an intrepid maker has created their own “shield” that references all the GPIO pins and has a handy reset button.
Here’s on way to make @Raspberry_Pi pico shields. This pinout shield uses really simple components, has a snug fit on the pico and can be put onto a breadboard 😎 You also get a reset switch + access to the bootsel switch.#RaspberryPi #Arduino #electronics pic.twitter.com/Izi0AWyqjsMay 10, 2021
See more
Developer Nathan Mangar has fixed this issue with a simple, custom Pico shield PCB. The design is made from scratch and features labels on top for each pin. There’s also a handy reset button and access to the bootsel button, necessary for flashing our Pico with a new firmware image.
Image 1 of 3
Image 2 of 3
Image 3 of 3
The best Raspberry Pi projects are easy to use and this one is very straightforward. Mangar designed the shield to be mounted on top of the Pico and soldered into place with pins installed on the underside.
With this configuration, makers can easily attach the unit to a breadboard and know exactly which pin they’re using. The custom PCBs were ordered from and manufactured by AllPCB.com.
If you want to see this custom Raspberry Pi Pico shield up close, check out the original thread share via Twitter. Be sure to follow Nathan Mangar for more cool projects and future updates on this one.
