Installing a new cartridge is something of a rite of passage for turntable owners. It’s a skill that once was common, but now seems to be considered some kind of black art by many.
In reality it’s not such a hard thing to do provided you have the appropriate tools, a reasonably steady hand and some patience.
So what tools are you likely to need? Typically, cartridge bolts need a 2mm Allen key or a small, flat-bladed screwdriver depending on type of fixing used. Unless you have unusually thin fingers, a small, long-nose plier is handy too.
While things such as Allen keys, screwdrivers and pliers can be found in most toolboxes, few non–audiophiles will have a proper tracking weight gauge or cartridge alignment tool. Fortunately, neither has to cost a fortune and a budget of £20 should cover the purchase of both if you stick with something basic.
Unless this is your turntable’s first cartridge, you’ll need to start by removing the old one. In this case, make sure you fit the stylus guard before you do anything else to prevent damage to the old cartridge. You never know if you’ll ever need to use it again.
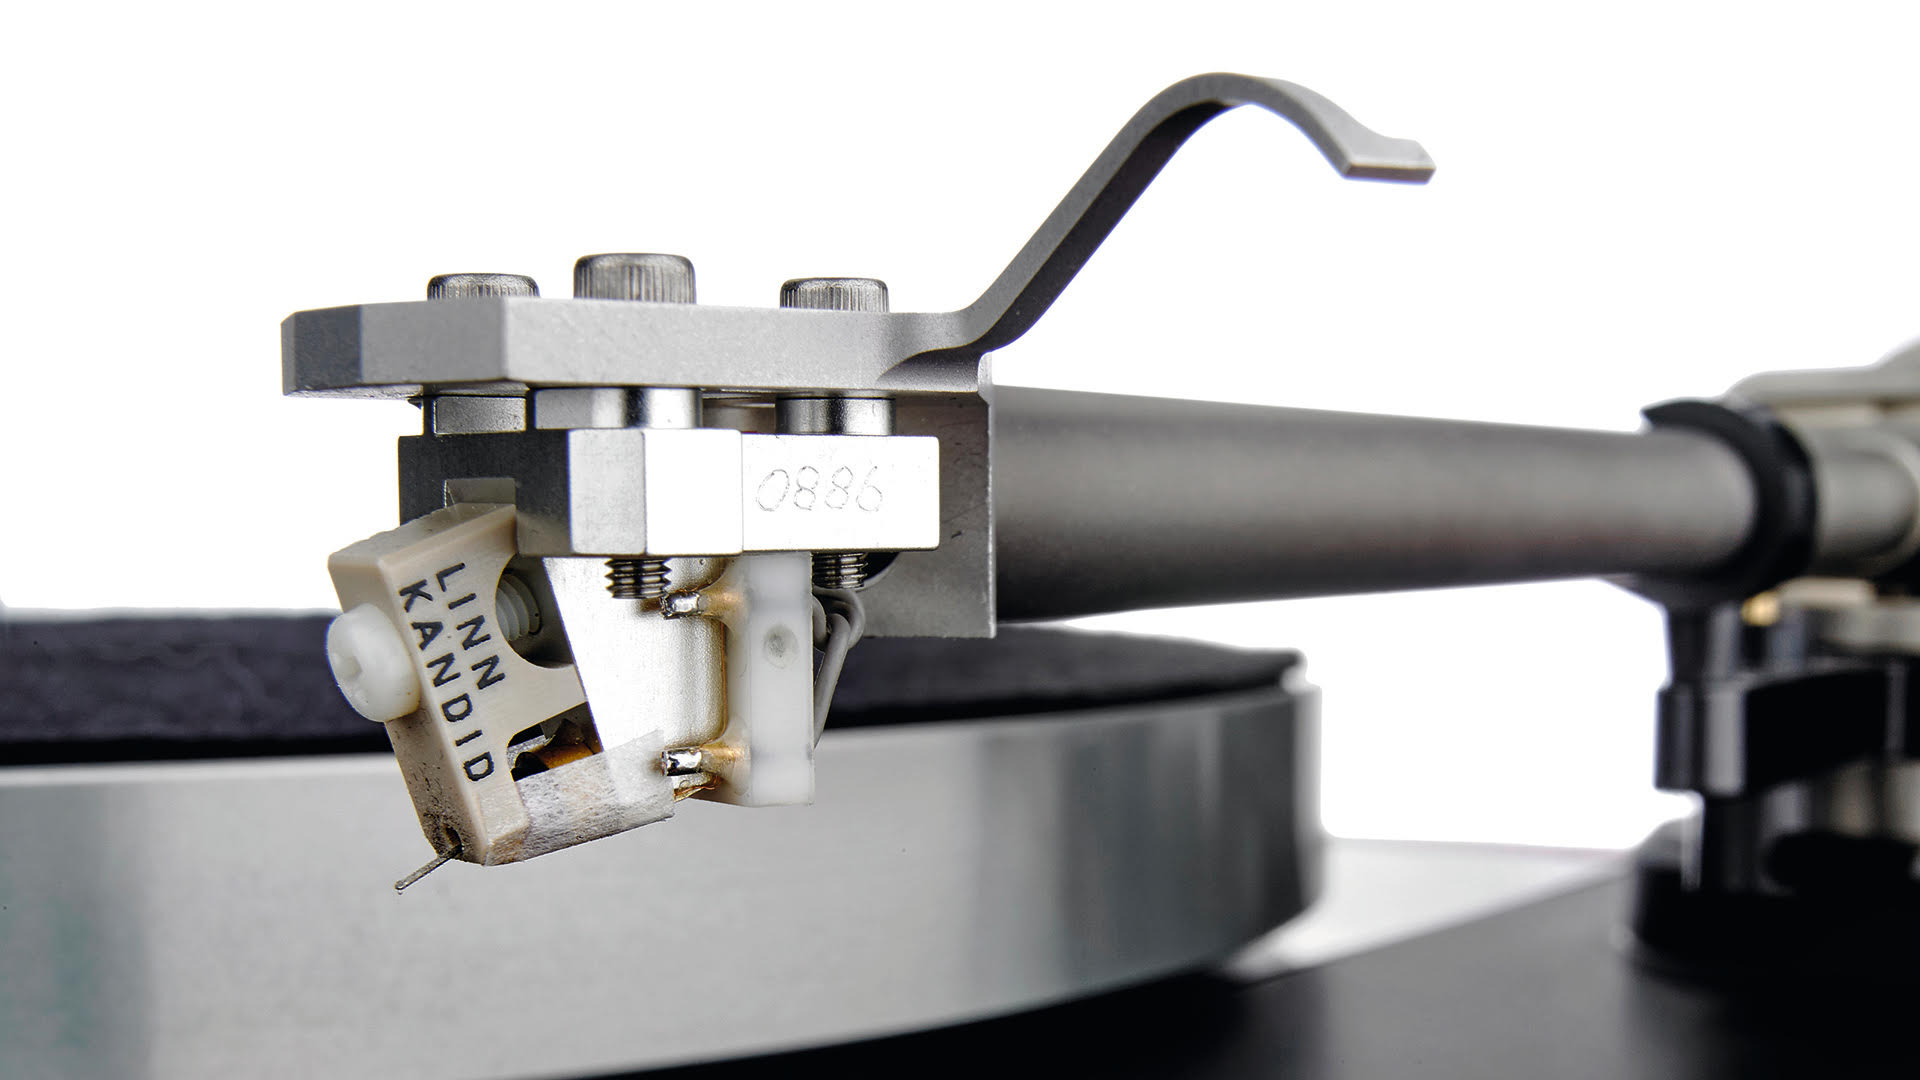
Then disconnect the four lead-out wires from the cartridge as carefully as you can. We like to use those long nose pliers for this. These colour-coded leads are fragile, so only pull them from the metal connector at the cartridge end rather than the wire itself. Once that’s done it’s a simple matter to undo the mounting bolts and take the cartridge off.
Fitting your new cartridge
Once you’ve got the new cartridge out of the box it’s worth checking that the stylus cover is still properly mounted. Cartridges are immensely fragile and any lack of care will usually result in catastrophic damage.
No matter how careful you are, there are times when accidents will happen. If you have a moving magnet design then it’s usually possibly to get a replacement stylus assembly. This won’t be cheap though, typically costing around 60% of the total cartridge price.
If you damage a moving coil cartridge then there’s no cheaper way back. You’ll typically just have to buy another one, or get it repaired at great cost. In short what we’re saying is try not to break it in the first place.
We would recommend mounting the new cartridge onto the arm first. Use the supplied fixings. This can be a bit fiddly, particularly if the cartridge body doesn’t have captive nuts. Take your time and don’t over-tighten things; just do the bolts up enough so that the cartridge body doesn’t move around. Don’t worry about alignment at this point.
Next connect the four lead-out wires. These are colour coded (red, blue, green and white) and you’ll find corresponding markings next to each of the four pins on the back of the cartridge.
This is where the pliers come in handy. If the connectors are a little loose on the pins then you can use the pliers to squeeze them a little tighter. Take care. It’s easy to damage or break those connecters.
Alignment and weighting
Once this is done, it’s time to put the tracking weight onto the rear of the arm. Don’t worry about setting the exact downforce at this point. Just turn the weight until the arm balances and then carry on further towards the arm pivot to add about 1.5-2.0g extra. This just means that the cartridge will sit properly in the record groove rather than float above. Arm bias should be set to zero at this point.
You’ll need the tracking alignment gauge next. Use the parallel lines on this to align the cartridge body. The measurement is done at two different points: one towards the centre of the platter and the other near the outside edge.
Once you align the cartridge at one of these positions, move the arm to the other and re-adjust if necessary. You may find that you have to work between the two a few times until everything lines up just so. This takes a bit of patience but, once the cartridge is aligned correctly, the stylus top will sit at the proper angle in the record groove, distortion levels will drop and record wear will be minimised.
Once you’ve got the correct cartridge position tighten the mounting bolts fully. Don’t overdo things though, as it’s possible to damage the cartridge body if you go too far. Everything just needs to be tight enough so that the cartridge doesn’t move.
Now you can set the tracking weight properly using the scales. The cartridge manufacturer will recommend a suitable range of downforce, usually between 1.5 and 2.5g, with a specific weight listed as most suitable. That weight would be our starting point but, with production tolerances and the use of different arms, it is sometimes possible to get better sound with a bit of experimentation. It’s usually best to stay within the recommended range, though.
If the sound is a bit dull and lifeless you’ve gone too heavy, while a thin or aggressive presentation means the tracking weight is a little too light. If you overdo the lightness, perhaps in an attempt to reduce record wear, the cartridge will mis-track, damaging the record grooves in the process. Counter-intuitively, if in doubt go a touch heavier – the stylus tip will sit in the record groove with more stability, produce less distortion and cause less damage.
Many upmarket decks allow the user to adjust tonearm height. Usually, the arm is set to be parallel with a record when playing, though sometimes a cartridge may have a particular preference depending on its design. Generally though, if the arm is too high you’ll get a bright, forward sound and the opposite if the arm is too low.
While it all seems a bit of a hassle to get right, you only have to do it once. With everything properly set and aligned you’ll have minimised any distortion, reduced record wear distortion and optimised the cartridge’s performance. You can’t ask for more than that.
More:
- Best turntables: Budget, mid-range, high-end
- How to set up a turntable
- How to get the best sound from your turntable
- 9 affordable ways to upgrade your turntable
- 14 of the best turntable accessories for better vinyl sound