After the longest wait between flagship Raspberry Pi models ever (the Raspberry Pi 4 was released in June 2019), the Raspberry Pi 5 is finally here and it’s early! In late 2022, Raspberry Pi CEO Eben Upton said that we wouldn’t see the Raspberry Pi 5 in 2023, and that it would be a year for Raspberry Pi stock to improve after a global chip shortage. But it seems that Upton wanted to offer a surprise to the many loyal Raspberry Pi fans. The board is being announced now, and you’ll be able to buy one on October 23.
The Raspberry Pi 5 claims to have two to three times the processing power of the Raspberry Pi 4, already a powerful single board computer. Available in 4 and 8GB RAM capacities (with 1 and 2GB models to come later), the Raspberry Pi 5 is the same basic size and shape as the Model 4 B, but adds a number of long-requested features such as a built-in real-time clock, a PCIe 2.0 connector and a power button.
Perhaps more importantly, the Raspberry Pi features a new quad core 2.4 GHz, Cortex-A76 Arm CPU (the old model was originally a Cortex-A72 running at 1.5 GHz, but a firmware update brought this to 1.8 GHz), a new Southbridge that promises to improve USB 3 throughput and a new VideoCore VII GPU that operates at 800 Mhz (versus 500 MHz VideoCore VI on the Pi 4). There’s a slew of little improvements throughout the board, including a built-in fan header with mounting holes, faster and dual camera connectors and a microSD card reader that works with higher-speed cards.
At just $60 or $90 MSRP, the 4 and 8GB models are a mere $5 more than the same memory capacity SKUs of the Raspberry Pi 4, making them a strong upgrade. But how much better does the Raspberry Pi 5 perform and how does it work with the existing ecosystem of HATs and accessories? We did some testing to find out.
Raspberry Pi 5 Hardware Specifications
Swipe to scroll horizontally
| Header Cell – Column 0 | Raspberry Pi 5 | Raspberry Pi 4 |
|---|---|---|
| SoC | BCM2712 SoC Arm Cortex-A76 64-bit CPU running at 2.4 GHz |
BCM2711 SoC Quad core Cortex-A72 64-bit CPU running at 1.8 GHz |
| 800 MHz VideoCore VII GPU, supporting OpenGL ES 3.1, Vulkan 1.2 | 500 MHz VideoCore VI GPU | |
| Display | 2 x 4Kp60 HDMI display output with HDR support | 2 x 4Kp60 HDMI display output |
| RAM | 1,2,4,8GB LPDDR4X-4267 SDRAM | 1,2,4,8GB LPDDR4 |
| Storage | Micro SD (SDR104 compatible) M.2 NVMe SSD via M.2 HAT |
Micro SD |
| GPIO | 40 Pin Raspberry Pi HAT Compatible | 40 Pin Raspberry Pi HAT Compatible |
| USB | 2 x USB 2 2 x USB 3 (simultaneous 5Gbps) |
2 x USB 2 2 x USB 3 |
| Connectors | 2 × 4-lane MIPI camera/display transceivers PCIe 2.0 x1 interface UART breakout RTC clock power Fan power |
2-lane MIPI DSI display port 2-lane MIPI CSI camera port 4-pole stereo audio and composite video port |
| Networking | Gigabit Ethernet, PoE via PoE+ HAT | Gigabit Ethernet, PoE via PoE+ HAT |
| Wi-Fi / Bluetooth | Dual-band 802.11ac, Bluetooth 5 / BLE | Dual-band 802.11ac, Bluetooth 5 / BLE |
| Power Button | Soft power button | None |
| Power | 5V 4A via USB C PoE via Poe+ HAT 5V via GPIO |
5V 3A via USB C PoE via Poe+ HAT 5V via GPIO |
| Dimensions | 85 x 56mm | 85 x 56mm |
| MSRP | 1GB TBC 2GB TBC 4GB $55 8GB $75 |
1GB 2GB 4GB $60 8GB $80 |
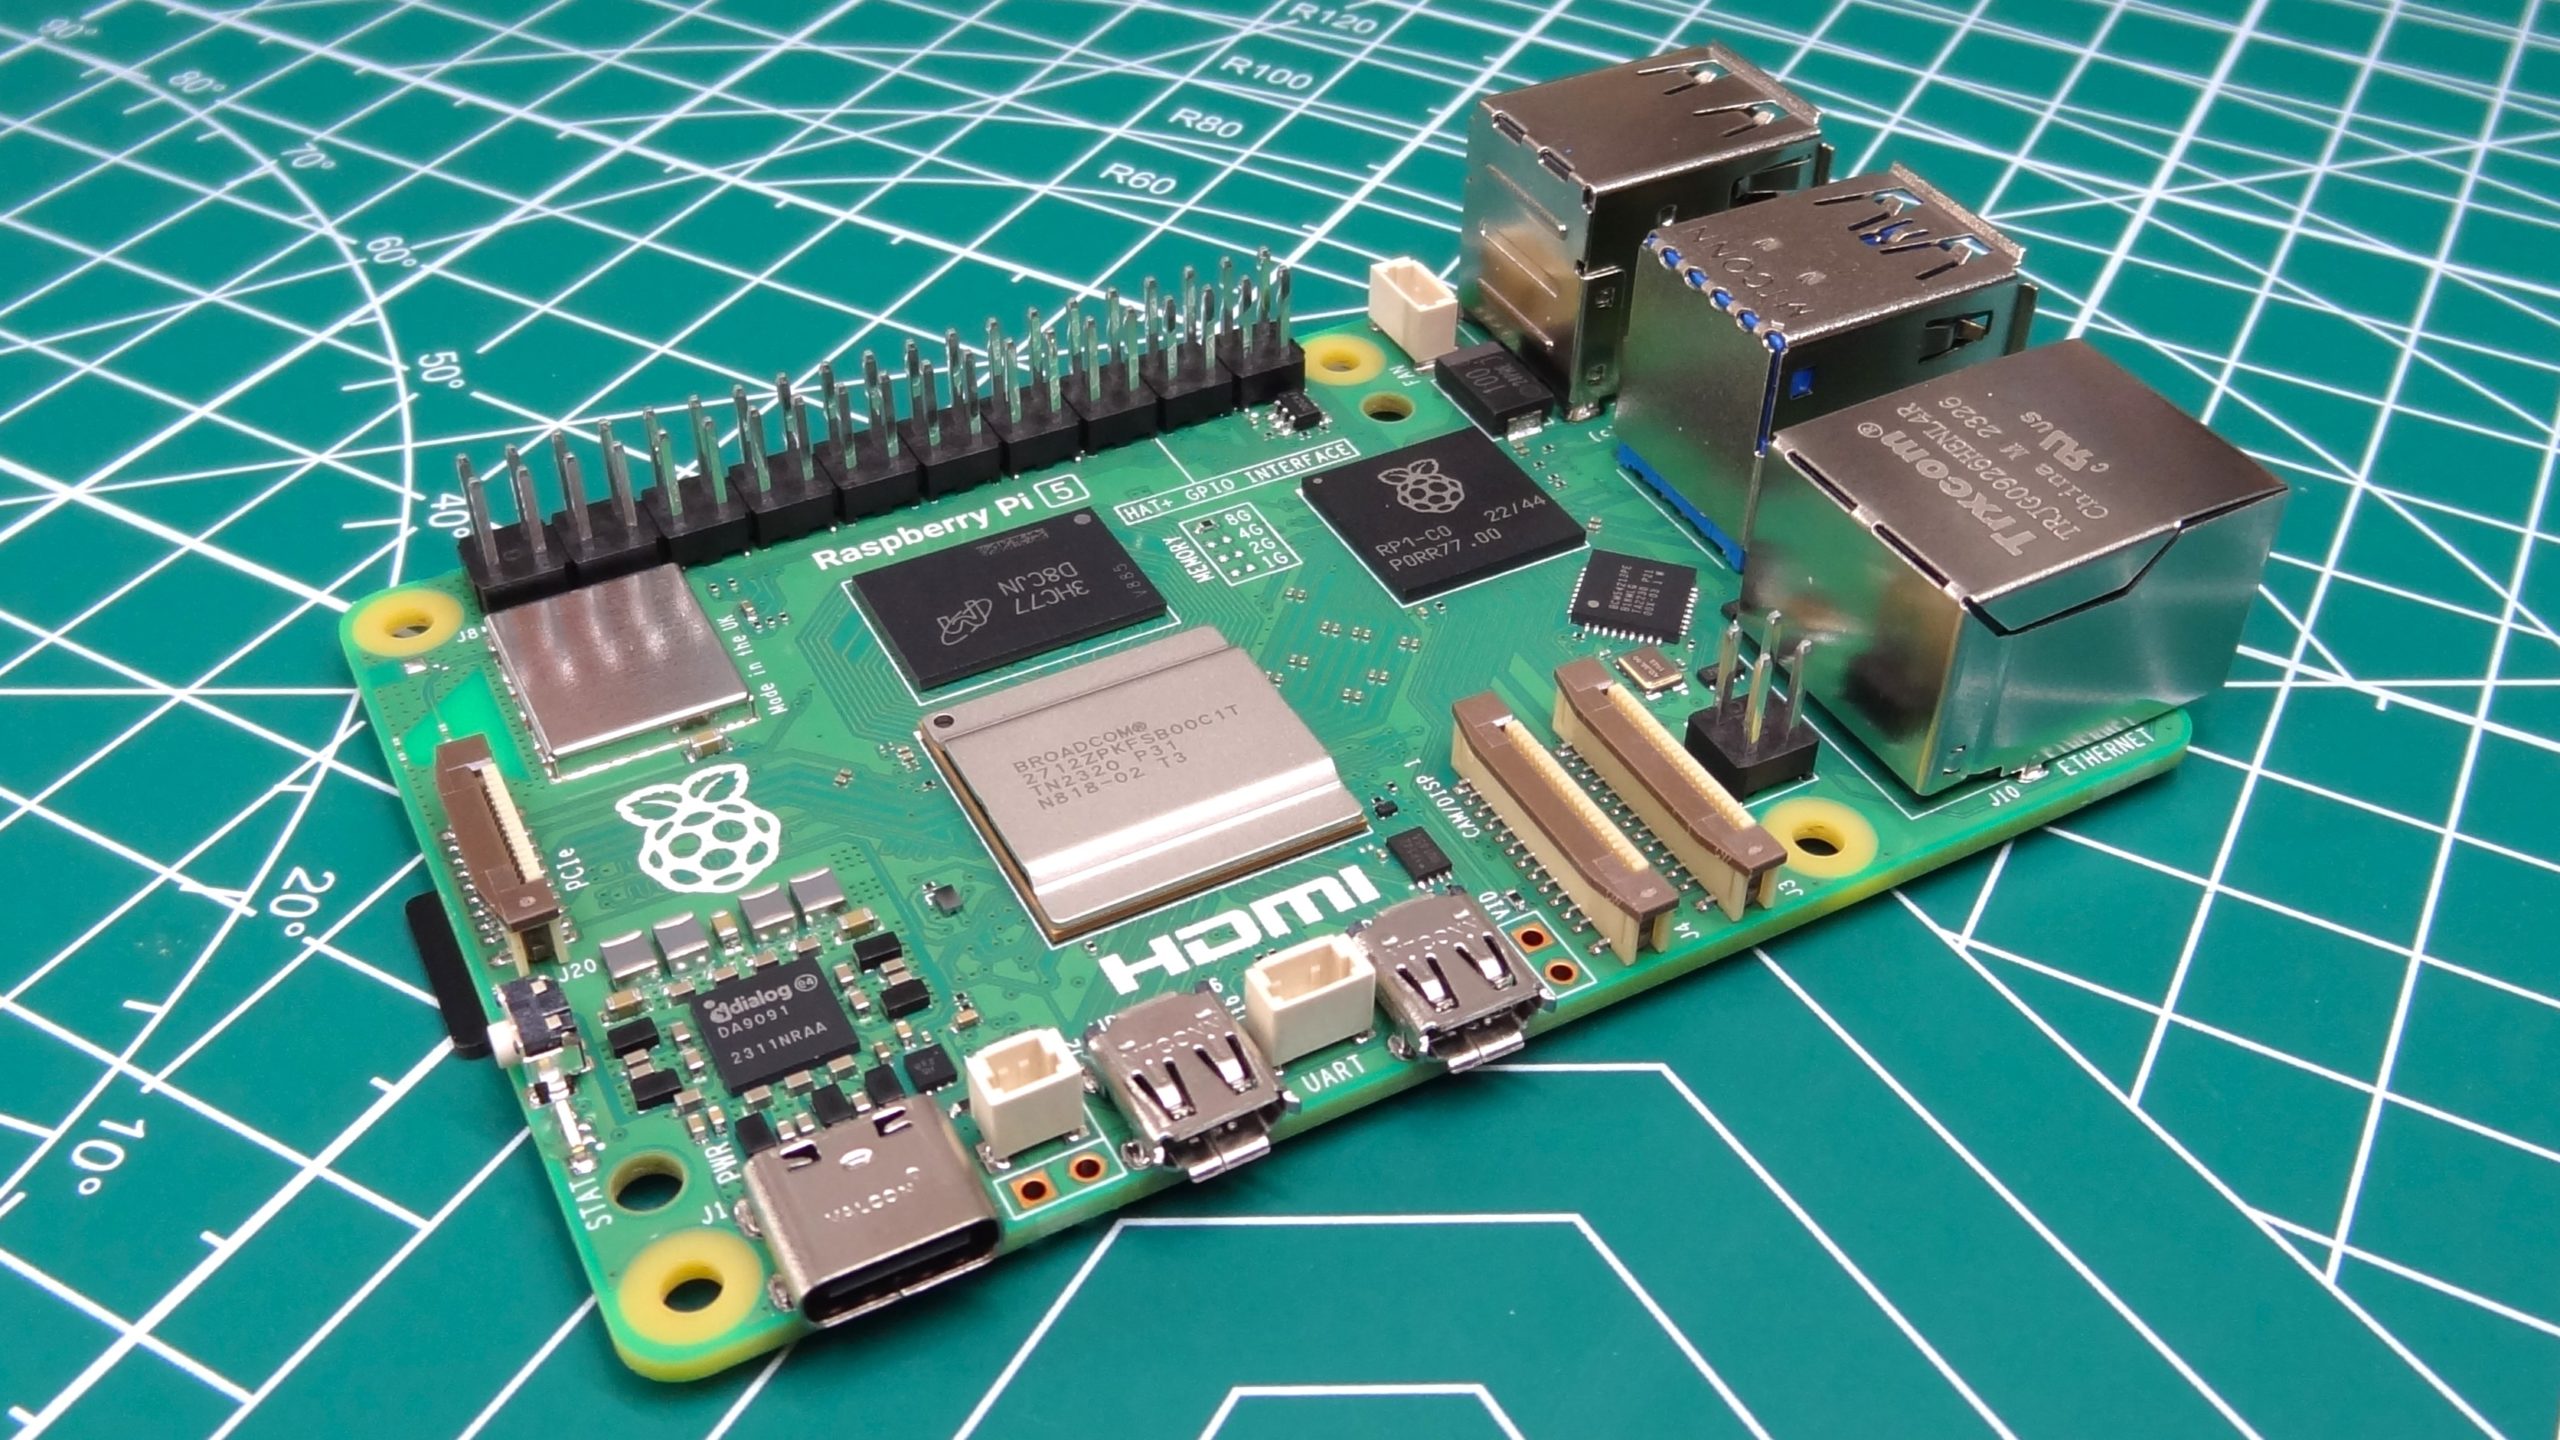
The Raspberry Pi 5 bears a striking similarity to both the Raspberry Pi 4 and the 3B+. On the face of it, this is another classic Raspberry Pi board design, harkening back to the B+ redesign in 2014, but look a little closer! Gone is the 3.5mm composite jack, so no analog video / audio for this generation of Raspberry Pi. That said, we’ve not used that port since the Raspberry Pi 3.
The camera and display connectors are smaller, matching the Raspberry Pi Zero’s smaller 15 pin connector instead of the original 22 pin. Note also that there are now two connectors next to each other and that we can now connect two cameras, two DSI displays or a mix of either.
The third interface is for PCIe devices. This is a PCIe 2.0 x1 interface for fast peripherals, and yes that means NVMe SSDs. We asked Upton about this interface and he confirmed that it will take all sizes of NVMe drives, but in order to do so, we need to use a specially designed M.2 HAT which was not ready for release at the time of this review.
The Raspberry Pi 5 retains the dual micro HDMI ports introduced with the Raspberry Pi 4. Each port is capable of 4K 60 output, but to be honest we have never used a Raspberry Pi with dual displays. Between the micro HDMI ports is a single UART connector, this can be used with the Raspberry Pi Pico Debug kit, or used to make UART connections to other microcontrollers.
The keen eyed amongst you will notice that the USB and Ethernet ports are swapped.It seems as though the Raspberry Pi 5 is taking a cue from older boards. The Raspberry Pi 4 saw the port positions swapped, and now they have been swapped back. What does this mean? It means that the Raspberry Pi 5 will need a new case. Port changes aside, there are subtle differences that will make cases designed for older Raspberry Pi model B boards no longer compatible. The interesting thing is that the Raspberry Pi 5 Product Brief states that “if used inside a case, the case should not be covered”. The reason for this is something we will address during the review, but the tl;dr is that the Raspberry Pi 5 CPU needs to be kept cool.
Lets address two new features for the Raspberry Pi 5. Firstly we have a real-time clock battery backup. Yes, your Raspberry Pi can now keep correct time without the need for an NTP server or an add-on board taking up space on the GPIO.
The other new feature is a power button! Some may scoff at this addition but it was an often requested feature and caused some makers to invent their own / buy third-party products.. With the Raspberry Pi on, a single press brings the shutdown / logout menu. Another press will trigger a safe shutdown. This shutdown is more of a standby, with the Raspberry Pi consuming 1.4W. A press of the power button will start the Raspberry Pi 5 up. You can also program the OS to make the button do other things because it is a momentary button rather than a hard switch that cuts off electricity.
One thing that remains the same is the now ubiquitous 40 pin GPIO. First introduced with the Raspberry Pi B+ in 2014, the 40 pin GPIO also introduced the HAT (Hardware Attached on Top) standard. A standard in a similar vein to Arduino’s Shields, HATs offered a standard design template and electronic standardization for the growing selection of add-ons. The Raspberry Pi 5’s GPIO is essentially the same as on previous models, but with a few changes along the way. More on that later.
Raspberry Pi 5 Thermal and Power Performance
The Raspberry Pi 5 is the hottest of all the Raspberry Pi boards we have ever used. At idle, without any added cooling, it sits at around 50.5 degrees Celsius and consumes around 2.7 Watts. Pushing it with a stress test will quickly make the Raspberry Pi 5 thermal throttle (which triggers at 82°C), dropping the CPU speed in an attempt to keep the CPU cool. Under stress, we hit 86.7°C (7 Watts) and saw the CPU throttle from 2.4 GHz down to 1.5 GHz. Interestingly we saw the CPU change speed a few times (2311 MHz, 2256 MHz, 2201 MHz and 2146 MHz), likely in an attempt to provide a balance between speed and cooling.
The question on your lips right now is “How does this compare to the Raspberry Pi 4?” At idle, the Raspberry Pi 4 runs at 45.7 C and consumes 1.02 W. Under stress, we see the temperature jump to 79.8 C and the Pi 4 consumes 6.2 W of power.
That’s approximately 1W more power for the Pi 5, for a lot more computational power. Where the Raspberry Pi 4 beats the Pi 5 is its stress test temperature with no cooling: 79.8 C versus the Pi 5’s 86.7 C (thermal throttled). But drop in the active cooler and the Pi 5 drops to 59.3 C giving us exceptional processing power while staying relatively cool.
The Raspberry Pi 5 is a hot slice of Raspberry Pi and that means, to get the best performance, we need cooling. We tested out the official Raspberry Pi Active Cooler and it worked rather well. The cooler is a mix of aluminum heatsink (with a lovely anodized Raspberry Pi logo) and blower fan.
It cools the Arm based SoC, RAM and the new RP1 chip. More on that later. Rather than attach to the M2.5 mounting holes, the active cooler has its own mounting holes. One next to the USB C port, the other between the GPIO and the USB ports. The active cooler uses push-fit plastic / nylon plugs to hold the cooler in place. Removing the cooler is possible. Carefully with some needle nose pliers or using a plastic pen tube to squeeze and push the plastic pins.
The official cooler connects to the new fan connector, just next to the USB ports, a big improvement over prior Pis where any fan you attached had to take up GPIO pins, sometimes preventing the use of HATs. The fan is set to come on when the CPU hits 50°C. At idle, the heatsink kept the Raspberry Pi 5 at 39.5°C and consumed 2.6 Watts. Running our stress test saw the temperature rise to 59.3°C (6.8 Watts), way below the thermal throttle point. It seems that when running the Raspberry Pi 5 with cooling it consumes a fraction less power than without.
The Raspberry Pi 5 introduces a new feature, a power button. I know that for many of us this isn’t earth shattering news. We had power buttons on home computers in the 1970s, but the Raspberry Pi has never had one, until now.
The button is a soft power button, calling a script to either select logout / power off / reboot or another press will soft power off the Raspberry Pi, placing it into standby mode. At standby the Raspberry Pi 5 consumes 1.3 Watts, around half the power of an idle Raspberry Pi. But we can go lower. The Raspberry Pi Engineering Team gave us instructions on how to lower the standby power and what a result we saw!
Now our standby power usage is 0.05W, many times lower than before. This leaves the 5V GPIO pins at a high state, but the 3V3 pins are low. This could be a problem for your favorite HAT as it may not power off along with the Raspberry Pi. A revision to the HAT specification, HAT+ will address this, and clarification will be provided by Raspberry Pi.
Can we cool the Raspberry Pi 5 with existing heatsinks and fans? The answer is yes, but given the board layout changes, not every cooler will fit. Our favorite passive cooler is the Akasa Gem Pro.
Looking like the set decoration of a 1970s sci-fi show didn’t detract from its cooling performance. A solid lump of aluminum pulled the heat from the chips. Sadly that cooler will not work the Raspberry Pi 5. Nor will the Ice Tower coolers from 52Pi, unless you want to get creative in how they are mounted.
For active cooling we tried Pimoroni’s Fan Shim. A board that slides onto the GPIO, still providing access, and not getting in the way. At idle, the Raspberry Pi 5 sat around 29.6 C and was really quiet, not as quiet as the new active cooler, but barely audible. Fan Shim clocked up an impressive 60.4 C cooling (versus 59.3 C for the official active cooler) and is a viable alternative to the official active cooler, if you already have one. If not, buy the active cooler, whose price we don’t yet know.
For passive cooling, we purchased a set of generic self adhesive heat sinks from Amazon. Using their adhesive backs we placed the correctly sized heatsinks on the SoC, PMIC and Wi-Fi chip. Did they work? Well kind of. The Raspberry Pi 5’s idle temp was 41.1 C, versus the no-cooling temp of 50.5 C.
We did hit thermal throttling (80 C) with the heatsinks, clocking in at 85.6 C, just 1.2 C below the no cooling test. So what did we learn from this test? Buying cheap heat sinks is a waste of money. Either buy active cooling, or wait for bespoke passive cooling solutions to hit the market.
Can we Overclock the Raspberry Pi 5?
The short answer is yes, but how fast you can go depends on the “silicon lottery”. Overclocking is a simple process, requiring a few tweaks to a config file. In our tests we managed to overclock the CPU to 3 GHz, we did manage 3.2 GHz, but the system reported the speed differently in neofetch and vcgencmd. Neofetch reported 3.2 GHz, but vcgencmd said 3 GHz. After talking to the Raspberry Pi Engineering Team we are confident that the 3.2 GHz speed was erroneous and have omitted the data from the review.
For any overclock, you will need good cooling. Passive cooling via small heatsinks will not make the cut, because you need active cooling to drop the temperature below the 80°C thermal throttle trigger point. At 3 GHz the Raspberry Pi 5 had an idle temperature of 46.6°C and consumed 3 Watts. Under stress the Raspberry Pi 5 hit a top temperature of 69.2°C and consumed 10 Watts.
Raspberry Pi 5 64-bit OS
Our review unit came with a microSD card running a pre-release of the latest Raspberry Pi OS, but this time it was a 64-bit OS running Linux kernel 6.1.0. The 64-bit Raspberry Pi OS release has long played second fiddle to the popular 32-bit release. This is largely due to the many older boards which only support a 32-bit OS. But since the Raspberry Pi 3, there has been support for 64-bit OS.
The new OS is based upon Debian 12 codename “Bookworm”, released in July 2023. Bookworm comes with a number of changes and one of the biggest changes is a new version of Python. In previous releases, we saw Python 3.9 as the default, but for Bookworm we see an upgrade to 3.11 and this brings about a change on how we install Python modules.
In the past, we would install Python modules either system wide, or per user. This worked great for many users, but it introduced the chance of corrupting / conflicting your base OS Python installation which would use a package manager, with Python modules installed via pip. With Python 3.11 we see PEP 668 introduced as a means to prevent or at least lessen the impact.
The goal of PEP 668 is to minimize the chance of a user installed Python module interfering with the version of Python installed for the OS, used for OS specific tools and for end-user applications. PEP 668 will not let a user install a Python package using pip to the main OS. Instead we have to create a virtual environment (venv), activate it and then install our chosen Python modules. This venv is isolated from the OS, and should not cause any issues. It does make it a little trickier for newcomers to install Python modules, but it is of greater impact for companies which produce third party add-ons and HATs.
Raspberry Pi 5 Processing Performance
With a faster boot time, faster micro SD card performance and a 64-bit OS we have a much more speed focused system. Raspberry Pi claims that the Raspberry Pi 5 is 2 to 3 times faster than the Raspberry Pi 4 and in general it feels just that fast.
Opening apps is much much faster. On the supplied micro SD card it took 5.5 seconds to open Gimp on the Raspberry Pi 5, compared to 10.8 seconds on a Raspberry Pi 4. Opening Firefox took 5.1 seconds on the Pi 5, versus to 8.6 seconds on the Raspberry Pi 4. Boot times were around 18 seconds versus 38 seconds on the Raspberry Pi 4 (with the same microSD card and OS image).
On synthetic benchmarks, the differences between generations were readily apparent. On Sysbench’s CPU test in single-threaded mode, the Pi 5 generated 2,729 events per second versus 1,766 for the Pi 4 (more events is better). When we upped the ante to four threads, the Pi 5 won again by 10,912 to 7,068 events, a 54 percent improvement.
When we ran the 7-Zip compression benchmark, the Pi 5 delivered 9,543 MIPS of compression versus 4,287 for the older model, a 122 percent boost. It also gave 13,231 MIPs of decompression versus 7,568 for the Pi 4.
We haven’t gotten to do a full suite of AI tests, but we were able to run Phoronix Benchmark Suite’s TensorFlow Lite benchmark using the SqueezeNet neutral network. On this test, a lower score, which is the number of microseconds the computer took to complete the task, is better. The Pi 5 took a modest 25,276 microseconds versus 80,327 for the Pi 4, a 68 percent difference.
Video Playback and Streaming
Like the Raspberry Pi 4, the Pi 5 has the ability to output to two monitors at up to 4K resolution via its dual microHDMI ports. With its enhanced GPU, the board promises to deliver 60 Hz on each screen and even use HDR color if it’s available.
We weren’t able (yet) to get it to do HDR or to verify whether it delivers at 60 Hz, but it outputted to a single 4K monitor easily and we have every reason to believe it would power a second one (as its predecessor did). The bigger issue is how the board handles challenging situations such as streaming videos from YouTube at high resolution.
Streaming video has been an Achille’s heel for Raspberry Pi for a long time and the faster GPU and CPU promise to improve this. However, during our tests, the YouTube performance still left something to be desired. Running the screen at 1080p resolution, we played Tears of Steel at 1080p / 30 (actually more like 24 fps) on YouTube and performance was smooth with few dropped frames. When we switched to a 1080p, 60 fps nature video, the images still looked pretty smooth, though YouTube’s “Stats for Nerds” overlay reported a fair number of dropped frames.
When we ran the screen at 4K but kept the videos going at 1080p resolution, both videos were extremely jerky and sluggish. Stats for Nerds reported each of them dropping about two thirds of their frames. This was true whether the video was playing full screen or just in part of the browser window. Even resizing the video player was sluggish.
Perhaps future software updates or configuration tweaks will make YouTube streaming better. However, the fact that it plays fairly smoothly at 1080p when the screen is at 1080p is still a nice step up from previous Pis.
USB and MicroSD Card Performance, RP1 Chip
The Raspberry Pi has a new “Pi Silicon” chip on its board, the RP1. Looking remarkably like an RP2040, Raspberry Pi’s first foray into custom silicon, the RP1 is there to provide the bulk of I/O for the Raspberry Pi 5.
According to the product brief we received, the RP1 provides more than double the USB bandwidth of previous models, so faster transfer speeds for USB drives using UAS (USB Attached SCSI). The RP1 also provides a dedicated four-lane 1.5 Gbps MIPI camera and display interface. This triples the total bandwidth for a combination of cameras and displays. Keep in mind, though, that the USB 3.0 ports top out at the same 5 Gbps theoretical maximum as on the Pi 4 so we’re counting on increased processing power to drive increased throughput.
To find out just how much faster the USB 3 connections are on the Pi 5, we conducted storage benchmarks on both the built-in microSD card reader and on a PCIe 3.0 SSD that was in an enclosure and connected via USB. With Sysbench’s file IO test, the Raspberry Pi 5 was able to read at 12.75MB/s from a Kingston Canvas Go Plus microSD card and write at 8.5 MB/s. Meanwhile, the SSD managed to read at 31.33 MB/s and write at 20.89 MB/s.
How does that compare to the Raspberry Pi 4? Well the Kingston Canvas Go Plus managed to read at 8.78 MB/s and write at 5.85 MB/s. The SSD read at 12.96 MB/s and had write speeds of 8.64 MB/s. So that’s more than double the speed on both the USB 3.0 and microSD reader interfaces.
Speaking of microSD, the Pi 5’s card reader now supports higher-speed microSD cards that use the SDR104 standard. SDR104 is a subset of the popular UHS-I card standard and can theoretically transfer at up to 104 MBps. Though few cards are actuall labeled as supporting SDR104, you can find UHS-I cards that claim transfer speeds over 100 MBps. The Pi 4’s card reader had a theoretical maximum of about 50 MBps, but in practice, we never saw a card go much above 40 MBps.
We tried a few different microSD cards with both the Pi 5 and the Pi 4. Using IOZone, a storage benchmark, we found that the Kingston Canvas Go Plus, which is rated for 170 MBps, hit a sequential read and write speeds in 86 and 55 MBps ranges. The same card was in the 37 to 41 MBps range for sequential writes on the Pi 4.
There’s also an M.2 connector on the Pi 4, that will allow you to connect SSDs to it directly. This is quite the improvement and we can’t wait to test NVMe drives using the required M.2 HAT when it becomes available. It should wipe the floor with these already impressive figures.
Using the GPIO
The GPIO is the Raspberry Pi’s crowning glory. Those 40 GPIO pins open up a world of electronic projects using our preferred programming language. The Raspberry Pi has a long link to Python and that is chiefly the go-to language for many projects, but we can also write GPIO code in Lua, Go, C, JavaScript, BASIC or other languages.
Our tests normally involve using the Python modules RPi.GPIO and GPIO Zero to interact with the GPIO. We performed our usual battery of GPIO Zero tests and had no issues, this is great news for beginners looking to cut their teeth with electronics and Raspberry Pi. While GPIO Zero worked flawlessly, RPi.GPIO proved to be an issue and this is down to some behind the scenes configuration.
The RPi.GPIO module was created by Ben Croston in the early days of the Raspberry Pi and it quickly became the standard for many Raspberry Pi projects and hardware. RPi.GPIO is most likely under the hood of your favorite Raspberry Pi HAT’s software module and this means that your Raspberry Pi 5 experience may not be smooth sailing to start with. In fact we failed to correctly test any of our usual third party HATs. The official Raspberry Pi Sense HAT did test correctly, likely due to it using libgpiod over RPi.GPIO.
Gordon Hollingworth, Raspberry Pi CTO provided a statement on PEP668 and Raspberry Pi 5 HAT compatibility.
“The Raspberry Pi OS will be following the Debian OS, Ubuntu and others in its adoption of PEP668 which encourages users to understand the issues they may have when installing, updating and removing packages from the system with pip. Additional documentation will be available to help our users understand this change and we will be pointing our users at tools such as virtualenvwrapper which makes the process easier.
Any of the HATs which use the standard Linux interfaces for their communication will work with no changes to software. However, there are a significant number of HATs with software that rely on non-portable interfaces, such as RPi.GPIO, which get broken every time we release a new hardware device. We’re working closely with manufacturers in this pre-launch period to get their software updated in time for the launch of Raspberry Pi 5, one of the obvious advantages of splitting the announcement and launch of our products!”
As Hollingworth states, the time between this announcement and the retail launch of Raspberry Pi 5 will give manufacturers the time to get many of the best Raspberry Pi HATs and addons ready for Raspberry Pi 5. We will re-test a number of boards once the official launch has taken place.
Also note that when the active cooler is in place your access to the GPIO for jumper wires is not blocked. It can be a little tricky to get to a pin, but not impossible. Just make sure to keep the wires away from the spinning fan. If you plan to use HATs or other addons with the GPIO, purchase a 2×20 female to male header riser. This will give you clearance over the cooler, keep the air intake clear. Some M2.5 standoffs and screws (around $10 on Amazon) will help stabilize the board.
Dual Camera Support
The Raspberry Pi 5 introduces multiple camera support to mainstream Pi boards Compute Module users will be used to multiple camera support as it has been baked into the Compute Module IO boards since day one, but most Pi fans probably don’t own a Compute Module.
On the coding side, both libcamera and the Picamera2 Python module support multiple cameras and we successfully tested by passing the camera argument for libcamera (0 or 1) and with Picamera by using the correct camera constructor (again, 0 or 1). We’re working on a tutorial that details exactly how to use both cameras.
The camera / display connectors use the 15 pin connector which has previously been used with the Raspberry Pi Zero range of boards, most recently the Raspberry Pi Zero 2 W. Camera modules and older Raspberry Pi use a 22 pin connector, necessitating replacement cables or adaptors. We tested both with the Raspberry Pi 5 and all went well.
Power over Ethernet Support
The Raspberry Pi 5 supports Power over Ethernet (PoE) but you’ll need to purchase a new PoE HAT in order to use it. The Raspberry Pi 3B+ and Raspberry Pi 4 originally placed the PoE header between the GPIO and the Ethernet port, a place that the Raspberry Pi 5 uses for its fan connector, but the PoE header now moves down the board, between the camera / display connector and the Ethernet port. So we can’t just route the connections with some jumper wires. A replacement PoE HAT is expected in the near future.
Emulation with the Raspberry Pi 5
Emulation on the Raspberry Pi 5 is playing catchup at the time of writing. Undoubtedly RetroPie, Lakka, Recalbox etc will be working on updates to their respective offerings. We’ll be testing this once there are compatible images.
Our hope is that emulation from the PS2 era onwards is better. Boards such as Khadas’ VIM4 and Edge 2 Pro have exceptional emulation performance for PS2 and PSP era games. Gamecube / WiiU emulation would be the sweet spot and could see the Raspberry Pi 5 being adopted as the low cost option for retro emulation.
If your tastes are even further in the past, then we are 100% confident that the Raspberry Pi 5 has more than enough processing power for 8, 16 and many 32-bit games consoles. It may even improve performance on some later arcade cabinets (late 1990s onwards) which had custom chips that needed to be emulated.
Pi vs Pi
With a $5 price increase over the previous model, is the Raspberry Pi 5 worth your money? For raw computational power, yes. We don’t reach the lofty heights of the Khadas VIM4, Edge2 Pro or the LattePanda Sigma, but then again we’re not spending that amount of money.
The Raspberry Pi 5 moves towards a low cost, low power Linux desktop which benefits from a GPIO. In the past the Raspberry Pi was often seen as a GPIO with a Linux computer attached. But the move to align Raspberry Pi OS with Debian and Ubuntu standards makes this more a Linux computer than ever before. PEP688 and its impact on HATs is an example of this change. For a short while it will be hard for companies producing Raspberry Pi add ons to adapt their products, but it will happen. There is a chance that some older addons may not receive an update, and in that case the fallback option is to use a Raspberry Pi 4 or older.
The weeks between this announcement and the general release should provide enough time to get addons and HATs ready for launch. Ready for the general public to get hands on with the Raspberry Pi.
Bottom Line
In many ways, the Raspberry Pi 5 is a review-proof product. If you are a Pi fan, you’ll be chomping at the bit to buy one as soon as it’s available and, given the $60 or $80 price point, you can probably afford one (just budget a few extra dollars for cooling).
Like us, most makers will find a lot to love in the Raspberry Pi 5: faster performance overall, smoother video playback, and more storage bandwidth are among the best reasons to prefer Pi 5 over 4. And many people will find the RTC or the power button to be game changers.
Since we tested the Pi 5 a few weeks before it goes on sale, we encountered some rough edges around HAT compatibility. HAT vendors such as Pimoroni and Adafruit are going to need to update their Python libraries to work with the new version of Linux that the Pi 5 requires. However, we expect that most of the major HATs will have updates before consumers get their hands on the board. Older or more obscure HATs may have support issues.
If you don’t need the power, then a Raspberry Pi 4 is still a solid choice; the older model can do more without an active cooling system and has rock-solid support after four years on the market. If you don’t need Linux, just the GPIO then the $8 Raspberry Pi Pico W has proven itself to be a versatile microcontroller. However, if you want the best single-board computer around, the Raspberry Pi 5 is your new leader.