how-to-build-a-motion-triggered-raspberry-pi-security-camera

How to Build a Motion-Triggered Raspberry Pi Security Camera

Home security camera systems have exploded in popularity while decreasing in price over the past few years. For example, you could purchase a Ring Indoor Security Camera for around $60, but there are some drawbacks: first, vendors like Ring often charge a monthly fee to store your data and second, you might not want video and photos from inside your home being shared with a third party (in Ring’s case, Amazon) where strangers could potentially see them. 

MotionEyeOS, a free open-source application, allows you to turn a Raspberry Pi with a camera into a home video monitoring system, where the photos and videos can either stay on your device (and home network) or, if you choose, be uploaded automatically to a cloud-storage service such as Google Drive or Dropbox. 

In this tutorial, we will show you how to set up a Raspberry Pi security camera with MotionEyeOS. This software works with almost any Raspberry Pi (connected to the internet) and almost any webcam or Pi camera. There’s no fancy coding to be done in this project; it just works.

Here are a few of the cameras I’ve successfully used with MotionEye.

(Image credit: Tom’s Hardware)

This Raspberry Pi security camera can be used to record porch pirates, monitor children or pets or to watch out for burglars. 

(Image credit: Tom’s Hardware)

Disclaimer: This article is provided with the intent for personal use. We expect our users to fully disclose and notify when they collect, use, and/or share data. We expect our users to fully comply with all national, state, and municipal laws applicable. 

What You’ll Need

  • Raspberry Pi 4 or Raspberry Pi 3B+, or Raspberry Pi Zero W
  • 8 GB (or larger) microSD card
  • Raspberry Pi Cam, HQ Camera, Infrared Camera, or webcam
  • Monitor/Power supply/Monitor/HDMI Cable (for your Raspberry Pi)
  • Your Windows or Mac computer.

Install MotionEyeOS

In this section, we will download MotionEyeOS, flash to a microSD card for our Raspberry Pi security camera, and set our WPA credentials. 

1. Download the latest version of MotionEyeOS corresponding to the specific model of Raspberry Pi you are using from https://github.com/ccrisan/motioneyeos/releases  

Image 1 of 2

(Image credit: Tom’s Hardware)

Image 2 of 2

(Image credit: Tom’s Hardware)

2. Insert your microSD card into your computer to be read as a storage device. 

3. Launch Raspberry Pi Imager. You can download the imager here if you don’t already have it installed on your computer. 

4. Select “Use custom” for the Operating System. 

(Image credit: Tom’s Hardware)

5. Select the motioneyeos version that you just downloaded. This should be a .img.xz file. 

6. Select your microSD card under “SD Card.” Note that all data on your microSD card will be erased in the next step. 

(Image credit: Tom’s Hardware)

7. Click “Write” in the Raspberry Pi imager. The ‘write’ process could take 1 to 2 minutes. 

8. When the process completes, physically remove and then reinsert your microSD card. We do this because the software automatically ejects the microSD card when the process completes, but we need to add one file before the next step. 

9. Create a new file named wpa_supplicant.conf with the following text, replacing “YOUR_NETWORK_NAME” and “YOUR_NETWORK_PASSWORD” with your information. A source code editor such as Atom works great for this purpose. WordPad and Notepad are not recommended to create this file as extra characters are added in the formatting process. 

country=us
update_config=1
ctrl_interface=/var/run/wpa_supplicant

network={
 scan_ssid=1
 ssid="YOUR_NETWORK_NAME"
 psk="YOUR_NETWORK_PASSWORD"
}

(Image credit: Tom’s Hardware)

10. Save wpa_supplicant.conf to your microSD card. Eject your microSD card.

11. Insert your microSD card into your Raspberry Pi. 

12. Connect your camera, monitor and power supply to your Raspberry Pi. Power up your Pi. 

(Image credit: Tom’s Hardware)

13. Find your internal IP address on the Pi screen. In most cases your internal IP address will start with 192.168.x.x or 10.0.0.x. Alternatively, if you do not have access to a monitor, you can download Angry IP Scanner and find your IP address for your Motioneye Raspberry Pi. Look for “MEYE” to identify your MotionEye Pi.  

(Image credit: Tom’s Hardware)

14. Enter your internal IP address into a browser window of your Windows or Mac computer. Alternatively, you could use a Chromebook or a tablet. At this point your Motioneye should start streaming. 

(Image credit: Tom’s Hardware)

In most cases, the system will automatically stream from the attached camera. If no image comes up, the camera may be incompatible with the Raspberry Pi. For example, an HD webcam may be incompatible with the Raspberry Pi Zero, but will work with a Raspberry Pi 3. There may be some trial and error in this step. Interestingly, most older webcams (manufactured before the Pi) will work with Motioneye. Here’s an old Logitech Pro 9000 connected to a Pi Zero W with a 3D printed stand. 

(Image credit: Tom’s Hardware)

Configuring MotionEye for Raspberry Pi Security Camera 

In this section, we will perform a basic configuration of Motioneye and view our Raspberry Pi security camera video stream. 

1. Click on the Profile icon near the top left within your browser menu to pull up the Login screen. 

(Image credit: Tom’s Hardware)

2. Log in using the default credentials. The username is admin, and the password field should be blank. 

3. Select your Time Zone from the dropdown menu in “Time Zone.” Click Apply. Motioneye will reboot which will take a few minutes. This step is important as each photo and video is timestamped.  

(Image credit: Tom’s Hardware)

4. Motioneye detects motion when _% of frames change. The intent is to set your % low enough to pick up the movement you are tracking, but high enough to avoid recording a passing cloud. In most cases, this is achieved through trial and error. Start with your default 4% Frame Change Threshold and then move up until you reach your optimal setting. 

(Image credit: Tom’s Hardware)

5. Click the down arrow to the right of “Still Images” to reveal the corresponding settings. Do the same for “Movies.” Set Capture Mode and Recording Mode to “Motion Triggered” and length of time to “Preserve Pictures” and “Movies.”

I have chosen “For One Week” since I’m only working with an 8GB microSD card. The photos saved locally will serve as a backup. You’ll save all of the photos to Google in a later step. Click Apply to save your changes. 

(Image credit: Tom’s Hardware)

6. Set your Camera Name, Video Resolution, Frame Rate and other options in the “Video Device” section. Click Apply to save your changes.  

(Image credit: Tom’s Hardware)

Viewing Raspberry Pi Security Camera Images / Video Locally 

If you don’t wish to upload images to a third-party service such as Google Drive, you can view the images and/or videos) captured locally on your Raspberry Pi security camera. If you choose this method, the images will never leave your local network.

1. Click on the live camera feed and new icons will appear. 

2. Click on the image icon to view images. 

(Image credit: Tom’s Hardware)

3. Or Click on the “Play”button icon to view movies. 

(Image credit: Tom’s Hardware)

Automatic Uploading to Google Drive (Optional) 

In this step, we will configure our Raspberry Pi security camera to automatically upload all of the photos (and videos) taken to Google Drive. This method (with a couple of nuances) also works with Dropbox. Of course, you have to be comfortable with having your images in the cloud. 

Most users create a separate Gmail account specifically for this purpose, to maximize free storage space from Google. Additionally, this will come in handy if you decide to enable email notifications in the next step.

1. Click the down arrow corresponding to “File Storage” in the main admin menu. 

2. Toggle “Upload Media Files” to ON. This should automatically toggle “Upload Pictures” and “Upload Movies” to ON, but if not, hit ON. 

3. Select Google Drive from the “Upload Service” dropdown menu.  

(Image credit: Tom’s Hardware)

4. In your Google Drive, create a new folder for storing your photos and videos. I chose “PorchCam” for the name of my folder.

5. Enter “/” followed by your folder name for ‘Location.’

(Image credit: Tom’s Hardware)

6.  Click “Obtain Key” and accept associated permissions by clicking “Allow.”  

(Image credit: Tom’s Hardware)

7. Copy and paste the authorization code into your “Authorization Key” in Motioneye.

8. Click the “Test Service” button. If you don’t get an error message in Motioneye, then it was a success.

9. Go to your Google Drive folder and test your setup by pointing the camera at yourself and waving to the camera.  

(Image credit: Tom’s Hardware)

Configuring Automated Email Notifications (Optional)

In this optional step, we will configure our MotionEye to automatically send us emails with attachments containing the photos our Raspberry Pi security camera has taken. It is highly recommended that you create a separate Gmail account specifically for this purpose. These instructions are specific to Gmail only. 

1. Enable “Less Secure Apps” in your Gmail account. 

(Image credit: Tom’s Hardware)

2. Expand “Motion Notifications” in Motioneye.

3. Toggle ON “Send An Email”

4. Enter your Email address, password

SMTP Server = smtp.gmail.com

SMTP Port = 587

Use TLS – Toggle to On

Enter a value for “Attached Pictures Time Span”

5. Click the “Test Email” button

(Image credit: Tom’s Hardware)

The first email is a text only email. Subsequent emails will contain attachments.  

(Image credit: Tom’s Hardware)

Mobile App Access to Raspberry Pi Security Camera 

MotionEye also features a mobile app for iOS and Android / Google Play stores. Keep in mind that the app will only work while you are on the same network as your Raspberry Pi (unless you enable port forwarding, which is not encouraged for security reasons).

MotionEye iOS apphttps://apps.apple.com/us/app/motioneyeos-client/id1485489242 

(Image credit: Tom’s Hardware)

Google Play apphttps://play.google.com/store/apps/details?id=com.jairaj.janglegmail.motioneye&hl=en_US&gl=US 

(Image credit: Tom’s Hardware)
how-to-install-apple’s-watchos-7-and-ios-14-betas-so-you-can-unlock-your-phone-with-your-watch

How to install Apple’s watchOS 7 and iOS 14 betas so you can unlock your phone with your watch

Apple’s iOS 14.5 beta is out, and with it comes the ability to have your Apple Watch unlock your Face ID-protected phone if you happen to be wearing a mask. If you really want this feature right now, you’ll have to download the latest iOS and watchOS betas — something that does come with at least a little risk, as it’s unfinished software. There are bugs, and features might change between updates. There have been reports in the past of watches being bricked by betas (though I didn’t find any for this release).

With all that said, I’ve been using the betas since they came out, and I haven’t noticed anything acting particularly buggy. So if you’re willing to throw caution to the wind to get access to the new Apple Watch unlock feature, here’s how you can get the betas.

First, start by going to beta.apple.com on your iPhone. If you’ve never participated in a public beta before, you’ll have to tap on the sign up button, and if you have, you can tap on the sign in button.

Click the Enroll Your Devices button to get the beta profiles for your phone and watch.

Once you’re logged in, tap the down arrow on the header, and go to Enroll Your Devices. I highly recommend following Apple’s advice to make an archived backup of your device, as iCloud backups won’t necessarily be accessible if you have to switch back from a beta. Apple explains how to make one on the Enroll page. Go ahead, I’ll be here when you get back.

After you’ve backed up your device, you can scroll down and tap the Download profile button, and your phone will let you know that you have to review the profile before it installs.

Before we do that, though, let’s grab the profile for the watch by scrolling up to the top and choosing WatchOS from the list. There, you can tap the Download profile button, then press Allow.


  • Tap install to add the beta profile to your Watch.


  • You’ll then have to reboot your watch.

This will automatically open the Watch app, where you can press Install. This will reboot your watch, so while that’s happening, let’s install the phone’s profile by going to Settings, then Profile Downloaded.

There, you can tap the Install button, and your phone will restart.


  • Tapping install will add the beta profile to your phone.


After you’ve got the profiles downloaded and your devices rebooted, you’ll have to update your phone, then your watch. Unfortunately, you have to wait until the phone is updated before you can even start on the watch, so you can’t multitask.

Once you’re officially running iOS 14.5 and watchOS 7.4, we can finally enable the unlock with watch feature.

Go to Settings > Face ID & Passcode

Go to Settings > Face ID & Passcode, and scroll down to the new Unlock With Apple Watch option. Toggling it will turn on the feature, there’s nothing you have to do on the watch.

Toggling Apple Watch under Unlock with Apple Watch turns the feature on.

Now that you have it installed, here’s what you can expect. First, and most important to note, is that your phone isn’t looking for your face with a mask, it’s looking for a face with a mask. With this feature on, if my wife was wearing a mask, she was able to unlock my phone with no problem if I was within three or so feet.

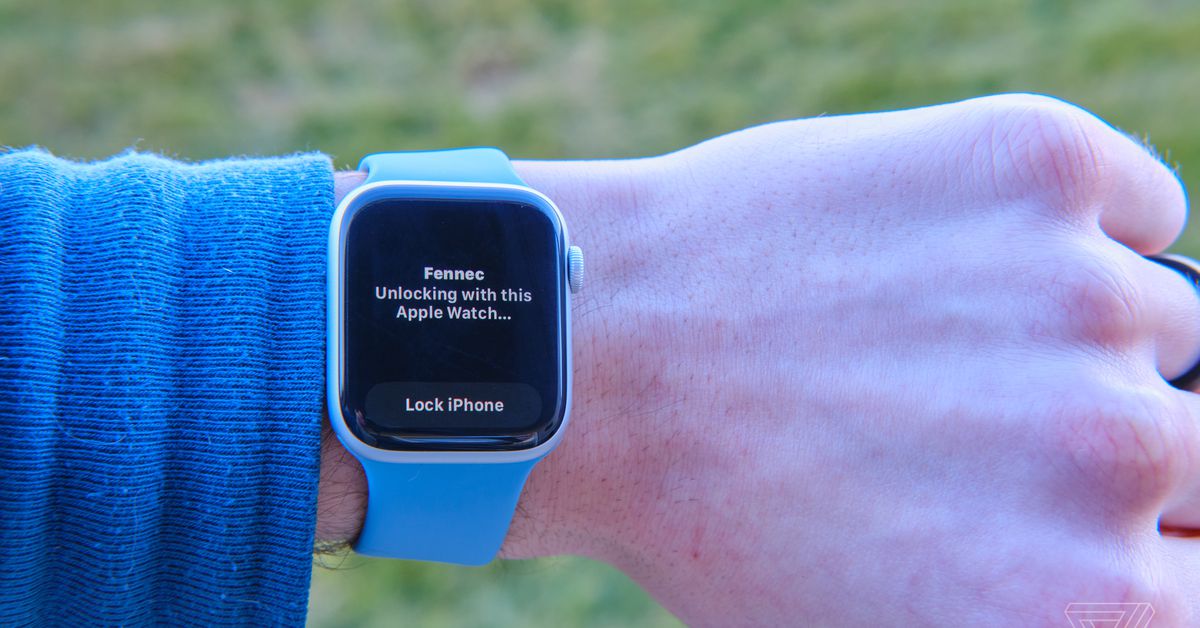
Apple’s mitigation to this is whenever your Apple Watch is used to unlock your phone, it buzzes you with a notification saying your phone has been unlocked, along with a button to lock it. Pressing that lock button immediately locks your phone and requires a passcode on next unlock.

With that caveat out of the way, so far I’ve had great success with the feature. I tried it with a variety of masks, and it worked with all of them for me. It is worth noting that, again, it is still looking for a face with a mask. This feature won’t help you in the situation where your phone is laying on the table and you want to unlock it without the Face ID camera being able to see you.

Still, for me, not having to put in my passcode every time I want to check my grocery list while shopping is a huge benefit and worth what I consider to be relatively minor security trade-offs. The feature may not be for those with super-secret info on their phones, but for everyone else it’ll be a nice quality-of-life improvement, whether you decide to go for it right now or wait for the official release.

the-verge’s-18-favorite-kitchen-gadgets

The Verge’s 18 favorite kitchen gadgets

When you’re stuck at home because of pandemics, bad weather, or just because you don’t feel like going out, there’s nothing more satisfying than cooking something really fantastic. Even if you’re not an experienced or enthusiastic cook, sometimes it’s really satisfying to create a new and tasty dish for you, your friends, and / or family.

We asked the staff of The Verge what kinds of equipment, gadgets, and tools they use to make their kitchen adventures better tasting, easier, or just more fun. Here are some of the answers we got.

Immersion blender

The Mueller Austria Ultra-Stick hand blender.
Photo: Mueller Austria

This is one of my favorite tools in the kitchen. It’s a hand-held blender that can be used to prepare soups, smoothies, whipped coffee, and more. I often use it in my Indian cooking just to smooth out the sauce a little and bring the dish together. It’s a game-changer, and I honestly just have so much fun using it. We also don’t own an actual blender so this has come in handy to make smoothies and shakes as well.

Dilpreet Kainth

Social media manager, video

When I was in college, I drove through a literal Maine blizzard to buy an immersion blender because I really wanted soup.

Nicole Wetsman

Health tech reporter

I have been making a lot of sauces and smoothies, and since I have a tiny kitchen, I don’t have a lot of counter space for more gadgets. This is why I love my immersion blender.

Kim Lyons

Weekend editor

I love my Breville hand blender. It makes soups and stuff that you don’t want to transfer into a blender so easy. I love the model I have, but clearly, there are a lot of good options out there.

Amelia Holowaty Krales

Senior staff photographer


Cooking app

Paprika Recipe Manager

The Paprika Recipe Manager is my entire cooking process now. Paprika is good because it:

  • Isn’t linked to a specific cooking service, so the features aren’t tied to a particular set of recipes
  • Can download and cleanly convert recipes from almost any site pretty well, either through its built-in web browser or a bookmark widget
  • Comes with a meal calendar and grocery list function that has become remarkably useful now that I do weekly grocery runs

Adi Robertson

Senior reporter

I’m seconding Adi’s recommendation of Paprika, which is the best recipe app, bar-none. It’s also got really great app support, with desktop and mobile apps on every platform (Mac ($15), Windows ($15), iOS ($5), and Android (free for up to 50 recipes).

Chaim Gartenberg

News editor

Air fryer

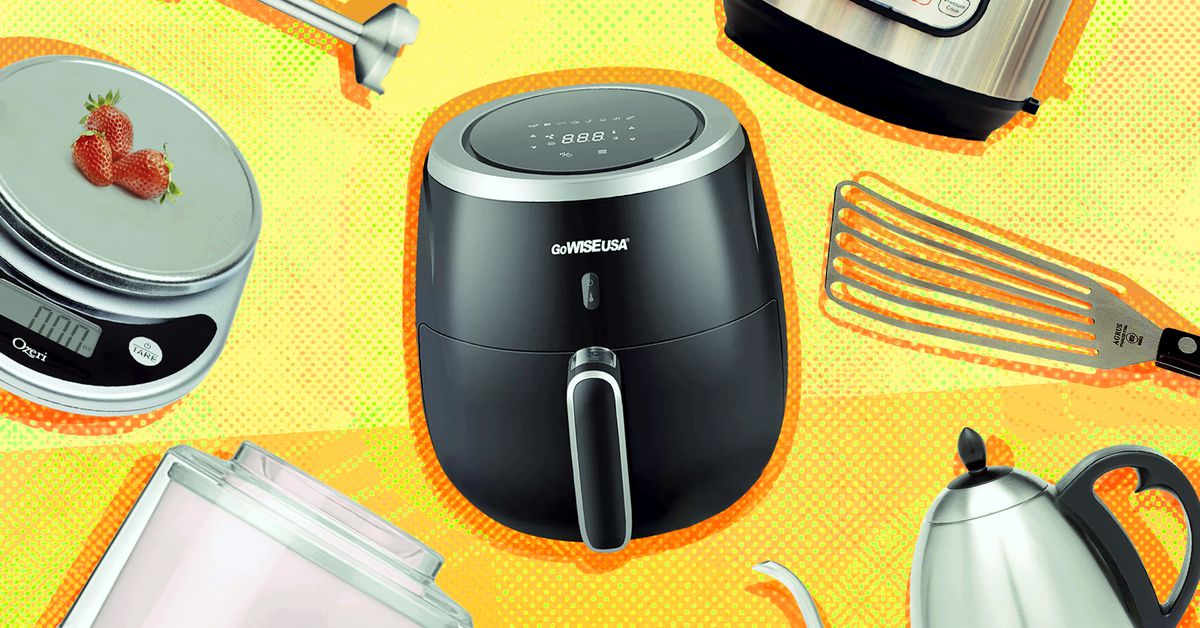
GoWise air fryer.
Image: GoWise

We just received a GoWise Air Fryer as a quarantine gift, and we couldn’t be happier with it! It replaces our microwave 90 percent of the time for reheating, and food comes out tasting crisp and delicious. It’s also great at cooking. We’ve made stuffed mushrooms, fried chicken, steak sandwiches — you name it, this thing makes it.

Grayson Blackmon

Senior motion designer


Electric kettle

Bonavita electric kettle.
Photo: Bonavita

In the UK, where I’m from, it’s pretty unusual for a kitchen to come without an electric kettle, and honestly, I’ve got no idea how anyone manages without them. Obviously, the main thing my kettle gets used for is brewing cups of tea, but it’s just as happy boiling water for coffee if you’re brewing it in a device like an AeroPress. When the water’s boiled the power automatically cuts off, which certainly feels a lot safer than the risk of leaving a burner on. Unfortunately, the US’s lower voltage means that electric kettles aren’t quite as fast as a burner if you’re boiling water to cook with, but I think they’re still a pretty useful kitchen addition.

Jon Porter

Reporter

It’s so fast, and I never have to worry about stuff catching fire.

Russell Brandom

Policy editor

Also +1ing an electric kettle. I love my Bonavita kettle.

Dan Seifert

Deputy editor


Food mixers & processors

KitchenAid mixer.
Photo: KitchenAid

KitchenAid stand mixers are great for mixing cake mix or whisking, but the thing I most regularly use mine for is kneading dough using its dough hook accessory. I’m sure there are purists out there who’ll claim that a machine can never match the process of kneading by hand, but for me, it’s worth it just so I can get dough ready for baking without having to cover an entire work surface with flour. I will accept that using a stand mixer means I’ll never end up with Paul Hollywood’s forearms of steel, but that’s my burden to bear.

Jon Porter

I can’t stop buying KitchenAid attachments! Specifically, the sifter, scale, and the pasta roller.

Sarah Smithers

Editorial coordinator

There are so many great things you can do with the Cuisinart food processor: pesto, perfectly mandolined veggie slices for lasagna, babka dough, savory crackers, dicing onions without weeping. My mom met a Cuisinart employee who swore by the 11-cup as their least-repaired model.

Helen Havlak

Vice president


Instant Pot

Instant Pot cooker.
Photo: Instant Pot

I’ve never been a great cook so, in an attempt to get me to eat more home-cooked food, my mom gifted me an Instant Pot. This was years ago, and I’ve never looked back. I am the queen of soups, but it’s such a handy tool to cut down cooking time and effort on almost any dish. For the most part, you just toss in all the ingredients, set the timer, and go about your business.

Kaitlin Hatton

Social media manager

About 90 percent of our quarantine meals have been made in an Instant Pot. There’s just no time to do anything anymore, and we can make large amounts of healthy food, with little attention, and have leftovers. I liked it before, but now I’m ready to build a shrine to it.

Christopher Grant

SVP, Polygon and The Verge

+1 to everything above. Also, the Instant Pot makes delicious rice — just make sure to wash the rice a few times before you put it in!

Jay Peters

News writer


Coffee makers

Baratza coffee grinder.
Photo: Baratza

I really like my overpriced Baratza Virtuoso coffee grinder. It’s expensive but has served me well for nearly five years now. It works very well for everything from fine-grind espresso to coarse French press. Almost every part is replaceable, as well, meaning I can keep it going for many more years to come. (Apparently, the exact model I have has been replaced by this newer one with a digital timer.)

Dan Seifert

I’m a big believer in the AeroPress. It’s especially good for camping.

Andrew Hawkins

Senior reporter


Cast iron pot

Lodge Cast Iron Double Dutch Oven.
Photo: Lodge

Cast iron pots are one of my key kitchen tools. First off, they’re essential for getting a great crust on a homemade loaf of bread (especially sourdough). But they’ve got myriad uses beyond that: soups, stews, roasting, deep-frying, and more. Plus, they’re relatively cheap, and if you take care of them, they can last a lifetime.

I’m a big fan of Lodge’s Double Dutch Oven since the lid doubles as a second cast iron pan, making it twice as useful.

Chaim Gartenberg


Fish spatula

Agrus fish spatula.
Photo: Agrus

Full disclosure: I have never used my fish spatula for fish. But its thin, flexible edge makes it perfect for getting under the edges of fried eggs, seared meat, and grilled cheeses.

Nicole Wetsman

We actually do use our fish spatula for fish, among other things, and it works beautifully, especially when trying to flip over delicate filets. If you’re picking up an especially large piece, two are better. And if you’ve got one of the Lodge cast iron pans (see above), you can use it to scrape off the burned bits.

Barbara Krasnoff

Reviews editor


Cutting board

Bamboo cutting board
Photo: Royal Craft Wood

I hate when pieces of chopped veggies roll off the edge of a cutting board, so I insist on using one big enough to fill up most of the counter. It can fit an onion and garlic with room to spare, so I don’t feel cramped while I’m focusing on my (mediocre) knife skills.

Nicole Wetsman


Sous Vide

A sous vide heats your food with the help of a mobile app.
Photo: ChefSteps

I only use it once every few months, but I love my Joule sous vide. It takes a bit of setup, but once everything is in the water bath, my job is basically over for a few hours. It cooks everything to the perfect temperature every time, meaning no more over- or undercooking. I get the perfect amount of pink with my steak, my veggies don’t get mushy, my chicken breasts stay moist, and I don’t have to stick everything with a food thermometer 15 times to make sure I don’t accidentally give my family food poisoning.

Sarah Smithers

A sous vide is great. I use mine all the time — I can proof bread in it, make garlic confit, lots of good meat / fish options.

Chaim Gartenberg


Ice cream machine

Cuisinart Frozen Yogurt, Ice Cream, and Sorbet Maker.
Photo: Cuisinart

Is it big? Yes. Is it extremely limited in what it can do? Also yes. Can I make ice cream and sorbet whenever I want? Yes.

Chaim Gartenberg


Pancake batter mixer

Whiskware Pancake Batter Mixer
Photo: Whiskware

Who doesn’t like pancakes? There’s something simply beautiful about a short stack of pancakes. But I felt I was using way too many dishes whenever I made pancakes. So I bought this pancake batter mixer.

It looks like a huge baby bottle, but it’s one of the best things I purchased for under $20. You place all the ingredients to make the batter in the bottle and shake it like a protein shake. Once the batter forms, you can squirt the batter out and adjust how big or how little you want your pancakes. The nozzle is great because it’s wide enough for things like chocolate chips to squeeze out the bottle as well.

Taylor Lyles

Writer


Garlic rocker

Garlic rocker / mincer / crusher
Photo: Joseph Joseph

We use a lot of garlic in my household, and traditional garlic presses never did it for us — they usually produced a messy, slushy paste. A friend of ours introduced us to the garlic rocker, which is not only fun to play with but produces beautifully minced pieces of garlic, perfect for sautéing and other uses.

Barbara Krasnoff


Digital scale

Ozeri Pronto digital scale.
Photo: Ozeri

A must for bread baking, especially if you’ve gotten your hands on some sourdough starter (or made your own). Anything that measures in grams and ounces will work — just get whatever’s cheapest.

Chaim Gartenberg


Update February 5th, 2021, 10:30AM ET: This article was originally published on June 6th, 2020; prices have been updated and a pancake batter mixer has been added.

our-14-favorite-gadgets-and-hacks-for-working-at-home

Our 14 favorite gadgets and hacks for working at home

If you buy something from a Verge link, Vox Media may earn a commission. See our ethics statement.

It’s been nearly a year since many of us started working from home due to the pandemic, and if you haven’t yet adjusted your workspace to accommodate your needs, then it’s probably time to get to it. Whether you’ve set yourself up in the guest bedroom, on your living room couch, or in a walk-in closet, you may need a little extra to make it possible to type comfortably, meet online, or just concentrate. Sometimes it means buying a new desk, lamp, or monitor; sometimes it just means finding a household item that will make life a little easier.

We asked the staff of The Verge what they’ve been using to make their work-at-home situations more practical, more pleasant, or simply more possible. Here are some of the answers we got.

Tech products

Apple AirPods Pro

Photo by Chris Welch / The Verge

I basically live in my AirPods Pro during the day. They let me listen to music, catch Slack pings, and take calls, all with the added benefit of some noise cancellation to help drown out outside noise. Their range is also great for my apartment — I can be anywhere in the house without losing connection to my computer, which is really nice if I need to step away from my desk to, say, microwave my second cookie of the afternoon. —Jay Peters


Apple AirPods Pro


Phone as webcam

Turning my phone into a fully functional webcam was surprisingly easy and cost-effective. I already had a Nexus 6P sitting around, and with these steps that work on most Android and iOS devices, I now have a phone-meets-webcam. It’s got video quality that’s roughly on par with a standalone webcam that would probably cost $200 right now. What makes it even better is that my iOttie car mount connects perfectly to my glass desk, so I don’t have to awkwardly arrange the phone to get a good angle on my face. —Cameron Faulkner

Satechi Aluminum Multi-Port Adapter V2

Photo by Amelia Holowaty Krales / The Verge

While I’m working off a MacBook, this Satechi hub has been a lifesaver for plugging in podcasting mics and any other gear I’m suddenly using on my own. —Adi Robertson


Satechi Aluminum Multi-Port Adapter V2


Rechargeable batteries

I go through tons of batteries with my flash when photographing at home and I find that these rechargeable batteries last so much longer than regular single-use batteries. Not only do they save me trips to the store and keep more batteries out of the landfills, but they also save me money in the end. —Amelia Holowaty Krales


Panasonic AA NiMH 2,550mAh rechargeable batteries


CalDigit TS3 Plus Thunderbolt 3 dock

Photo: CalDigit

This Thunderbolt 3 dock lets me switch my whole desk setup (keyboard, mouse, speakers, Ethernet, display, external storage drives, and microphone) from one computer to another by just moving one cable. I plug all of my peripherals into the dock, and then just use the one Thunderbolt cable to hook up my Mac or whatever Windows machine I need to test at the moment. It also has a very useful high-speed SD card slot on the front, which is great for whenever I need to dump images from my camera onto my computer. —Dan Seifert


CalDigit TS3 Plus Thunderbolt 3 dock


Google Nest Wifi Router

Photo by Vjeran Pavic / The Verge

Last year, I installed a Google Nest Wifi router with a mesh point. I’ve had a lot of networking equipment over the years, and this was immediately the best. And it was extremely easy to set up. —TC Sottek


Google Nest Wifi router


Ultrawide monitor

Photo: LG

An ultrawide monitor is the best purchase I ever made for working from home. It’s so big I have to physically lean from side to side to see it all. I can have three full-size windows up at the same time or countless windows overlapping. (Right now, I have nine different windows open and it doesn’t feel cramped at all.) Mine is an old LG 34UM94-P that they don’t make anymore — it looks like there is an updated version, the LG 34BL850-W. However, any monitor that is at least 34 inches in size with 1440p or better resolution is what I recommend. —Dan Seifert


LG 34BL850-W 34-inch QHD monitor


Home office helpers

Fully Jarvis Bamboo Standing Desk

Photo: Jarvis

We heard from three staffers about this desk:

The Jarvis from Fully was recommended to me by my colleague Christian Mazza, and it’s been far and away my best work-from-home purchase in years. It’s rather pricey by desk standards, but cheap by standing desk standards.

Assembly was far less cumbersome than I thought it would be. Just having the option to sit or stand, when you’re cooped up in your room or home office all day, makes a big difference. Plus it looks great and has some nice customization options for color and desk material. —Nick Statt

I love my Jarvis desk for all of the same reasons Nick does. If you’re considering one, I highly recommend spending the extra $20 for the extended-range height, which lets the desk get lower for sitting and higher for standing, and the extra $35 for the programmable height switcher, which lets you preset heights that you can switch back and forth to just by pressing a button.

I also sprung for the $29 casters so that I could wheel the desk around my apartment, which lets my wife and I use it as a mobile entertainment system. When we’re done working for the day, we can roll the desk over to our comfy chairs and watch Netflix or play Animal Crossing on the desk’s monitor. —Jay Peters

I have the Jarvis, too, just in a larger size. It has served me well for about four years now. It’s a comfortable, stable, spacious desk that has more versatility than typical desk options. —Dan Seifert


LapGear Designer Lap Desk

Photo courtesy LapGear

I should work at a desk more, but I spend a lot of time working from a couch. It’s bad for me, but also very comfortable. Using a lap desk like this one helps me at least pretend to be a little more conscientious about my posture; plus, it’s helpful for writing on physical paper (or when my laptop gets too hot). —Chaim Gartenberg


LapGear Designer Lap Desk


Huanuo monitor mount stand

Photo: Huanuo

This monitor mount brings my screen up to a nice height so that I don’t hunch over, and it’s the tallest one I’ve found. Other monitor arms I tried just weren’t tall enough for me when I was standing while working — and I’m not that tall at five feet, 11 inches. The mount also lets me adjust my monitor to exactly the right height for movies or Animal Crossing when I’m using my desk as a mobile entertainment center. —Jay Peters


Huanuo monitor mount stand


Nespresso Inissia Espresso Machine

Photo: De’Longhi

I’m hopelessly addicted to iced lattes and I finally invested in this espresso machine with my stimulus check. It makes waking up in the morning a little more exciting when I don’t have to French press my coffee. And it came with a milk frother! —Makena Kelly


Ello Devon Glass Tumbler

Photo: Ello Products

I never drink enough water. I just seem to forget to and I get headaches from dehydration, but something about this bottle helps remind me. Maybe it’s the design? I love it! —Amelia Holowaty Krales


Ello Devon Glass Tumbler


Herman Miller Sayl Chair

The Herman Miller Sayl is a common chair — Vox Media’s NYC office has hundreds of them. I bought one without arms, though, because it works a little better for my posture. I’m tall, and it’s hard to find chairs that don’t encourage me to slouch. Also, I like the red. —Sam Byford


Herman Miller Sayl Chair


Notebook and pen

While all of my work and most of my writing happen on my computer, sometimes it’s easier (especially for sudden phone calls or when I don’t want to switch out of a video) to simply turn to the notebook I keep next to my laptop and jot down a note or two. And I’ve found that using a classy pen is not only good for my morale, but makes it a lot less likely that I’ll find myself out of ink (or with a hand cramp) when I need to get something important written quickly. Currently, I’m using a True Writer ballpoint pen from Levenger that I got as a birthday present, but any pen that makes you feel good will do. —Barbara Krasnoff

Update February 4th, 2021, 2:37PM ET: This article was originally published on April 28th, 2020, and has been updated to include changes in prices and circumstances.

kef-unveils-mu3-true-wireless-headphones-with-active-noise-cancelling

KEF unveils Mu3 true wireless headphones with active noise cancelling

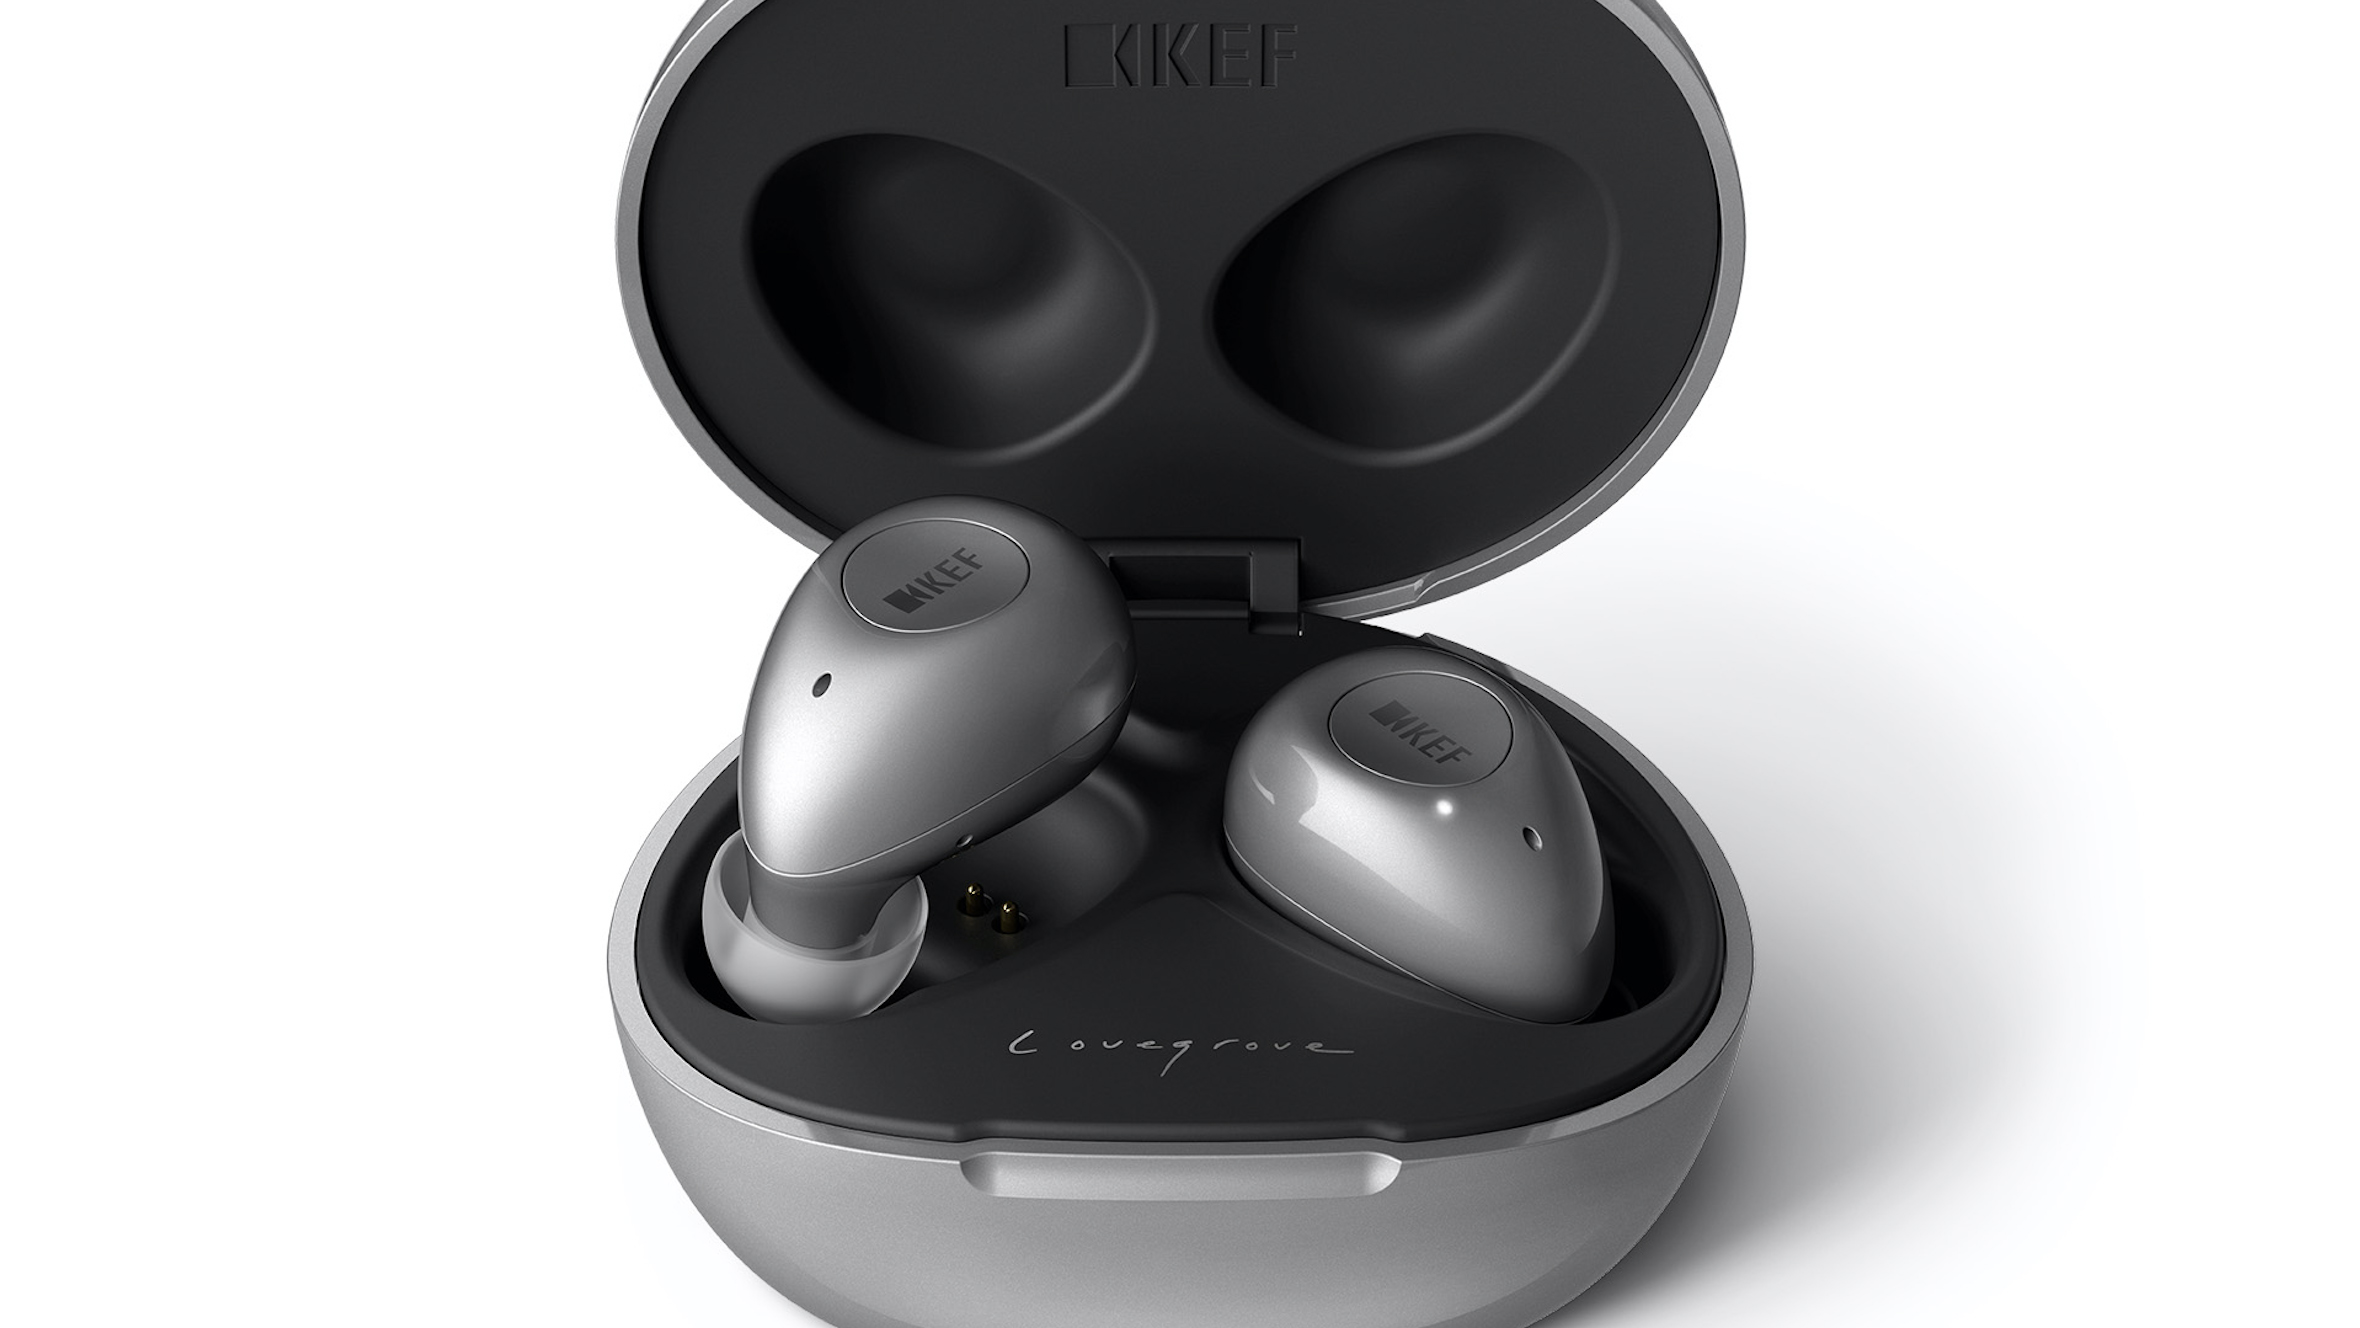
(Image credit: KEF)

UK Audio specialist, KEF, has just introduced the Mu3: the company’s first set of true wireless headphones that also boast noise cancelling. They’re designed by Ross Lovegrove – of KEF’s high-end Muon speakers and bijou Bluetooth Muo fame – and engineered by the firm’s Maidstone acoustic team.

2021 sees KEF celebrating its 60th anniversary too, so why not mark it with some new high-spec wireless headphones to rival Apple’s AirPods Pro? The audio performance benefits from KEF’s specially tuned active noise cancellation technology, promising to eliminate external noise without altering the details that bring your music to life.

Each of the Mu3s’ sculptural enclosures contain an 8.2mm full-range dynamic driver and the ergonomic design also promises a comfortable and secure audio experience. The Mu3s are apparently balanced in the ears by smart weighting, which KEF assures us stops them from falling out. They also come with a choice of four subtly different sized ear tips to give the most tailored fit for your ears – ie. the perfect seal for noise isolation and security.

The Mu3 also boasts Bluetooth 5.0 connectivity further enhanced by the introduction of simultaneous transmission, where both earphones receive a signal at the same time (rather than the more common approach where audio is sent to one earpiece and relayed to the other, therefore running the risk of latency) for improved true wireless audio on both Android and iOS devices. 

(Image credit: KEF)

KEF promises a simple setup, automatic pairing and an ambient mode too, where at the touch of a button active noise cancellation is disengaged and instead, the audio picked up on the microphones is filtered in, providing the wearer with instant awareness of their surroundings. The IPX5 splash-proof rating actually beats the AirPods Pro’s IPX4 rating for water ingress and the high-capacity, quick-charge batteries boast a full day’s listening (a claimed nine hours of playtime with a further 15 hours in the charging case) even with noise cancellation engaged.

They’ll be available by the end of February, priced at £199 ($230, AU$300) – slap bang in AirPods Pro and Sony WF-1000XM3 territory. Are they set to become the best AirPods alternatives on the block? There’s tough competition at that level, but we’re very interested to find out…

MORE:

Read all our KEF reviews

See our pick of the best wireless noise-cancelling headphones 2021

Touch of insomnia? Peruse the best headphones for sleeping 2021: wired wireless and noise-cancelling