Asus is going big with its latest gaming phones. The ROG Phone 5 lineup will start shipping this month across the globe, costing 799 euros (around $950) for the base configuration with 8GB of RAM and 256GB of fast UFS 3.1 storage. Every configuration has a 6.78-inch FHD+ OLED screen with a 144Hz refresh rate and a 300Hz touch sampling rate. Also, the headphone jack has made a comeback after being absent from the ROG Phone 3, this time with a quad DAC in tow for hi-res audio. (In case you’re wondering where the ROG Phone 4 went, Asus skipped over the number four, like OnePlus did, due to its similarities with the word “death” in some Asian languages.)
The most notable changes from the last generation are exclusive to some even more expensive configurations, the ROG Phone 5 Pro and Ultimate (which I published a review of) that release in April for 1,199 euros (approximately $1,420) and in May for 1,299 euros (about $1,583), respectively. Both of these models have double the storage and more RAM (starting at 16GB in the Pro and going all the way up to 18GB in the Ultimate); come in limited edition colors; and have two additional ultrasonic touch sensors than the standard model, located near where your ring fingers might rest while holding the phone in landscape mode. You’ll also get a case and a clip-on AeroActive Cooler 5 fan attachment with purchase with either the Pro or Ultimate phone (which adds two more buttons attached to the fan.)
The new Asus gaming phones aren’t huge departures from their predecessors, though the hardware and software are more refined. I reviewed the ROG Phone 5 Ultimate, and while it delivers on its promises to be a spec and feature juggernaut in some clever ways, paying $1,580 for it seems steep. Even the $950 base configuration isn’t what I’d consider affordable.
The Ultimate and Pro include “ROG Vision,” a feature that pushes premade or custom text or graphics to its rear-facing OLED screen. It’s a spin on Asus’ “Anime Matrix” effect used in the Zephyrus G14 gaming laptop, allowing you to personalize your phone if you want. The standard ROG Phone 5 simply has a backlit ROG logo, which some might find to be just enough pizazz.
I go into all of the features in the review. But if you’re just passing by and want to know all about the specs, I’ve attached a handy table just for you.
Asus ROG Phone 5 lineup specs
Comparison
ROG Phone 5 Ultimate
ROG Phone 5 Pro
ROG Phone 5
Comparison
ROG Phone 5 Ultimate
ROG Phone 5 Pro
ROG Phone 5
Colors
Matte white
Glossy black
Phantom black or Storm white
Price
1,299 Euros (approx. $1,583)
1,199 Euros (approx. $1,420)
Starts at 799 Euros (approx. $950)
Processor
Snapdragon 888
*
*
OS
Android 11 with ROG UI
*
*
Display
6.78-inch 2448 x 1080 OLED with 144Hz refresh rate
*
*
RAM
18GB LPDDR5
16GB LPDDR5
8GB,12GB or 16GB LPDDR5
Storage
512GB UFS 3.1
*
256GB UFS 3.1
Extra touch sensors
Yes
*
No
Rear-facing cameras
64-megapixel with F/1.8 aperture, 13-megapixel 125-degree ultra-wide with F/2.4 aperture, and a 5-megapixel macro lens with F/2.0
*
*
Front-facing camera
24-megapixel with F/2.45 aperture
*
*
ROG Vision support
Yes, monochromatic
Yes, color
No
Battery
6,000mAh
*
*
Included charger
65W
*
*
Dimensions
172.8 x 77.2 x 10.29 mm
*
*
Weight
238 grams
*
*
Connectivity
LTE and sub-6GHz 5G on AT&T and T-Mobile, Wi-Fi 6E, Bluetooth 5.2
Kingston Digital is the flash memory business unit of Kingston Technology Company, Inc., and has been the source for several retail products we have covered in the past, including internal NVME SSDs and encrypted USB drives. What we do not necessarily recognize is that a lot of flash memory sales are in the form of eMMC and memory cards, with the latter having become invaluable for content creators, as well as portable storage to carry around or use in mobile devices. Today, we take a look at a brand-new device from Kingston Digital that aims to streamline the workflow of content creators, and it is quite aptly named. Thanks again to the company for sending a review sample to TechPowerUp!
The Kingston Workflow Station is a hub that is part of a new family of products from the company. It includes a base station with four receptacles that can be occupied by different reader hubs, including USB (Type-A and Type-C), full-size SD cards, and microSD cards. The station comes with the USB reader hub—the others are optional extras. Kingston sent along the whole package, so we will take a look at everything, but begin with the specifications for these products in the tables below.
Specifications
Kingston Workflow Station Dock and USB miniHub
Interface:
Dock: USB 3.2 Gen 2; USB miniHub: USB 3.2 Gen 1
Connector:
USB Type-C for both
Supported USB Inputs:
USB miniHub: USB Type-A, USB Type-C
Dimensions:
Dock: 160.27×70.27×55.77 mm; USB miniHub: 62.87 x 16.87 x 50 mm
Weight:
Dock: 292 g; USB miniHub: 30 g
Operating Temperature:
0–60 °C
Storage Temperature :
-25–85 °C
Compatible OS:
Windows 10, 8.1, 8, Mac OS (v.10.10.x +)
Warranty:
Two years with free technical support
Kingston Workflow SD Reader
Interface:
USB 3.2 Gen 1
Connector:
USB Type-C
Supported Cards:
Supports UHS-II SD cards, backwards compatible with UHS-I SD cards
Dimensions:
62.87 x 16.87 x 50 mm
Weight:
31 g
Operating Temperature:
0–60 °C
Storage Temperature :
-25–85 °C
Compatible OS:
Windows 10, 8.1, 8, Mac OS (v.10.10.x +)
Warranty:
Two years with free technical support
Kingston Workflow microSD Reader
Interface:
USB 3.2 Gen 1
Connector:
USB Type-C
Supported Cards:
Supports UHS-II microSD cards, backwards compatible with UHS-I microSD cards
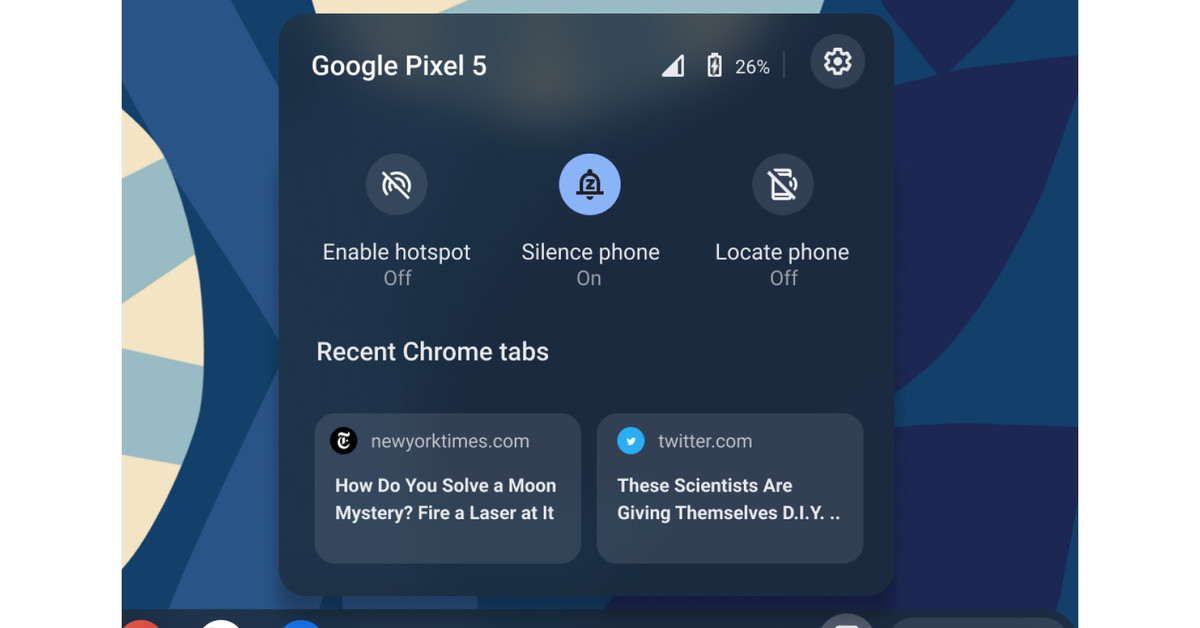
Google is marking 10 years of Chromebooks by unveiling new features for Chrome OS today. The biggest addition is a new Phone Hub feature that connects an Android phone to a Chromebook. It allows Chrome OS users to respond to texts, check a phone’s battery life, enable its Wi-Fi hotspot, and locate a device easily.
Phone Hub is packed into a taskbar widget that even expands to show you recent Chrome tabs that you have been browsing on your phone. It looks like it will be a super useful feature for Android and Chromebook owners. Google is also enabling its Wi-Fi Sync feature on more devices, allowing you to connect to Wi-Fi networks you’ve already configured and used on your Android phone and other Chrome OS devices.
Chrome OS gets an AirDrop competitor.Image: Google
Another significant addition to Chrome OS is Nearby Share between Chromebooks and other Android and Chrome OS devices. Much like AirDrop, Nearby Share will let people send and receive files between devices. Google says this will arrive in Chrome OS in the coming months, finally providing its laptop OS with a full AirDrop competitor.
Elsewhere, Google is also adding in a new Screen Capture tool into the Quick Settings menu in Chrome OS. Like the name implies, this will let you record your screen or take screenshots and access them quickly in a “Tote” space from the Chrome OS Shelf.
The Clipboard is also being improved in Chrome OS, allowing you to save five recent items to paste elsewhere without switching windows. The Launcher Key will provide access to this updated clipboard experience. Quick Answers is another new addition, which lets you right-click a word in Chrome OS to get a definition, translation, or unit conversion. It’s very similar to what exists in macOS today.
Google is even improving the virtual desktops feature of Chrome OS — Desks. When you reboot a Chromebook, it will now restore all windows to their correct virtual desktops, and you can also right-click at the top of an open window to send apps to a different virtual desktops.
Chrome OS’s clipboard feature is getting a history feature.Image: Google
Most of these new Chrome OS additions are clearly playing catch-up to what already exists on Windows and macOS, but they’re welcome additions for those relying on Chrome OS every day. Google first launched a range of Chromebooks back in 2011 in a partnership with Samsung and Acer. There are now Chromebooks from every major PC maker, and Google is promising that 50 new Chromebooks will launch during 2021.
Following the TicWatch Pro 3, Mobvoi has announced the TicWatch Pro S, a smartwatch that carries over some of the hallmark TicWatch features like a “Dual Display” that layers an always-on LCD over an AMOLED screen for longer battery life, and some custom health apps, for a slightly more affordable $259.99 price. But the older internals of the device might not make it so appetizing.
The TicWatch Pro S costs $40 less than the Pro 3, but that price comes with pretty big tradeoffs. First and foremost, an old processor. As we highlighted in our review, the more expensive TicWatch Pro 3 has a new Snapdragon 4100 that brings more processing power and battery efficiency to address some long-standing Wear OS issues. But the TicWatch Pro S makes do with an old Snapdragon 2100 instead, a processor that’s been kicking around Wear OS devices since at least 2016.
The TicWatch Pro S is thicker than the Pro 3 and only 2mm narrower.Image: Mobvoi
And while the TicWatch Pro S is actually very slightly thicker than the Pro 3 (12.6mm vs 12.2mm) and only slightly narrower (45mm wide vs 47mm), it’s also saddled with a smaller battery. In comparison to the Pro 3’s 577mAh battery, the Pro S only has 415mAh to spare. In another circumstance it might be a negligible difference, but when battery life was an area in need of improvement for most Wear OS watches, it shouldn’t be ignored.
The TicWatch Pro 3 is large for most wrists and not much larger than the TicWatch Pro S.Photo by Dieter Bohn / The Verge
The slight change in size also doesn’t seem like it would make a big difference for anyone who would find the TicWatch Pro 3 too big.
The TicWatch Pro S’s always-on display option is neat and might provide more battery life than your average Wear OS device, but if the insides of a Wear OS watch from five years prior are powering it, it might be worth it to pause and reconsider how much that extra $40 is worth to you.
The TicWatch Pro S is available today in the US, UK, and Europe for $259.99 from Mobvoi’s site and Amazon.
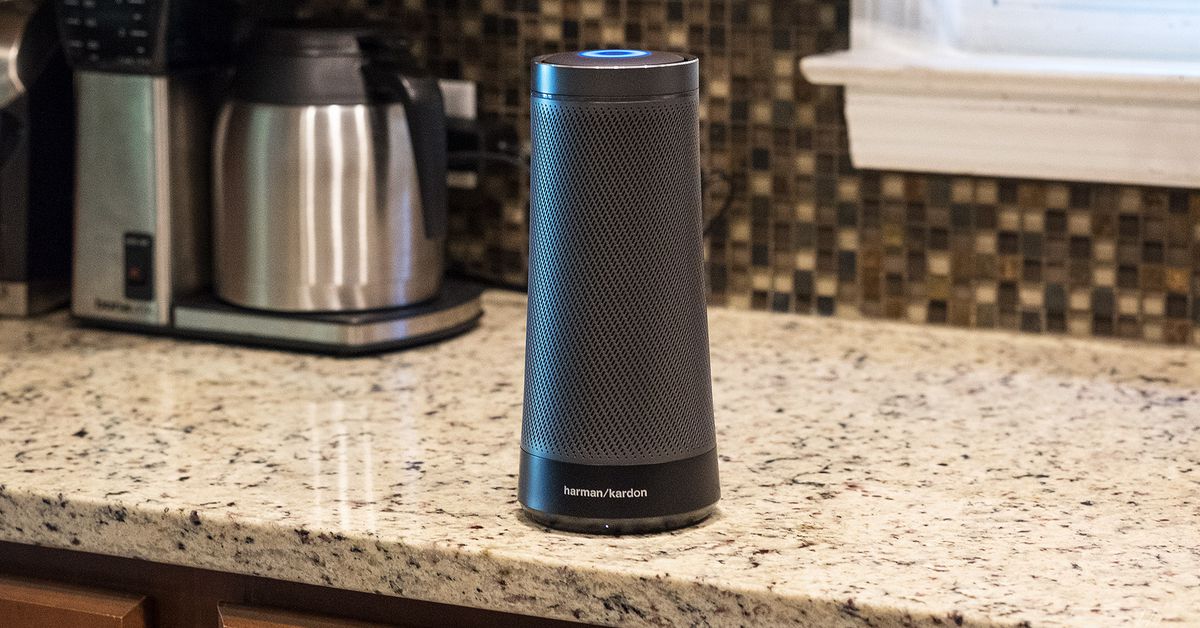
Microsoft once envisioned a future full of Cortana-powered fridges, toasters, and thermostats, but it never worked out. Harman Kardon’s Invoke speaker was the first and only Cortana-powered speaker to hit the market, but it’s now receiving an update on Wednesday to disable Microsoft’s digital assistant.
Harman Kardon will push an update to the Invoke speaker tomorrow (spotted by Thurrott) to remove Cortana, after Microsoft announced its plans last year to shut down its digital assistant across multiple devices. “Please note that the Cortana service on the Harman Kardon Invoke will end in the coming months regardless of whether you receive the update,” says Harman Kardon. Cortana is also disappearing on iOS and Android, and even Microsoft’s own Surface Headphones.
Cortana on the Harman Kardon Invoke speaker.Photo by Dan Seifert / The Verge
Microsoft originally had bigger plans for Cortana back in 2016. The software maker outlined a vision for bringing its digital assistant to fridges, toasters, and other Internet of Things (IoT) devices, but Cortana never really caught on. Even the beautiful Cortana-powered GLAS thermostat is no longer powered by Microsoft’s digital assistant.
Microsoft now sees Cortana’s value in conversational AI and the company is trying to reposition Cortana as a skill that can run anywhere instead of competing with Alexa or Google Assistant. Cortana is increasingly being used to improve Microsoft’s enterprise-focused offerings, after the company separated it from Windows 10 search and silenced the digital assistant during the OS setup process.
If you buy something from a Verge link, Vox Media may earn a commission. See our ethics statement.
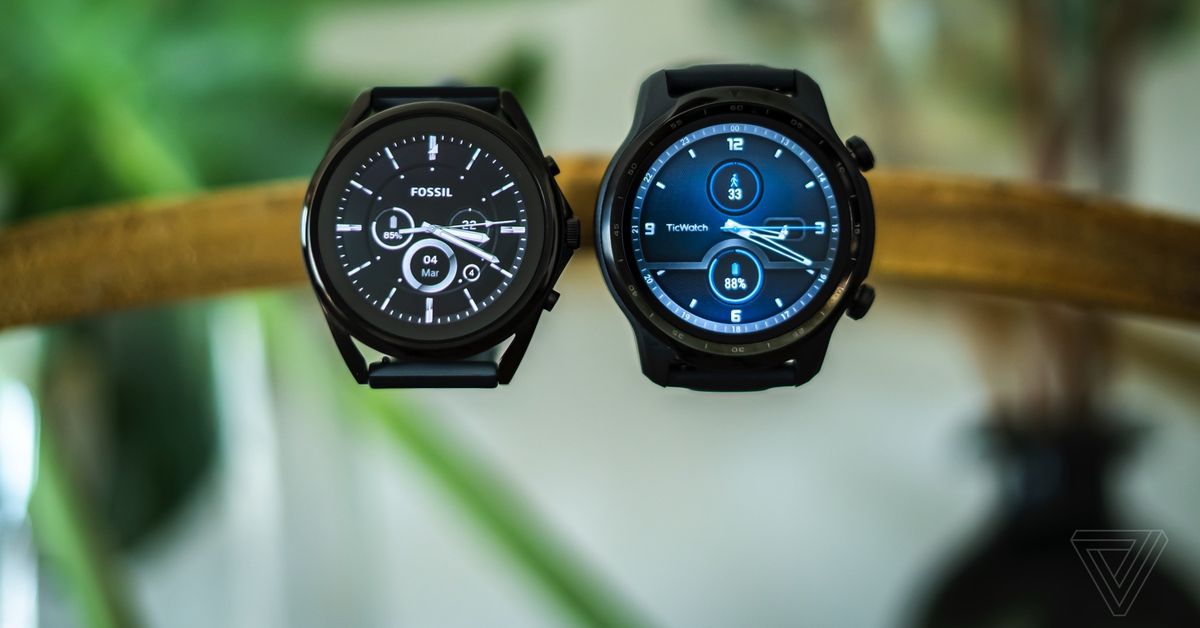
For the past month, I’ve been testing the two most powerful Wear OS watches you can buy: the TicWatch Pro 3 from Mobvoi and the Fossil Gen 5 LTE. They’re not spec-for-spec identical, but they do share a basic shape: big, chunky, round, and black. If you’re using Android and want a smartwatch, they’re at the top of a persistently tiny list of top-flight smartwatches.
Despite Wear OS’s reputation, both watches are perfectly competent and can do the basics of what many people want out of a smartwatch. Both also offer what I’d characterize as acceptable battery life: a full day most of the time, two at a stretch. The TicWatch can actually go much longer, thanks to a clever second screen layered on top of the first one.
But Wear OS does have that reputation: for years, watches that ran it have been slow, ran out of battery life quickly, and suffered from a tiny ecosystem of apps. Some of those problems have been solved, but that doesn’t mean that these watches (or, honestly, any smartwatch available to Android owners) lives up to the polish and features iPhone users can get with the Apple Watch.
The Apple Watch comparison isn’t really useful for Android users — it’s not and probably never will be an option. Instead, let’s just look at these two watches on their own terms.
The Mobvoi TicWatch 3 Pro
TicWatch Pro 3 review
At $299.99, the TicWatch Pro 3 is not an impulse buy. But the price is about right for what Mobvoi has created. It has pushed the limits of what Wear OS can do in two ways.
First, it has crammed the best technology it could get for a Wear OS device in here. One big differentiator for the TicWatch Pro 3 is that it is the only watch using Qualcomm’s latest smartwatch processor, the Snapdragon 4100. (More from Motorola and possibly OnePlus have been rumored to be coming this year.)
That processor makes the watch faster than other Wear OS devices — though it still can sometimes feel a step behind both Samsung’s Tizen-based watches and even Fitbits. It also accounts for some of the TicWatch’s battery life, which I’ve found can last two and even three days with all the bells and whistles turned on.
The second thing Mobvoi has done to push Wear OS is add a bunch of bells and whistles to make up for the platform’s missing features. The main thing it’s done is put an LCD panel on top of the regular OLED screen. This allows the TicWatch to go into a low power mode when it’s on standby and a super-low power mode when you need it to last for more than a few days on a charge.
Wear OS powers its fitness offerings with Google Fit, which has seen a few updates but is very far behind Apple’s fitness offerings. Mobvoi can’t fix that, but it has tried to fill in the gaps with its own suite of fitness apps on the watch. It even includes a blood oxygen sensor — though it’s no more accurate than the norm for smartwatches, which isn’t very good.
However, using them requires you to place a large amount of trust in Mobvoi the company — as the watch makes perfectly clear when you try to launch these apps, there’s no way to do that without sharing a bunch of information with Mobvoi. I applaud the transparency, but that still wasn’t enough to make me comfortable with it.
One thing to keep in mind with the TicWatch Pro 3: its aesthetics. It’s unapologetically a big, chunky watch. I don’t have huge wrists and it absolutely feels dominated by this thing. It is “honest” in its design, at least, in that it isn’t trying to look like a fancier watch than it is — right on down to the matte plastic lugs that hold the replaceable straps in place. I also wish it had a rotating crown for scrolling.
I ended up using the TicWatch Pro 3 like a bog standard Wear OS watch in the end, turning off its extra screen and sticking to Google Fit for fitness data. It absolutely did the job, but at $299 I think most people would be better off considering other options.
There is only one spec that the TicWatch lacks: LTE. For that, you’ll need to buy the Fossil.
The Fossil Gen 5 LTE
Fossil Gen 5 LTE review
I reviewed the original Fossil Gen 5 smartwatch in 2019, and I called it the “best of a Wear OS situation.” I think that (dubious) honor now goes to the TicWatch Pro 3, but if you need LTE, the $349 Fossil Gen 5 is one of two options you’ve got on Android (the other is Samsung’s Galaxy Watch 3 LTE).
Fortunately, the Fossil Gen 5 is essentially unchanged by the addition of LTE. If you’re willing to pay your carrier the extra monthly charges to turn it on, using the Gen 5 with LTE felt virtually the same as using it with Wi-Fi or Bluetooth.
Even battery life didn’t seem to be a problem. I did notice the watch was more likely to hit two full days with LTE turned off, but I usually didn’t manage to drain it in a single day even when using mostly LTE. Sadly, Fossil also feels as though it needs to make up for Wear OS’s shortcomings by keeping its entirely too complicated battery saver features. A watch should never require users to dig into granular radio toggles.
It does still use the older Snapdragon 3100 processor, though it didn’t feel particularly slow as a result. Aesthetically, it’s very slightly different from the regular Fossil Gen 5 Carlyle that I own and it’s not that much smaller than the TicWatch, but subtle differences make it look just a little more premium.
All in all, if you must have an LTE smartwatch and you use Android, this is your best option if you really prefer Wear OS to Tizen. If you’re agnostic, I think the Galaxy Watch 3 with LTE is probably a better choice.
Wear OS watches
As I’ve been harping on for three years now, every smartwatch for Android involves some kind of compromise.
Samsung watches need a lot more apps and require you to install a lot of extra stuff on your phone to get them working.
Fitbits are great for fitness but not so great at integrating into Android. There’s also the not-so-little matter about the company now being owned by Google’s hardware division. The future of the entire Fitbit ecosystem is sort of up in the air right now.
And honestly, the future of Wear OS is also up in the air. There’s little movement lately in app support and though Google has done a decent enough job keeping the OS from falling into utter decay, it hasn’t done much more than that. It’s overdue for an overhaul.
There are likely more Wear OS watches coming that might be worth waiting for, but the Samsung Galaxy Watch 3 remains the best option for traditional smartwatch stuff. At the end of the day, it’s difficult to recommend anybody spend three or four hundred dollars to get on board the rudderless Wear OS boat.
Both the TicWatch Pro 3 and the Fossil Gen 5 LTE are good enough smartwatches for what they are. It’s just that what they are is the best of an old platform with a questionable future.
If you’ve ever needed remote access to a PC, you’ve probably tried VPN or other apps such as TeamViewer. However, this kind of software only works within the remote computer’s OS, which means that it can’t access the BIOS, reboot, install an operating system or power on the computer. There are several solutions that allow you to remote control a PC independently of its operating system, but using a KVM over IP is one of the most convenient and affordable.
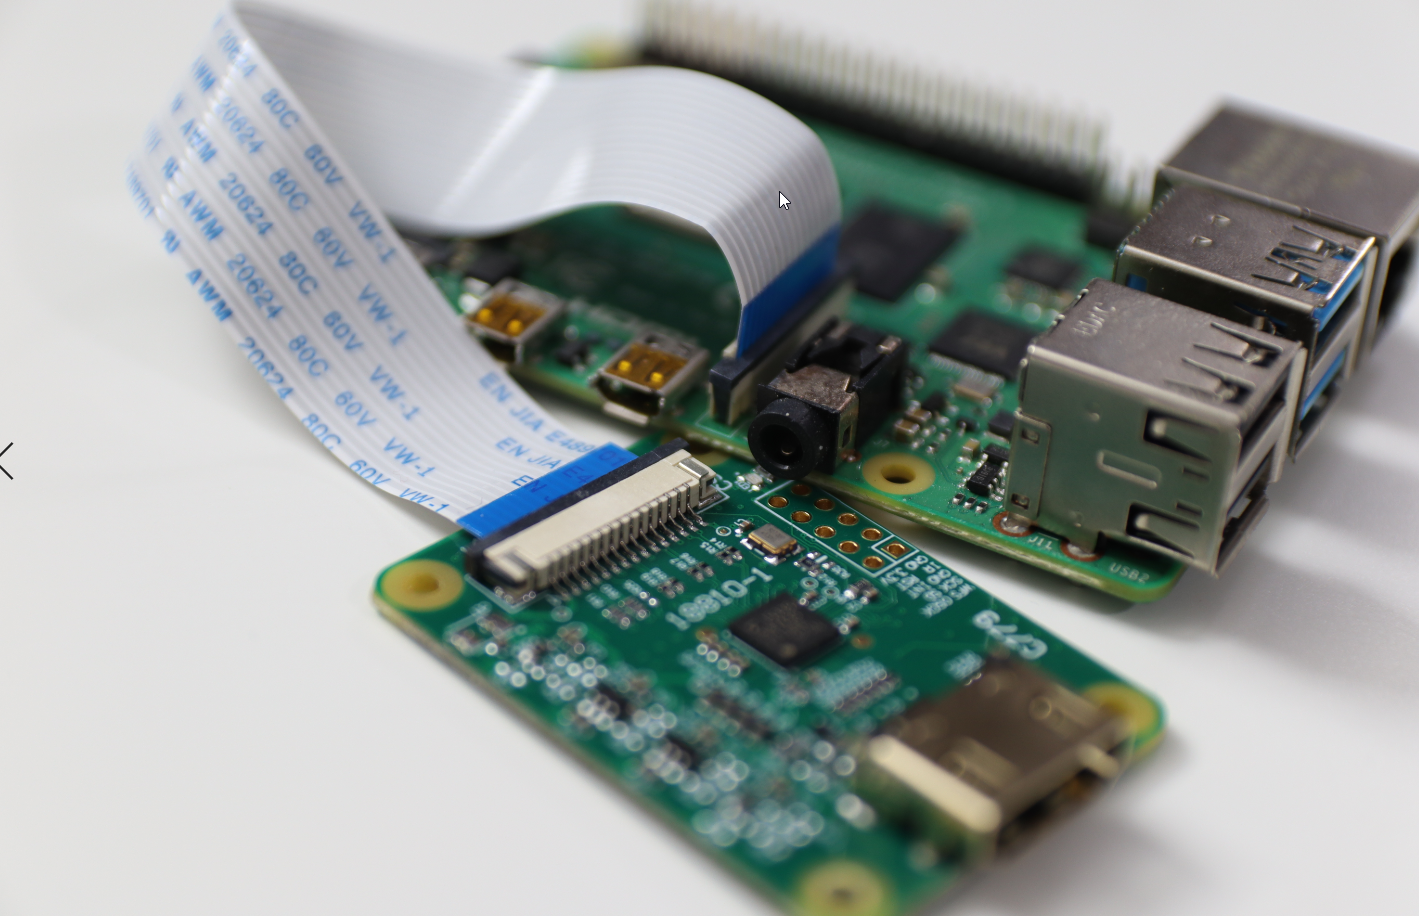
While a store-bought KVM over IP device can cost hundreds of dollars, it’s easy to use a Raspberry Pi to create your own. A developer named Maxim Devaev designed his own system called Pi-KVM, which he is planning to sell as a $130 kit. However, if you have the right parts, you can use the software he’s developed and your Pi, to put it together for far less.
Below, we’ll show you how to build your own Raspberry Pi-powered KVM over IP that can output full HD video, control GPIO ports and USB relays, configure server power using ATX functions and more. You’ll be able to control the whole setup via a web browser from another device over the internet via TailScale VPN or on your local network.
Pi-KVM prototype v3 without case (Image credit: Tom’s Hardware)
What You Need to Build a KVM Over IP with Raspberry Pi
Raspberry Pi 4 or Raspberry Pi Zero
16 GB or larger microSD Card. (See best microSD cards for Raspberry Pi)
HDMI-to-CSI bridge like this one or or USB HDMI capture dongle. (https://amzn.to/2ZO9tjo
USB female to dual male Type-A splitter like this one.
USB C to Type-A cable
5V, 3 amp power supply with USB Type-A output. You’ll be plugging a type-A cable into it so the official Raspberry Pi power supply won’t do.
Setting Up the SD Card for Raspberry Pi KVM Over IP
The software you need for the Raspberry Pi is all contained on a custom disk image that you must download and burn to a microSD card. Here’s how to do that with Raspberry Pi Imager, but you can also use other burning software such as balenaEtcher.
1. Download the Pi-KVM disk image. The first thing we will need is to download the ready made image from pikvm.org. Note that there are different versions, depending on which Pi you use and whether you use the HDMI-to-CSI bridge or an HDMI-to-USB capture dongle. The image file is in BZ2 format so you’ll need to uncompress it.
(Image credit: Tom’s Hardware)
2. Extract the IMG file from the BZ2 file you downloaded. If you have Windows, BZ2 support isn’t built-in, but you can use 7Zip to do it.
3. Launch Raspberry Pi Imager. If you don’t have it installed already, you can download it from the Raspberry Pi Foundation’s website.
4. Select “Choose OS” -> “Use Custom” and locate the Pi-KVM image.Pick your microSD card by clicking Choose SD Card. We will now “Choose SD Card”, make sure it’s the correct one you are choosing.
5. Click Write.
(Image credit: Tom’s Hardware)
Setting Up the Raspberry Pi for KVM Over IP
Now that we have finished burning the microSD Card, we can move on to installing the HDMI-to-CSI-2 bridge or USB-to-HDMI dongle and prepping the OTG USB-c cable
1. Connect the CSI ribbon cable from the HDMI-to-CSI-2 bridge to the Raspberry Pi’s CSI camera port. Make sure that the blue marking faces the black clamp. If you are using an HDMI-to-USB dongle instead, connect it to a USB port on your Pi. If you are using a Pi Zero, you will need microUSB to USB Type-A hub.
(Image credit: Tom’s Hardware)
2. Disable the 5V pin on one of the USB Type-A male connectors from your splitter. The easiest way to do this is to place a small piece of Kapton tape over the right-most pin on the connector. You could also try cutting that leads to that pin, but that’s more complicated.
This will be the connector that attaches to a USB port on the PC you wish to control. If you don’t disable that 5V pin, it will back feed the power from your wall power to the PC, possibly causing damage to its USB port.
(Image credit: Tom’s Hardware)
3. Connect the USB C-to-A cable to the Type-A female connector on the splitter. This will provide power to the Pi. Your cables should look like the picture below.
(Image credit: Tom’s Hardware)
4. Connect the USB-C cable to the Raspberry Pi 4’s USB-C port.
5. Connect the unmodified Type-A male to your power supply.
(Image credit: Tom’s Hardware)
6. Attach the USB Type-A connector and HDMI to the PC you wish to remote control.
(Image credit: Tom’s Hardware)
7. Insert the microSD card we created and power on the Raspberry Pi.
Setting Up the Pi-KVM Software
At this point we are ready to start using the Pi-KVM. On first boot it will take longer then expected due to the initial process for enlarging the microSD card so be patient and it will boot.
1. Locate your Raspberry Pi’s IP address. You can do this looking through your router’s control panel to see what devices are logged on, or by using a little method I like to do called ARP.
To find the Pi’s IP using this method, launch Windows PowerShell, run the command “arp -a” and you’ll see a list of devices on your local network. Anything that begins with b8:27:eb: or dc:a6:32: is a Raspberry Pi.
(Image credit: Tom’s Hardware)
2. Navigate to the Pi’s IP address in a browser on your client computer (the one you are using to control the other PC). You will be redirected you to your login page.
3. Log in. The default username is admin and the password is admin also.
(Image credit: Tom’s Hardware)
4. Click the KVM icon.
(Image credit: Tom’s Hardware)
You should now be presented with a screen like the one shown below, providing you with access to the remote PC and a number of other menus. . I have more options then others and you can unlock them by going to the pikvm github for more instructions.
(Image credit: Tom’s Hardware)
Keep in mind that the more storage you have on your sd card the more ISO images you can store and use for future PC setups.
(Image credit: Tom’s Hardware)
With the proper GPIO hook ups you can also enable the use of ATX controls
(Image credit: Tom’s Hardware)
To expand the functionally of the PI-KVM to allow for more display inputs, you can connect it to an HDMI 4 port switch with USB control.
Pi-KVM Prototype V3 without case and KVM 4 port switch (Image credit: Tom’s Hardware)
(Image credit: Tom’s Hardware)
Updating Pi-KVM to the Latest Version
Pi-KVM is always getting new features so it’s important to keep the software up to date. Fortunately, you don’t need to reflash the microSD card. To update:
1. Click the Terminal icon on Pi-KVM’s main menu. A CLI shell will appear.
(Image credit: Tom’s Hardware)
2. Become a super user by typing “su” and then entering “root” as the password.
3. Type “rw” to make the file system read/write.
(Image credit: Tom’s Hardware)
4. Enter “pacman -Syu” and “Y” to get updates.
(Image credit: Tom’s Hardware)
(Image credit: Tom’s Hardware)
Reminder: set the file system back to ReadOnly with “ro” in the command line when done.
Access Pi-KVM Over the Internet
You can use Tailscale to access Pi-KVM over the internet. This is a convenient and free (for private use) tool for organizing a small VPN network.
1. Create a Tailscale account choosing the Solo Plan will be free for personal use only
2. Click the Terminal icon on Pi-KVM’s main menu.
(Image credit: Tom’s Hardware)
3. Become a super user by typing “su” and then entering “root” as the password.
4. Type “rw” to make the file system read/write.
(Image credit: Tom’s Hardware)
5. Type “pacman -S tailscale-pikvm” to install tailscale VPN service on PI-KVM.
(Image credit: Tom’s Hardware)
6. Type “reboot” to perform a soft reboot on the Pi-KVM
7. After the reboot has been performed we will need to gain access to the terminal again so follow steps 1-4
8. Type “systemctl enable –now tailscaled” to enable to service
9. Type “tailscale up” to start the initiation process
(Image credit: Tom’s Hardware)
10. Follow the Link to authorize this installation
(Image credit: Tom’s Hardware)
11. Once connected successfully you will see “Success” appear on the terminal.
(Image credit: Tom’s Hardware)
12. Navigate to this URLhttps://login.tailscale.com/admin/machines to view the IP address assigned by tailscale VPN.
On the Client Side
This will show you how to install tailscale on the workstation side. Tailscale supports most operating systems including windows, mac, and linux.
1. Download tailscale for your OS from https://tailscale.com/download
2. Navigate to this URLhttps://login.tailscale.com/admin/machines to view the IP address assigned by tailscale VPN.
(Image credit: Tom’s Hardware)
3. Navigating to the IP address given by tailscale on your browser. It will connect you to your PI-KVM
(Image credit: Tom’s Hardware)
This is a very affordable way to build a very modern, very fast KVM over IP without the high cost. This software is also provided to you for free. There are more features that I have not covered in this tutorial such as VPN, Sharing network from your PI to PC, VNC and many more and if you wish to learn about it, visit the Pi-KVM github page or join the Discord.
The Samsung Galaxy A52 5G has not been officially announced yet – that is expected to happen later this month – but a retailer in Saudi Arabia has put the phone on sale already, listing the full specs and everything.
The A52 5G has a 6.5” Super AMOLED display with 1,080 x 2,400 px resolution. We’re not seeing a refresh rate listed but it should be 120Hz (the rumors were right about everything else). The fingerprint reader is built into the display and the whole thing is guarded by Gorilla Glass (we’re not 100% clear on the version).
The Snapdragon 750G is the brains of the operation, as expected. It is hooked up to 8 GB of RAM and 128 GB storage and there’s a microSD slot for up to 1 TB more (the dual card slot has a hybrid design). Only one memory configuration is listed, but that’s something that varies by region.
Samsung Galaxy A52 5G (in Black)
Anyway, the Galaxy A52 5G has a 64MP main camera that can record 4K videos. Next up is a 12MP camera (presumably ultrawide) and two 5MP modules (macro and depth is our bet). The selfie camera has a 32MP sensor.
The phone’s 4,500 mAh battery is charged over USB-C at 25W. There’s no 3.5 mm headphone jack by the looks of it, but the phone does have NFC.
Note that the OS version is listed as Android 10, but we believe this to be a mistake – the phone ran Android 11 when it went through Geekbench.
The retailer is charging SAR 1,650 for the Galaxy A52 5G, which works out to $440/€365. This matches the rumored prices. There should be a 4G model as well, but that one isn’t showing up yet.
(Pocket-lint) – Think ‘Montblanc’ and in your mind’s eye you could be picturing any number of things: wallets, pens, jewellery, watches, bags, belts, or even notebooks. The one thing that they all have in common (apart from often being made from black leather) is that they’re luxury items and aren’t cheap. A Meisterstück gold-coated Classique ballpoint pen could set you back hundreds.
So when Montblanc launches a Wear OS smartwatch it’s best to go in with the expectation that it won’t be cheap. But actually, if you compare this second-gen watch – here the Summit Lite – to other Montblanc watches, it’s relatively cost efficient. That means there’s still definitely some appeal here for anyone wanting a luxury smartwatch but who doesn’t wish to spend more than a grand.
Design
Colours: Grey or black
43mm aluminium case
Straps: Fabric or rubber
Anti-scratch crystal glass
Water resistant to 50m (5ATM)
Rotating crown and 3 push buttons
Montblanc’s first smartwatch, the Summit, was pretty but underwhelming. From a design perspective there was a missed opportunity – it had a stylish looking crown, but it didn’t rotate and it was the only button on the side; and we found the whole device too big.
Pocket-lint
The company improved things considerably with the Summit 2, which launched in 2019, and now there’s the new Summit Lite model – hence that slightly more affordable price point.
The Summit Lite has three buttons on its side. Each of them feels sumptuous when pressed, giving a lovely ‘click’ and feeling just like a proper watch with proper buttons should. But the best thing about these buttons is that the middle one has a proper rotating crown.
Rotating it is smooth and effortless without it feeling too loose. Doing so enables you interact with elements on the screen. For instance, you can use it to scroll up and down lists or messages, or – when on the watch face – bring up notifications or the quick settings tiles.
Our only complaint about the rotating crown – as pretty and shiny as it is – is the surface is just a little too smooth and shiny. That means you need a little firm pressure to make sure you finger gets enough traction to turn it. A slightly toothier edge would have made this a little easier.
Pocket-lint
What’s great about traditional fashion and design companies getting involved in the smartwatch market is that they deliver decent case designs. For its full-fat Summit watches, Montblanc uses stainless steel for the case material. With the Lite model it’s aluminium.
The 43mm case isn’t too big and sits comfortably on the wrist. The contrast between the glossy bezel and buttons with their softer anodised finish on the case is eye-catching. It has that glint of dress watch that looks great just subtly poking out from under your blazer or cardigan sleeve.
There are some subtle angles on the lugs that make the edges softer in appearance, while they curve downwards towards the strap to create a skinny side-on profile. It’s nice and lightweight too thanks to that shift from steel to aluminium.
It’s not just about being pretty though. The casing feels like it’s well put together, while the screen is capped off with crystal glass to help avoid scratches from when you inevitably brush it against all manner of hard surfaces in your daily activity.
Pocket-lint
Our unit shipped with a thick black rubber strap which had something of a ‘sticky’ feel when we first put it on, but that sensation has since tamed. Other fabric strap options are available too. However, the case will fit any 22mm strap and the quick-release catches mean it’s super simple to swap for one you really want.
Turn the Summit Lite upside down and you’ll see its well-considered underside. Right in the centre is the optical heart-rate sensor – built within a subtle protrusion that’s surrounded by a metal ring – and accompanied by a four-pin connector for the charging base.
It looks and feels more purposeful than a lot of other Wear OS undersides and, happily, it snaps onto its magnetic charging cradle with ease. It holds the watch in position well and – thanks to having a rounded cutout for the rotating crown – only fits the watch one way, so there’s no chance you’ll ever find yourself placing the watch in the wrong way.
If there’s any criticism it’s that the cradle itself is relatively lightweight plastic and so – because of the strong connection – if you try and remove the watch one-handed you’ll more than likely take the cradle with you. You need to hold both in order to separate them.
Pocket-lint
On the plus side, the underside is coated in an almost-sticky rubber-like material that helps it not to slide around all over the place.
Display and software
1.2-inch circular AMOLED display
390 x 390 resolution
Wear OS software
For the most part, the software situation with the Montblanc Summit Lite is the same as pretty much every other Google Wear OS watch. The main interfaces and preinstalled apps are the same, but it comes with Montblanc’s own watch faces.
Pocket-lint
Press the middle button and it launches your apps list, and the top and bottom buttons can be customised to launch any number of functions or apps. By default, however, they launch two elements of Montblanc’s own activity tracker screens. And this is where the Summit Lite is slightly different to some of the other Wear OS devices.
The activity app can be used to manually track any workout, but will also track your movement, heart-rate and stress levels throughout the day, and your sleep quality at night. Combining that information it can also measure how well rested you are and give you an Energy Level reading. It’s similar in theory to Garmin’s Body Battery feature.
Go running and it’ll work out your VO2 Max (that’s blood oxygen saturation) and judge your fitness level. It’ll even give you the time frame you need to rest for in order to recover for you next workout session. Interestingly, there’s also a Cardio Coach function which tells you what you should aim for in terms of heart rate intensity and duration for your next activity.
There are some pretty glaring holes in this workout software though. Firstly, there’s no mobile companion app. That means all that useful data and detail just stays on the watch. Secondly, if you go on a run or bike ride, there’s no map to look at afterwards to see if it tracked your route properly.
The solution to these issues is to use third-party apps – like Strava for running/cycling – or just use the Google Fit app that’s built-in as standard to all Wear OS watches.
Pocket-lint
For those who want those features it makes more sense to completely bypass Montblanc’s offering. It’s a shame really, because otherwise that data and information on the watch could be really useful. It’d just be nice to get access to it from a phone.
Otherwise accuracy seems on point. Comparing the Summit Lite’s data to that captured on the Garmin Vivoactive 4 reveals that the average heart-rate was within one or two beats-per-minute away from matching. There was a slight difference in distance measured and, as a result, pace – but not enough that it made any serious difference to the tracked activity. It was about 10-20 metres out on a 25 minute 4km run, which is a pretty standard discrepancy between watches.
All of this software and detail is shown on a fully round AMOLED panel. It’s a 1.2-inch screen, and boasts 390 pixels both vertically and horizontally, making pretty much on par with the latest hardware from the likes of Fossil.
Hardware and battery performance
Snapdragon Wear 3100 platform
1GB RAM + 8GB storage
Tech aficionados will complain that a watch in 2021 doesn’t feature the newest Snapdragon Wear 4100 processor. Nonetheless, there’s not a huge amount wrong with the way the Montblanc Summit Lite performs.
The Wear 3100 processor here ensures that the interface and animations are mostly smooth and responsive. There are elements that still feel a little laggy and slow, however, which is usually when extra data is required – like when browsing the Google Play Store on the wrist to download apps. There’s a little bit of a wait launching most apps, too. You’ll maybe need to wait three seconds for Google’s Keep Notes to launch, for example.
Pocket-lint
As far as connectivity and modern tech goes, the Summit Lite has pretty much everything you’d want from a smartwatch. There’s NFC (near field communication) to enable Google Pay for contactless payments. There’s Wi-Fi for direct downloading apps on to the watch. And there’s GPS for location tracking.
Best Apple Watch apps 2021: 43 apps to download that actually do something
By Britta O’Boyle
·
Battery life is pretty standard for a Wear OS watch too: you’ll get roughly two days between charges. We managed to get through two work days even with the always-on display switched on – because the watch faces run a lower brightness and lower refresh rate than the main watch face.
Verdict
The Montblanc Summit Lite’s side buttons have been purposefully redesigned with a proper rotating crown for enhanced interaction, paired with a great all-round display, plus all the features you’d expect from a Wear OS watch.
Despite being a ‘Lite’ model it’s still expensive, though, so you’re very much still paying for the Montblanc brand name. Furthermore Montblanc’s otherwise useful activity tracking doesn’t have a companion phone app to download and view your data in much detail. So it’s more decoration than designed for those super serious about tracking fitness.
Overall, things have improved dramatically since the first Montblanc Summit watch. The Summit Lite is really well designed, with its subtle, stylish and almost minimalist look, while also featuring practical material choices and the durability you’d expect from any modern smartwatch.
Also consider
Pocket-lint
Tag Heuer Connected 2020
squirrel_widget_231495
Compare the prices and the Montblanc starts to look like good value for money. The Tag is about double the price, but it’s still the luxury smartwatch champ that has a lot going for it.
Read our review
Pocket-lint
Fossil Gen 5 Garrett HR
squirrel_widget_307331
On the complete opposite end of the scale, but with a similar approach to style, Fossil’s Garrett is one of the nicest looking and more affordable options from the popular fashion brand.
(Pocket-lint) – Think ‘Montblanc’ and in your mind’s eye you could be picturing any number of things: wallets, pens, jewellery, watches, bags, belts, or even notebooks. The one thing that they all have in common (apart from often being made from black leather) is that they’re luxury items and aren’t cheap. A Meisterstück gold-coated Classique ballpoint pen could set you back hundreds.
So when Montblanc launches a Wear OS smartwatch it’s best to go in with the expectation that it won’t be cheap. But actually, if you compare this second-gen watch – here the Summit Lite – to other Montblanc watches, it’s relatively cost efficient. That means there’s still definitely some appeal here for anyone wanting a luxury smartwatch but who doesn’t wish to spend more than a grand.
Design
Colours: Grey or black
43mm aluminium case
Straps: Fabric or rubber
Anti-scratch crystal glass
Water resistant to 50m (5ATM)
Rotating crown and 3 push buttons
Montblanc’s first smartwatch, the Summit, was pretty but underwhelming. From a design perspective there was a missed opportunity – it had a stylish looking crown, but it didn’t rotate and it was the only button on the side; and we found the whole device too big.
Pocket-lint
The company improved things considerably with the Summit 2, which launched in 2019, and now there’s the new Summit Lite model – hence that slightly more affordable price point.
The Summit Lite has three buttons on its side. Each of them feels sumptuous when pressed, giving a lovely ‘click’ and feeling just like a proper watch with proper buttons should. But the best thing about these buttons is that the middle one has a proper rotating crown.
Rotating it is smooth and effortless without it feeling too loose. Doing so enables you interact with elements on the screen. For instance, you can use it to scroll up and down lists or messages, or – when on the watch face – bring up notifications or the quick settings tiles.
Our only complaint about the rotating crown – as pretty and shiny as it is – is the surface is just a little too smooth and shiny. That means you need a little firm pressure to make sure you finger gets enough traction to turn it. A slightly toothier edge would have made this a little easier.
Pocket-lint
What’s great about traditional fashion and design companies getting involved in the smartwatch market is that they deliver decent case designs. For its full-fat Summit watches, Montblanc uses stainless steel for the case material. With the Lite model it’s aluminium.
The 43mm case isn’t too big and sits comfortably on the wrist. The contrast between the glossy bezel and buttons with their softer anodised finish on the case is eye-catching. It has that glint of dress watch that looks great just subtly poking out from under your blazer or cardigan sleeve.
There are some subtle angles on the lugs that make the edges softer in appearance, while they curve downwards towards the strap to create a skinny side-on profile. It’s nice and lightweight too thanks to that shift from steel to aluminium.
It’s not just about being pretty though. The casing feels like it’s well put together, while the screen is capped off with crystal glass to help avoid scratches from when you inevitably brush it against all manner of hard surfaces in your daily activity.
Pocket-lint
Our unit shipped with a thick black rubber strap which had something of a ‘sticky’ feel when we first put it on, but that sensation has since tamed. Other fabric strap options are available too. However, the case will fit any 22mm strap and the quick-release catches mean it’s super simple to swap for one you really want.
Turn the Summit Lite upside down and you’ll see its well-considered underside. Right in the centre is the optical heart-rate sensor – built within a subtle protrusion that’s surrounded by a metal ring – and accompanied by a four-pin connector for the charging base.
It looks and feels more purposeful than a lot of other Wear OS undersides and, happily, it snaps onto its magnetic charging cradle with ease. It holds the watch in position well and – thanks to having a rounded cutout for the rotating crown – only fits the watch one way, so there’s no chance you’ll ever find yourself placing the watch in the wrong way.
If there’s any criticism it’s that the cradle itself is relatively lightweight plastic and so – because of the strong connection – if you try and remove the watch one-handed you’ll more than likely take the cradle with you. You need to hold both in order to separate them.
Pocket-lint
On the plus side, the underside is coated in an almost-sticky rubber-like material that helps it not to slide around all over the place.
Display and software
1.2-inch circular AMOLED display
390 x 390 resolution
Wear OS software
For the most part, the software situation with the Montblanc Summit Lite is the same as pretty much every other Google Wear OS watch. The main interfaces and preinstalled apps are the same, but it comes with Montblanc’s own watch faces.
Pocket-lint
Press the middle button and it launches your apps list, and the top and bottom buttons can be customised to launch any number of functions or apps. By default, however, they launch two elements of Montblanc’s own activity tracker screens. And this is where the Summit Lite is slightly different to some of the other Wear OS devices.
The activity app can be used to manually track any workout, but will also track your movement, heart-rate and stress levels throughout the day, and your sleep quality at night. Combining that information it can also measure how well rested you are and give you an Energy Level reading. It’s similar in theory to Garmin’s Body Battery feature.
Go running and it’ll work out your VO2 Max (that’s blood oxygen saturation) and judge your fitness level. It’ll even give you the time frame you need to rest for in order to recover for you next workout session. Interestingly, there’s also a Cardio Coach function which tells you what you should aim for in terms of heart rate intensity and duration for your next activity.
There are some pretty glaring holes in this workout software though. Firstly, there’s no mobile companion app. That means all that useful data and detail just stays on the watch. Secondly, if you go on a run or bike ride, there’s no map to look at afterwards to see if it tracked your route properly.
The solution to these issues is to use third-party apps – like Strava for running/cycling – or just use the Google Fit app that’s built-in as standard to all Wear OS watches.
Pocket-lint
For those who want those features it makes more sense to completely bypass Montblanc’s offering. It’s a shame really, because otherwise that data and information on the watch could be really useful. It’d just be nice to get access to it from a phone.
Otherwise accuracy seems on point. Comparing the Summit Lite’s data to that captured on the Garmin Vivoactive 4 reveals that the average heart-rate was within one or two beats-per-minute away from matching. There was a slight difference in distance measured and, as a result, pace – but not enough that it made any serious difference to the tracked activity. It was about 10-20 metres out on a 25 minute 4km run, which is a pretty standard discrepancy between watches.
All of this software and detail is shown on a fully round AMOLED panel. It’s a 1.2-inch screen, and boasts 390 pixels both vertically and horizontally, making pretty much on par with the latest hardware from the likes of Fossil.
Hardware and battery performance
Snapdragon Wear 3100 platform
1GB RAM + 8GB storage
Tech aficionados will complain that a watch in 2021 doesn’t feature the newest Snapdragon Wear 4100 processor. Nonetheless, there’s not a huge amount wrong with the way the Montblanc Summit Lite performs.
The Wear 3100 processor here ensures that the interface and animations are mostly smooth and responsive. There are elements that still feel a little laggy and slow, however, which is usually when extra data is required – like when browsing the Google Play Store on the wrist to download apps. There’s a little bit of a wait launching most apps, too. You’ll maybe need to wait three seconds for Google’s Keep Notes to launch, for example.
Pocket-lint
As far as connectivity and modern tech goes, the Summit Lite has pretty much everything you’d want from a smartwatch. There’s NFC (near field communication) to enable Google Pay for contactless payments. There’s Wi-Fi for direct downloading apps on to the watch. And there’s GPS for location tracking.
Apple watchOS 7: All the key new Apple Watch features explored
By Maggie Tillman
·
Battery life is pretty standard for a Wear OS watch too: you’ll get roughly two days between charges. We managed to get through two work days even with the always-on display switched on – because the watch faces run a lower brightness and lower refresh rate than the main watch face.
Verdict
The Montblanc Summit Lite’s side buttons have been purposefully redesigned with a proper rotating crown for enhanced interaction, paired with a great all-round display, plus all the features you’d expect from a Wear OS watch.
Despite being a ‘Lite’ model it’s still expensive, though, so you’re very much still paying for the Montblanc brand name. Furthermore Montblanc’s otherwise useful activity tracking doesn’t have a companion phone app to download and view your data in much detail. So it’s more decoration than designed for those super serious about tracking fitness.
Overall, things have improved dramatically since the first Montblanc Summit watch. The Summit Lite is really well designed, with its subtle, stylish and almost minimalist look, while also featuring practical material choices and the durability you’d expect from any modern smartwatch.
Also consider
Pocket-lint
Tag Heuer Connected 2020
squirrel_widget_231495
Compare the prices and the Montblanc starts to look like good value for money. The Tag is about double the price, but it’s still the luxury smartwatch champ that has a lot going for it.
Read our review
Pocket-lint
Fossil Gen 5 Garrett HR
squirrel_widget_307331
On the complete opposite end of the scale, but with a similar approach to style, Fossil’s Garrett is one of the nicest looking and more affordable options from the popular fashion brand.
Google says it will speed up how it releases Chrome updates. Starting with Chrome 94 in Q3, 2021, Google will release milestones of its browser every four weeks, instead of every six weeks. This is the first time Google has sped up its Chrome release schedule for more than a decade.
“As we have improved our testing and release processes for Chrome, and deployed bi-weekly security updates to improve our patch gap, it became clear that we could shorten our release cycle and deliver new features more quickly,” explains Alex Mineer, a technical program manager at Chrome.
While consumers will see a new version of Chrome every month, IT administrators will be able to opt for a new Extended Stable option that includes milestone releases every eight weeks. Extended Stable will be available for enterprise administrators and Chromium embedders that need the extra time to manage updates in their environments. Important security updates will still arrive every two weeks in this version, but Extended Stable should hopefully avoid the situation where silent Chrome experiments end up angering IT admins.
Google says it’s also planning “multiple stable release options” for Chrome OS, and will share details with Chrome OS admins in the coming months.
It’s not yet clear how Chromium contributors like Brave and Microsoft will handle their own releases of Chromium browsers in response to Google’s changes. We’ve reached out to both Brave and Microsoft to comment on Google’s new Chrome release schedule, and we’ll update you accordingly.
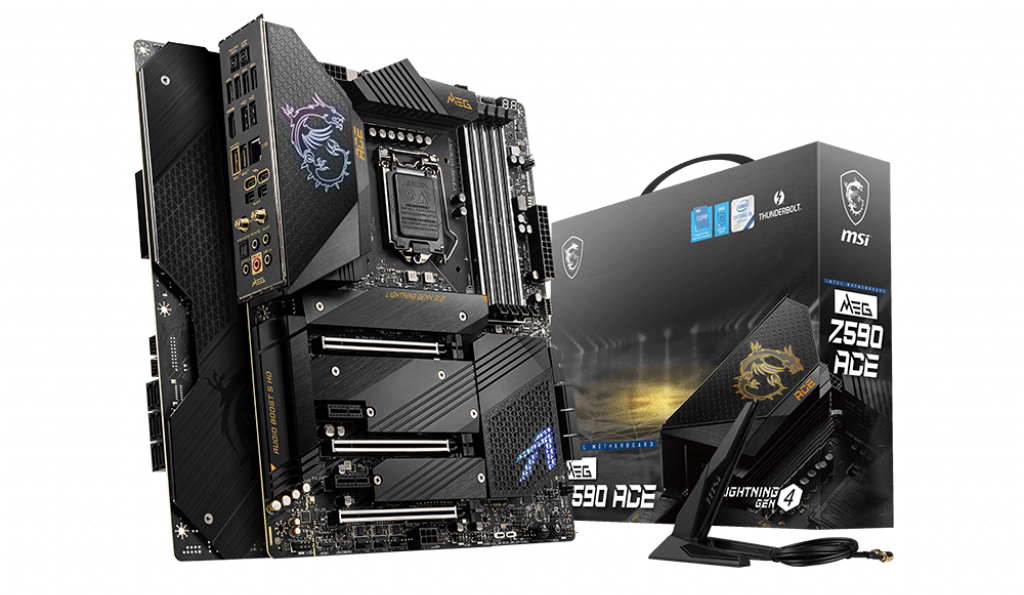
While we still don’t have an Intel Rocket Lake-S Core i9-11900K CPU to use for testing, Intel Z590 boards have been rolling in. So while we await benchmark results, we’ll be walking in detail through the features of these brand-new boards. First up on our bench was the ASRock Z590 Steel Legend 6E Wi-Fi, followed by the Gigabyte Z590 Aorus Master and Gigabyte’s Z590 Vision G. Today, we take a close look at the MSI MEG Z590 Ace. We’ll have to wait for benchmark results, though, to see if it deserves a spot on our best motherboards list.
The latest version of the Ace board features robust power delivery, four M.2 sockets, a premium audio codec and more. The new Ace also has updated styling on the heatsink and shrouds while still keeping the black with gold highlights theme from the previous generation. Emblazoned on the rear IO is the MSI Dragon (with RGB LEDs) and the Ace name (no lighting). We don’t have an exact price for the MEG Z590 Ace. However, the Z490’s MSRP was $399, so we expect the Z590 version to cost the same or slightly more.
MSI’s current Z590 product stack consists of 11 models, with most falling into the MEG (high-end) MPG (mid-range) and MAG (budget) lineups. We’re greeted by several familiar SKUs and a couple of new ones. Starting at the top is the flagship MEG Z590 Godlike, the Ace we’re looking at now, and a Mini ITX MEG Z590I Unify. The mid-range MPG line consists of four boards (Carbon EK X, Gaming Edge WiFi, Gaming Carbon WiFi and Gaming Force), while the less expensive MAG lineup consists of two boards (Z590 Tomahawk WiFi, and Torpedo). Wrapping up the current product stack are two ‘Pro’ boards in the Z590 Pro WiFi and Z590-A Pro. The only thing missing out of the gate is a Micro ATX board, but it’s likely we see one or two down the line.
We can’t talk about Rocket Lake-S performance yet — not that we have a CPU at this time to test boards with anyway. All we’ve seen at this point are rumors and a claim from Intel of a significant increase to IPC. But the core count was lowered from 10 cores/20 threads in Comet Lake (i9-10900K) to 8 cores/16 threads in the yet-to-be-released i9-11900K. To that end, we’ll stick with specifications and features, adding a full review that includes benchmarking, overclocking and power consumption shortly.
MSI’s MEG Z590 Ace includes all the bits you expect from a premium motherboard. The board has a stylish appearance, very capable power delivery (16-phase 90A Vcore) and the flagship Realtek ALC4082 audio codec with included DAC. We’ll cover these features and much more in detail below. First, here are the full specs from MSI.
(1) Intel Wi-Fi 6E AX210 (MU-MIMO, 2.4/5/6GHz, BT 5.2)
USB Controllers
??
HD Audio Codec
Realtek ALC4082
DDL/DTS Connect
✗ / DTS:X Ultra
Warranty
3 Years
The accessories included with the board are reasonably comprehensive, including most of what you need to get started. Below is a full list.
Manual
Quick Installation Guide
USB drive (Drivers)
Cleaning brush
Screwdrivers
Stickers (MEG/Cable)
(4) SATA cables
(4) Screws/standoff sets for M.2 sockets
Thermistor cable
1 to 2 RGB LED Y cable, Corsair RGB LED cable, Rainbow RGB LED cable
DP to mini DP cable
Image 1 of 3
(Image credit: MSI)
Image 2 of 3
(Image credit: MSI)
Image 3 of 3
(Image credit: MSI)
Looking at the Z590 Ace for the first time, we see the black PCB along with black heatsinks and shrouds covering most of the board. MSI stenciled on identifying language such as the MEG Ace name and the MSI Gaming Dragon in gold, setting this SKU apart from the rest. The VRM heatsinks are both made from a solid block of aluminum with lines cut out. Additionally, the shroud is made of metal and connected to the heat pipes, increasing surface area significantly. Also worth noting is the VRM heatsinks share the load connected via heatpipe. RGB LED lighting is minimal here, with a symbol on the chipset shining through a mesh cover on the chipset heatsink and the MSI dragon above the rear IO. While tastefully done, some may want more. With its mostly black appearance, the board won’t have trouble fitting in most build themes.
(Image credit: MSI)
Focusing on the top half of the board, we’ll get a better look at what’s going with the VRM heatsinks and other board features in this area. In the upper-left corner, we spot two 8-pin EPS connectors, one of which is required for operation. Just below this is the shroud covering the rear IO bits and part of the VRM heatsink. On it is a carbon-fiber pattern along with the MSI Gaming Dragon illuminated by RGB LEDs. The socket area is relatively clean, with only a few caps visible.
Just above the VRM heatsink is the first of eight fan headers. All fan headers on the board are the 4-pin type and support PWM- and DC-controlled fans and pumps. The CPU_FAN1 header supports up to 2A/24W and auto-detects the attached device type. The PUMP_FAN1 supports up to 3A/36W. The rest of the system fan headers support up to 1A/12W. This configuration offers plenty of support for most cooling systems. That said, I would like to have seen all pump headers auto-detect PWM/DC modes instead of only CPU_FAN1.
To the right of the socket are four reinforced DRAM slots. The Z590 Ace supports up to 128GB of RAM with speeds listed up to DDR4 5600 (for one stick with one rank). The highest supported speed with two DIMMs is DDR4 4400+, which is plenty fast enough for an overwhelming majority of users.
MOving down the right edge of the board, we see the 2-character debug LED up top, a system fan header, five voltage read points (Vcore/DRAM/SA/IO/IO2), 4-LED debug, 24-pin ATX connector, and finally, a USB 3.2 Gen2 Type-C front panel header. Between both debug tools and the voltage read points, you’ll have an accurate idea of what’s going on with your PC.
(Image credit: Tom’s Hardware)
With the MEG Z590 Ace towards the top of the product stack, you’d expect well-built power delivery and you wouldn’t be wrong. MSI lists the board as 16+2+1 (Vcore/GT/SA) and it uses a Renesas ISL69269 (X+Y+Z = 8+2+1) PWM controller that feeds power to eight-phase doublers (Renesas ISL617A), then onto 16 90A Renesas ISL99390B MOSFETs for the Vcore. This configuration yields 1440A of power for the CPU, which is plenty for ambient and sub-ambient/extreme overclocking. It won’t be this board holding you back in any overclocking adventures, that’s for sure.
(Image credit: MSI)
As we focus on the bottom half, we’ll take a closer look at the integrated audio, PCIe slot configuration and storage. Starting with the audio bits on the left side, under the shroud, is the Realtek latest premium codec, the ALC4082. Additionally, the Z590 Ace includes an ESS Sabre 9018Q2C combo DAC, a dedicated headphone amplifier (up to 600 Ohm) and high-quality Chemicon audio capacitors. This audio solution should be more than adequate for most users.
In the middle of the board are four M.2 sockets and five PCIe slots. With the PCIe connectivity, all three full-length slots are reinforced to prevent shearing and EMI, while the two PCIe x1 slots don’t have any reinforcement. The top slot supports PCIe 4.0 x16 speeds, with the second and third slots PCIe 3.0. The slots break down as follows, x16/x0/x4 x8/x8/x4 or x8/x4+x4/x4. This configuration supports 2-Way Nvidia SLI and 2-Way AMD Crossfire technologies. All x1 slots and the full-length bottom slot are fed from the chipset, while the top two full-length slots source their lanes from the CPU.
M.2 storage on the Z590 Ace consists of four onboard sockets supporting various speeds and module lengths. The top slot, M2_1, supports PCIe 4.0 x4 modules up to 110mm. Worth noting on this socket is that it only works with an 11th Gen Intel CPU installed. M2_2, M2_3, M2_4 are fed from the chipset, with M2_2 and M2_3 supporting SATA- and PCIe-based modules up to 80mm, while M2_4 supports PCIe only. M2_2/3/4 are all PCIe 3.0 x4.
The way this is wired, you will lose some SATA ports and PCIe bandwidth depending on the configuration. For example, SATA2 is unavailable when using a SATA-based SSD in the M2_2 socket. SATA 5/6 are unavailable when using the M2_3 socket with any type of device. Finally, the bandwidth on M2_4 switches from x4 to x2 when PCI_E5 (bottom x1 slot) is used. The M.2 sockets support RAID 0/1 for those who would like additional speed or redundancy.
Finally, along the right edge of the board are six horizontally oriented SATA ports. The Z590 Ace supports RAID 0, 1 and 10 on the SATA ports. Just be aware you lose a couple of ports on this board if you’re using some of the M.2 sockets. Above these ports is a USB 3.2 Gen1 front panel header along with another 4-pin system fan header.
Across the board’s bottom edge are several headers, including more USB ports, fan headers, and more. Below is the full list, from left to right:
Front Panel Audio
aRGB and RGB headers
(3) System Fan headers
Supplemental PCIe power
Tuning controller connector
Temperature sensor
(2) USB 2.0 headers
LED switch
BIOS selector switch
OC Retry jumper
TPM header
Power and Reset buttons
Slow mode jumpers
Front panel connectors
(Image credit: MSI)
Moving to the rear IO area, we see the integrated IO plate sporting a black background with gold writing matching the board theme. There are eight USB Type-A ports (two USB 3.2 Gen2, four USB 3.2 Gen1 and two USB 2.0 ports). On the Type-C front, the Z590 Ace includes two Thunderbolt 4 ports capable of speeds up to 40 Gbps. Just to the right of those are Mini-DisplayPort inputs for running video through the Thunderbolt connection(s). Handling the video output for the CPU’s integrated graphics is a single HDMI (2.0b) port. We also spy here the Wi-Fi antenna connections, 5-plug plus SPDIF audio stack, Intel 2.5 GbE and finally, a Clear CMOS button and BIOS Flashback button that can be used without a CPU.
Software
For Z590, MSI has changed up its software offerings. We used to have several individual programs to adjust the system, but MSI moved to an all-in-one application called MSI Center with thisboard. The new Software is a central repository for many of the utilities (12) MSI offers. These include Mystic Light (RGB control), AI Cooling (adjust fan speeds), LAN Manager (control the NIC), Speed Up (for storage), Gaming Mode (auto-tune games), among several others (see the screenshots below for details). The User Scenario application has a couple of presets for system performance and is where you manually adjust settings, including CPU clock speeds and voltage, RAM timings, and more. Overall, I like the move to a single application. The user interface is easy to read and get around in. However, sometimes loading these applications takes longer than I would like to see. But MSI Center does an excellent job of pulling everything in.
Image 1 of 10
(Image credit: Tom’s Hardware)
Image 2 of 10
(Image credit: Tom’s Hardware)
Image 3 of 10
(Image credit: Tom’s Hardware)
Image 4 of 10
(Image credit: Tom’s Hardware)
Image 5 of 10
(Image credit: Tom’s Hardware)
Image 6 of 10
(Image credit: Tom’s Hardware)
Image 7 of 10
(Image credit: Tom’s Hardware)
Image 8 of 10
(Image credit: Tom’s Hardware)
Image 9 of 10
(Image credit: Tom’s Hardware)
Image 10 of 10
(Image credit: Tom’s Hardware)
Firmware
To give you a taste of the Firmware, we’ve gathered screenshots showing most BIOS screens. MSI’s BIOS is unique from the other board partners in that the headings aren’t at the top but split out to the sides. In each section, all the frequently used options are easy to find and not buried deep within menus. Overall, MSI didn’t change much here when moving from Z490 to Z590 and their BIOS continues to be easy to use.
Image 1 of 23
(Image credit: Tom’s Hardware)
Image 2 of 23
(Image credit: Tom’s Hardware)
Image 3 of 23
(Image credit: Tom’s Hardware)
Image 4 of 23
(Image credit: Tom’s Hardware)
Image 5 of 23
(Image credit: Tom’s Hardware)
Image 6 of 23
(Image credit: Tom’s Hardware)
Image 7 of 23
(Image credit: Tom’s Hardware)
Image 8 of 23
(Image credit: Tom’s Hardware)
Image 9 of 23
(Image credit: Tom’s Hardware)
Image 10 of 23
(Image credit: Tom’s Hardware)
Image 11 of 23
(Image credit: Tom’s Hardware)
Image 12 of 23
(Image credit: Tom’s Hardware)
Image 13 of 23
(Image credit: Tom’s Hardware)
Image 14 of 23
(Image credit: Tom’s Hardware)
Image 15 of 23
(Image credit: Tom’s Hardware)
Image 16 of 23
(Image credit: Tom’s Hardware)
Image 17 of 23
(Image credit: Tom’s Hardware)
Image 18 of 23
(Image credit: Tom’s Hardware)
Image 19 of 23
(Image credit: Tom’s Hardware)
Image 20 of 23
(Image credit: Tom’s Hardware)
Image 21 of 23
(Image credit: Tom’s Hardware)
Image 22 of 23
(Image credit: Tom’s Hardware)
Image 23 of 23
(Image credit: Tom’s Hardware)
Future Tests and Final Thoughts
With Z590 boards arriving but now Rocket Lake-S CPUs yet, we’re in an odd place. We know most of these boards should perform similarly to our previous Z490 motherboard reviews. And while there are exceptions, they are likely mostly at the bottom of the product stack. To that end, we’re posting these as detailed previews until we get data using a Rocket Lake processor.
Once we receive a Rocket Lake CPU and as soon as any embargos have expired, we’ll fill in the data points, including the benchmarking/performance results, as well as overclocking/power and VRM temperatures.
We’ll also be updating our test system hardware to include a PCIe 4.0 video card and storage. This way, we can utilize the platform to its fullest using the fastest protocols supported. We will also update to the latest Windows 10 64-bit OS (20H2) with all threat mitigations applied and update the video card driver and use the newest release when we start this testing. We use the latest non-beta motherboard BIOS available to the public unless otherwise noted. While we do not have performance results from the yet-to-be-released Rocket Lake CPU, we’re confident the 70A VRMs will handle the i9-11900K processor without issue. A quick test of the i9-10900K found the board quite capable with that CPU, easily allowing the 5.2 GHz overclock we set. For now, we’ll focus on features, price, and appearance until we gather performance data from the new CPU.
(Image credit: MSI)
The MSI MEG Z590 Ace is a premium motherboard adorned with several high-end features, including a very robust VRM capable of handling 10th and 11th generation flagship Intel processors at both stock speeds and overclocked. Additionally, the board includes four M.2 sockets, 2.5 GbE and integrated Wi-Fi 6E, and two Thunderbolt 4 ports for increased bandwidth and peripheral flexibility.
The MEG Z590 Ace’s 16-phase 90A VRM handled our i9-10900K without issue, even overclocked to 5.2 GHz. We’ll retest once we receive our Rocket Lake-based i9-11900K, but so long as the BIOS is right, it shouldn’t pose any problems for this board. Although it has four M.2 sockets, unlike the Gigabyte Z590 Vision G, using these sockets causes SATA ports to drop, because more lanes are tied to the chipset on this board). That said, if you’re in a worst-case scenario, you can run four M.2 modules and still have three SATA ports left over. Most users should find this acceptable.
As far as potential drawbacks go, the price point of $400-plus will be out of reach for some users. Another concern for some may be the lack of RGB elements on the board. The MSI dragon and chipset heatsink light up with RGB LEDs, but that’s it. If you like a lot of RGB LED bling, you can add it via the four aRBG/RGB headers located around the board. The other drawback is the lack of a USB 3.2 Gen2x2 Type-C port, but the faster Thunderbolt 4 ports certainly make up for that.
Direct competitors at this price point are the Asus ROG Strix Z590-E Gaming, Gigabyte Z590 Aorus Master, and the ASRock Z590 Taichi. All of these boards are plenty capable with the differences residing in VRMs (Gigabyte gets the nod here), M.2 storage (MSI and Giga both have four) and audio (the Ace has the most premium codec). Beauty is in the eye of the beholder, but if you forced me to pick among these, the Taichi would be the board I’d want to show off the most. That said, no board here is a turnoff and has its own benefit over another.
The Ace’s appearance, including the brushed aluminum and carbon fiber-like finish, really gives it a premium look and feel, while easily blending in with your build theme. If your budget allows for a ~$400 motherboard and you’re looking for a lot of M.2 storage and enjoy a premium audio experience, the MEG Z590 Ace is an excellent option near that price point. Stay tuned for benchmarking, overclocking, and power results using the new Rocket Lake CPU.
Microsoft is starting to modernize some of the basic parts of Windows 10 by improving the system icons that are available in the operating system. A new preview build of Windows 10 is rolling out to testers this week, and it includes system icons that now adhere to Microsoft’s Fluent Design style.
The new icons include a more rounded and simplified look, and are available as a new font — Segoe Fluent Icons. Microsoft has also updated its new taskbar widget with the new icons, providing a good look at how basic icon changes can modernize even the smallest parts of Windows.
Some of the new system icons for Windows 10.Image: Microsoft
It’s a small change to Windows 10 that will appear later this year for most, but it’s part of a broader push by Microsoft to overhaul Windows 10. Microsoft updated some of its Windows 10 icons last year with colorful versions, and even tweaked the Start menu to make it a little more streamlined.
Microsoft is also planning a “sweeping visual rejuvenation of Windows,” codenamed Sun Valley. It might seem like Microsoft has been promising visual overhauls of Windows 10 for years with its Fluent Design push, but even bigger UI changes look set to appear later this year.
The Windows Start menu, File Explorer, and built-in apps are all expected to be overhauled as part of this UI refresh. Even basic things like buttons, controls, and sliders in apps should get some design love. This should mean Windows will look a lot more consistent, and hopefully a lot of the ancient icons and Windows 95-era prompts start to disappear.
The new system icons in action.Image: Microsoft
Microsoft has put a lot of work into improving its UI consistency in Windows 10X, an upcoming version of Windows that will be designed for Chromebook-like devices. Windows 10X includes a new Start menu, and lots of changes to basic controls like Wi-Fi, the notification center, and more. It feels like a stripped back, more simplified version of Windows.
How Microsoft markets Windows 10X could be a hint at where it sees Windows heading in the future. Rumors suggest the company is gearing up to use “the new Windows” as a marketing term, and we’re expecting Microsoft to have a lot more Windows news soon. Microsoft is planning events in the coming weeks to detail its future plans for gaming, Windows, and more.
While Microsoft held its Ignite conference this week, the company had very little to say about Windows. Microsoft’s head of Windows and devices, Panos Panay, acknowledged that news is on the way, though. “I haven’t talked about the next generation of Windows, and what’s coming next,” said Panay during an Ignite session earlier this week. “I’m so pumped. The future of Windows is incredible, but we’re here today to talk about Windows 10.”
It’s unusual to hear Microsoft talk about its “next generation of Windows,” particularly as the company has stuck to the Windows 10 branding since its debut nearly six years ago. I don’t think that means we’re about to see a Windows 11, but how Microsoft separates out Windows 10 and Windows 10X will be key to avoiding any confusion (hello, Windows RT). That’s especially true if Windows 10X doesn’t support legacy desktop apps at launch, as our recent look at the OS suggests.
A planned Motorola-branded Wear OS smartwatch with Qualcomm’s new Snapdragon Wear 4100 processor may have leaked (via 9to5Google). If the photos are real and not just renders, it could be a sign that the next Moto 360 (or whatever it’s called) could perform significantly better than the last, and may reap some of the efficiency gains brought by the jump from a 28nm process to a 12nm one.
The 2019 Moto 360 used a Snapdragon Wear 3100 processor, which was only a minor update to 2016’s 2100. Despite Qualcomm’s claims that the new(ish) 4100 has an 85 percent faster CPU, two-and-a-half times faster GPU, and 25 percent more battery life, it seems like there’s only one watch on the market that actually has the chip.
The image that shows the potential watch (and which also seems to show a wireless charging coil) was found in an investor presentation alongside three other smartwatches. The unnamed watch has some text on the back, and when Reddit user TheMacJezza zoomed and enhanced, they saw that it appeared to say “Snapdragon Wear 4100.” I’m no logician, but that would seem to imply that this Mystery Moto has a Snapdragon Wear 4100 in it (especially considering that the current Moto 360 has its processor name printed on the back as well).
The unnamed Motorola watch, with some contrast tweaks.Image: u/ThemacJezza
Motorola doesn’t actually make Moto-branded smartwatches itself. The name was licensed to a company called eBuyNow, which released the third-generation Moto 360 in 2019. eBuyNow later merged with another company called CE Brands, according to 9to5Google, which earlier reported on an investor presentation containing details of the Moto-branded hardware roadmap for 2021.
Correction: This article previously implied Moto-branded smartwatches were still made by Motorola; it has been updated to reflect that the brand is licensed out. The Verge regrets the error.
CircuitPython, Adafruit’s enhanced fork of the MicroPython language, runs on nearly 200 different microcontroller boards, including the Raspberry Pi Pico, and it could soon become an operating system for regular (non-Pico) Raspberry Pis. While appearing as a guest on the Tom’s Hardware Pi Cast this week, CircuitPython Programming Lead Scott Shawcroft told us that he wants to create a version of the language that single-board computers like the Raspberry Pi Zero, Pi 4 and Pi 400 can boot straight into, without the overhead of a full operating system.
“I’d like to get CircuitPython running on the Raspberry Pi alone, without Linux underneath it,” Shawcroft said in response to our questions about whether he plans to add Pico VGA output support to the languages. “So, when I think of ‘I want to interface with a TV’ sorts of tasks, I want to actually go the route of getting CircuitPython running the A series chips on the regular Raspberry Pis instead of putting my time into the VGA sorts of things on the Pico, because that’s super limited.”
Recently, a number of Raspberry Pi Pico projects have used the chip’s ability to output to VGA. Ben Stragnell created a Pico-powered NES emulator and, on another recent episode of the Pi Cast, Raspberry Pi Pico SDK author Graham Sanderson showed off a BBC Micro emulator he had created for the microcontroller. However, to Shawcroft’s point, the Pico and its 133 MHz RP2040 processor will never provide the kind of high-res, high refresh rate video out that a regular Pi can.
“If we can get CircuitPython running on a CM4, a Pi 4 or a Pi 400, that means that you can have that nostalgia programming experience on a 4K display or two 4K displays and, if we’re running native on the devices, we can still have that experience of like plug it in and it shows up as a drive, depending on how its connected,” Shawcroft said.
Aside from just allowing better video out than a Pico can handle, bringing CircuitPython to Raspberry Pi as an OS would have other advantages. It would likely allow a regular Raspberry Pi to act more like a microcontroller, booting and running its default program almost instantly and turning off without the need for a safe-shutdown process.
We got more details about this idea from Shawcroft after the show was over and he noted that, while he thinks that bootable CircuitPython for Raspberry Pi will happen, it’s just an idea at this point with no scheduled rollout.
A more immediate priority, which Shawcroft is starting to work on now, is creating the framework for users to edit CircuitPython over Bluetooth LE from mobile devices. So anyone who only has access to a phone or tablet will be able to edit code on a Bluetooth-enabled microcontroller using a mobile app or perhaps a browser. This will allow children, who may not have PCs, to get in on the programming experience.
Whenever bootable CircuitPython comes to Raspberry Pi, its workflow could take one of several forms. First, if the Pi supports USB host mode as Pi 4 and Zero do, you would be able to connect it to a PC and have it appear as a storage device you can write files to, much in the way you write files to CircuitPython-powered microcontrollers.
However, it’s also possible that the Pi could boot to a command interpreter that looks and acts similar to the way people programmed in BASIC on a Commodore 64. Shawcroft has actually played around with this mode of Python input and placed a demo of it, along with an animation of the demo in action, on his github. You also might be able to program the Pi via Bluetooth LE.
Even though there’s no bootable version yet, Raspberry Pi users do have a way to use CircuitPython right now. The Adafruit Blinka library for Python, which you can install via pip, allows you to add CircuitPython code to regular Python programs.
While Shawcroft may not have time to work on bootable CircuitPython for a while, he noted that other developers are free and encouraged to take up the project.
“If folks like this idea, then I’d encourage them to reach out to help make it happen,” he said. “We’re always looking for more CircuitPython contributors. My highest priority is always to support others working on CircuitPython so I’m happy to give guidance and get things merged into CircuitPython proper. I’d love to see CircuitPython supported directly on Pis and other single board computers.”
We use cookies on our website to give you the most relevant experience. By clicking “Accept”, you consent to the use of ALL the cookies.
This website uses cookies to improve your experience while you navigate through the website. Out of these, the cookies that are categorized as necessary are stored on your browser as they are essential for the working of basic functionalities of the website. We also use third-party cookies that help us analyze and understand how you use this website. These cookies will be stored in your browser only with your consent. You also have the option to opt-out of these cookies. But opting out of some of these cookies may affect your browsing experience.
Necessary cookies are absolutely essential for the website to function properly. This category only includes cookies that ensures basic functionalities and security features of the website. These cookies do not store any personal information.
Any cookies that may not be particularly necessary for the website to function and is used specifically to collect user personal data via analytics, ads, other embedded contents are termed as non-necessary cookies. It is mandatory to procure user consent prior to running these cookies on your website.