So simple to use and cheap to purchase, the Pico 2 Pi Adaptor is a complete no brainer purchase for your Pico projects.
For
+ Low cost
+ Ease of use
+ Access to thousands of HATs
Against
– You will need to use the included reference card
– Header pins too short if used with removable Pico
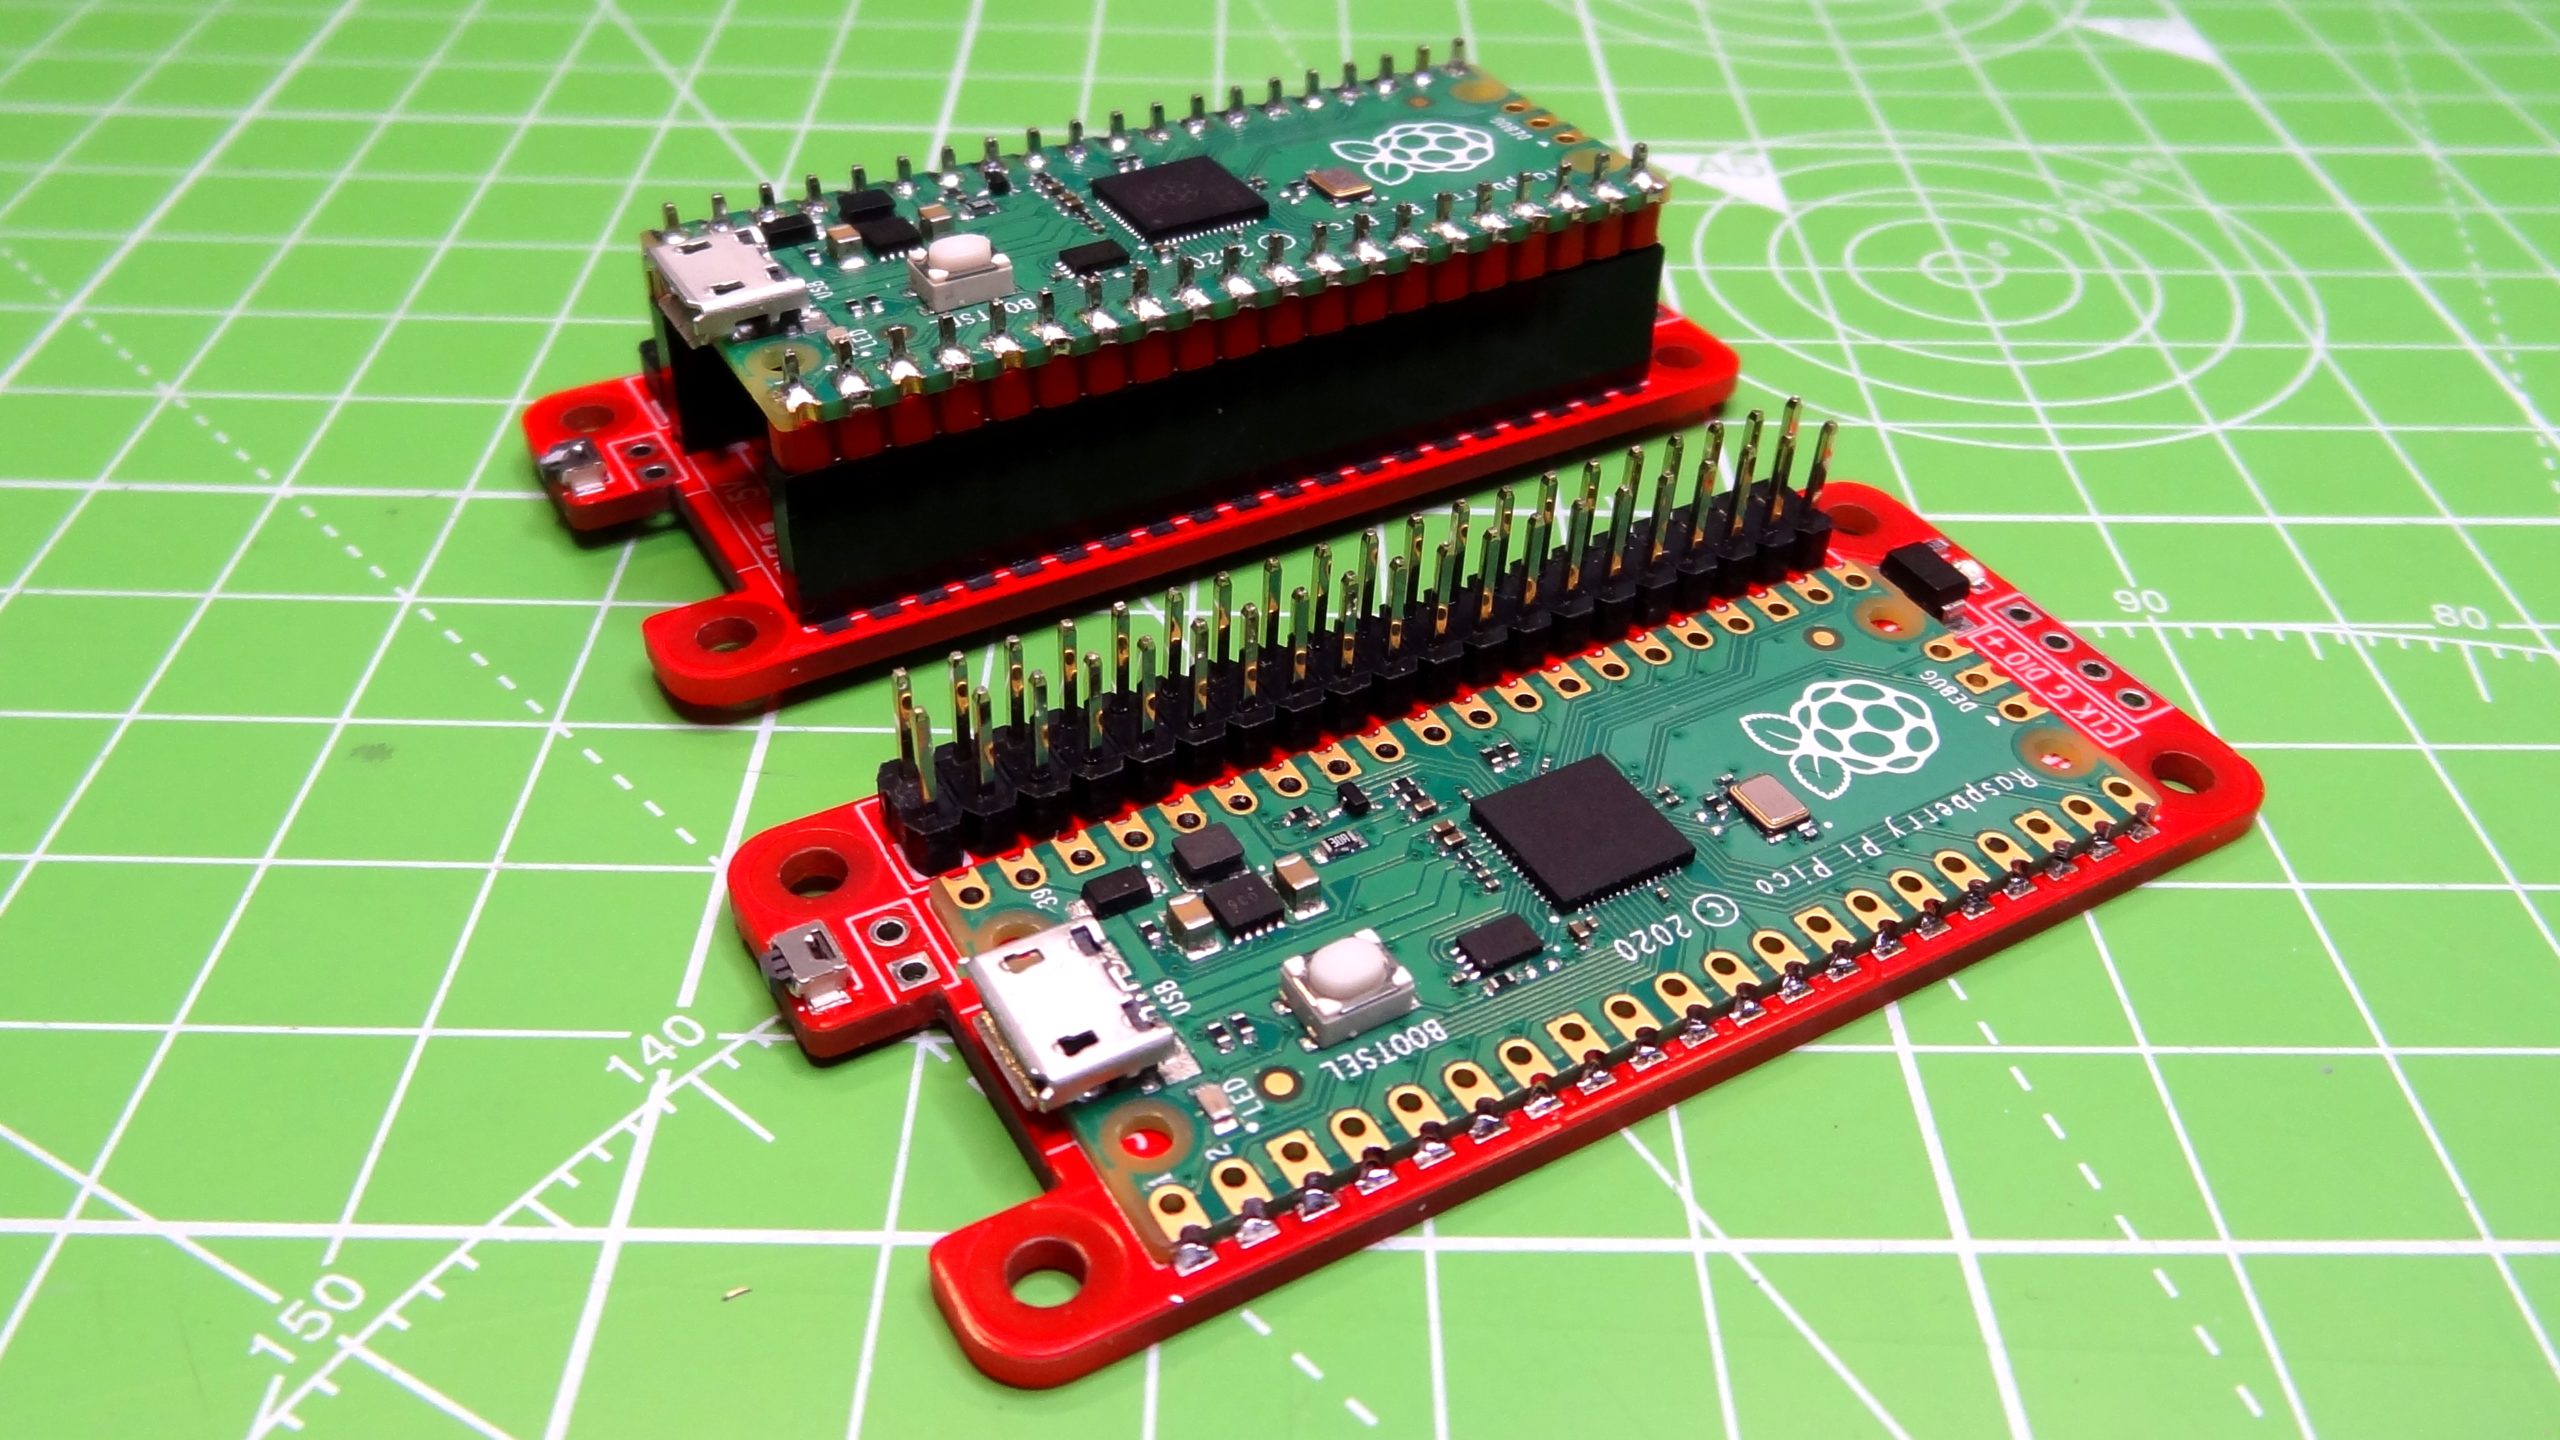
A new Raspberry Pi board such as the Raspberry Pi Pico introduces a new range of add-on boards and accessories, but the Raspberry Pi has been with us for nine years and in that time there have been a myriad of accessories on the market. Just imagine using some of the best Raspberry Pi HATS with your Pico. The Pico 2 Pi Adaptor from Red Robotics is a board which aims to enable the use of these older accessories with the new Raspberry Pi Pico by providing the same 40-pin GPIO layout you find on regular Raspberry Pis.
Retailing for just $6, the Pico 2 Pi Adaptor is not much more expensive than a Pico and this low cost, and the board’s ease of use are what attracted us to it. So we put it on the bench and took it for a full test.
Design and Use of the Pico 2 Pi Adaptor
Image 1 of 3
(Image credit: Tom’s Hardware)
Image 2 of 3
(Image credit: Tom’s Hardware)
Image 3 of 3
(Image credit: Tom’s Hardware)
The Pico 2 Pi Adaptor is designed to accommodate a Raspberry Pi Pico in one of two ways. Firstly it can be surface mounted to the adaptor by soldering the castellations directly to the board, this does mean that our Pico will be forever attached to the board. Secondly we can solder a row of female head pins enabling our Pico to be removed for another project, but this introduces one issue, many HAT boards will not clear the rather tall Pico. If we are using the Pico in this manner an additional male header riser will need to be purchased.
No matter what option we choose the Pico 2 Pi features a 2 x 20 male pin header compatible with Raspberry Pi HAT addons. You may be thinking that we can just drop a board on the Pico 2 Pi Adaptor and start hacking. That is partially true.
The pin layout for the 2 x 20 header is configured to match that of a typical Raspberry Pi, but the pin references in our code are still based upon the pins provided by the Pico. Pins such as I2C and SPI are in the same location as are the standard digital pins, power and GND. The included reference card is a useful tool to work out which pins are where. Pico 2 Pi has a useful GPIO pin reference, but this is covered up when a Pico is surface mounted to the board.
The Pico 2 Pi adaptor has the same footprint as a Raspberry Pi Zero W. At each of the corners is a M2.5 screwhole which can be used to secure a HAT or pHAT board to the adaptor.
We tested the Pico 2 Pi Adaptor with three HATs: a Cyntech Pibrella, Pimoroni’s Unicorn HAT and Pimoroni’s Explorer HAT Pro. The Pibrella and Unicorn HAT both use typical digital GPIO pins, with no need for any specialized interfaces or protocols. With just a little code we were able to write a library to control the Pibrella boards LEDs, buzzer and outputs. For the Unicorn HAT we chose to use CircuitPython as it has a pre-made Neopixel library that instantly worked with the board.
Pushing things a little further, we tried out the Explorer HAT Pro, a board that uses both standard GPIO pins as well as I2C for the capacitive touch sensor and the ADC. The inputs, outputs and motor connections were the easiest to get working, acting just like a typical digital GPIO pin. The capacitive touch sensor and ADC both use I2C for communication and, while we could discover these devices on the I2C bus, we didn’t have the knowledge to fully investigate and enable their use. Suffice to say that should you have the skills, this will pose no challenge to you.
In use, the Pico 2 Pi Adaptor is simple; it merely breaks out the Pico’s GPIO pins into a Raspberry Pi compatible pinout. It isn’t a hugely technical device, and that is what we love about it, a simple fix for a simple issue.
Use Cases for the Pico 2 Pi Adaptor
Image 1 of 3
(Image credit: Tom’s Hardware)
Image 2 of 3
(Image credit: Tom’s Hardware)
Image 3 of 3
(Image credit: Tom’s Hardware)
If you are a Raspberry Pi Pico fan, then chances are that you are already a Raspberry Pi fan with a large collection of add-ons and boards. The Pico 2 Pi Adaptor enables the use of these boards with the Pico, as long as you have the coding knowledge. The size of the Pico 2 Pi Adaptor means that this board can be used in robot builds, science experiments and embedded applications.
Bottom Line
(Image credit: Tom’s Hardware)
The Red Robotics Pico 2 Pi offers a simple solution to a simple problem. If you have a Pico and a load of Raspberry Pi HATs, then you should also have one of these boards too. Pico 2 Pi opens up a new world of addons for the Pico, and it looks great too.
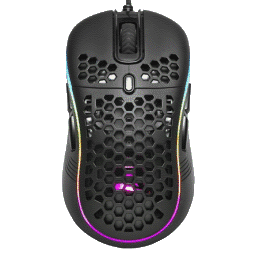
Established in 2003, Sharkoon is a hardware and peripherals company based in Germany. While there is no shortage of ambidextrous mice these days, fully symmetrical mice, those with side buttons on both sides, aren’t that common, leaving left-handers with alarmingly few options. The Light² S is such an option and comes with what people have come to expect from a gaming mouse in this day and age: PixArt’s PAW3327 sensor capable of up to 6200 CPI, a still competitive 78 g honeycomb design, high quality pure PTFE feet, and a flexible, braided cable. The usual customization options are provided in software, including a variety of RGB lighting effects.
Sourdough bread is a tricky thing to get right. But Breadwinner, a new smart gadget in development from hardware designers (and bread lovers) Fred Benenson and Sarah Pavis, is looking to try to take a little bit of the mystery out of the yeast by offering an app-connected gadget that can track the volume and temperature of your starter and notify you when it’s ready to bake, via LaughingSquid.
If you’ve never baked with a starter before, it’s very different from store-bought yeast. Your starter (mine, in case you were curious, is named Lancelot) needs to be fed frequently and rises and falls throughout the day as the yeast feeds on the sugars in the flour and creates bubbles of carbon dioxide — the same bubbles that help make your finished loaf of sourdough so fluffy and delicious.
But figuring out when to use your starter after a feeding is a tricky balance of art and science. What Breadwinner aims to do is take the guesswork out of the equation by letting you track the growth of your starter after a feeding and letting you know precisely when the peak point is to start mixing your doughs. It also logs previous feedings, allowing you to track the performance of your starter over time and tweak variables to get that perfect loaf.
The Breadwinner unit itself is designed to fit on top of a 16oz Ball Mason jar, and it works by using an infrared sensor to measure starter height. It also can take temperature readings of the surrounding air to make sure that it’s not too hot (or too cold), and it includes Wi-Fi connectivity to connect to your smartphone. A button on the top lets you easily log when you’ve fed your starter.
The current model — which costs $140 — is in the middle of a public prototyping phase. Buying a Breadwinner today is emphatically not buying a finished product. The hardware is extremely unfinished, and the current version charges via Micro USB, which I am fervently hoping will be swapped to USB-C for the finished product.
Obviously, that’s a lot to spend on any gadget, much less one that’s still extremely unfinished and as limited in function as this one — but if you’re someone who really likes baking bread, gadgets, and data analysis, it could be a fun addition to your kitchen.
The Breadwinner team is also planning to use feedback from early users — and the valuable data from the different types of starters, flour mixes, and feeding schedules from more users — to further refine the product before a commercially produced version arrives in the future. That might be worth waiting for if you’d prefer a more refined (or cheaper) product. To sweeten the pot, the prototype also comes with access to a Breadwinner Discord and a $50 discount of the final model when it’s released.
Breadwinner isn’t just about the single gadget, though. The site is pitched as an online community for bread enthusiasts, a self-described “social network for yeast” that aims to be a place for bakers to post recipes, share bread pictures, and get advice from fellow bakers, too.
If you buy something from a Verge link, Vox Media may earn a commission. See our ethics statement.
Any business laptop that comes out these days is entering a tough field full of very established players. The world is already stuffed full of ThinkPads and Latitudes, which have strong followings, cover price ranges across the board, and are highly attuned to what workers need.
So my question with lesser-known business laptops is usually: Where does this fit? What customer is it catering to who might be underserved by a ThinkPad?
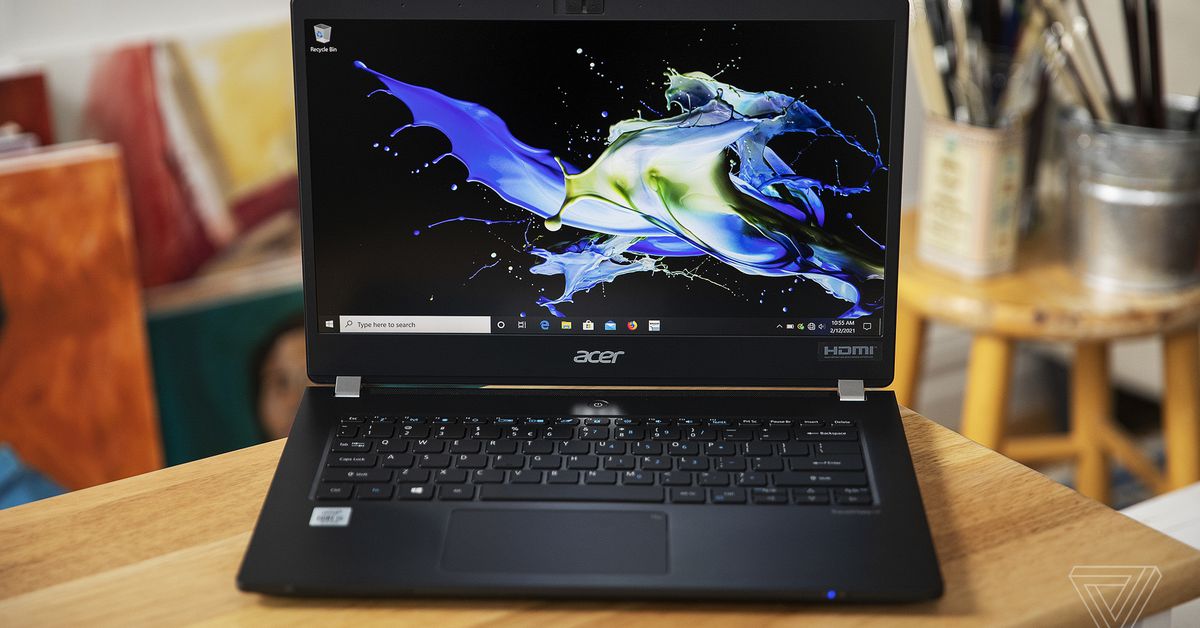
With its TravelMate line (specifically the TravelMate P6), Acer seems to be going for two potential openings. The first is that the TravelMate is, as the name implies, specifically intended for frequent business travelers. It’s light, portable, and sturdy, at the expense of some other traits. And the second is its price. Starting at $1,199.99, the TravelMate line is targeting a more price-conscious demographic than many business laptops that would be considered “premium” are. I think the TravelMate succeeds in filling these two niches in particular. But it has some other drawbacks that make it tough to recommend for a general audience.
The aspect of the TravelMate that should be a big help to mobile business users is the port selection. Despite being quite thin, the laptop is able to fit a USB Type-C (supporting USB 3.1 Gen 2, DisplayPort, Thunderbolt 3, and USB charging), two USB 3.1 Type-A Gen 1 (one with power-off USB charging), one HDMI 2.0, one microSD reader, one combination audio jack, one Ethernet port (with a trap-door hinge), one DC-In jack for Acer’s adapter, one lock slot, and an optional SmartCard reader. The fewer dongles and docks you have to travel with, the better.
Portability is another priority here and is another one of the TravelMate’s highlight features. At just 2.57 pounds and 0.65 inches thick, the TravelMate should be a breeze to carry around in a backpack or briefcase. Acer says it’s put the product through a slew of durability tests for weight and pressure, drops, shocks, vibrations, and other hiccups you may encounter during the day.
Another area that’s likely important to some mobile professionals is videoconferencing capability. I found that to be a mixed bag here. The TravelMate’s four-microphone array had no trouble catching my voice, in both voice recognition and Zoom meeting use cases. Acer says they can pick up voices from up to 6.5 feet away. The webcam also produces a fine picture (though this unit doesn’t support Windows Hello for easy logins) and has a physical privacy shutter. The speakers are not great, though — music was tinny with thin percussion and nonexistent bass.
Acer promises that the TravelMate can survive “the bumps from airport security, accidental drops, and other mishaps.”
The TravelMate also includes some business-specific features including a TPM 2.0 chip and Acer’s ProShield security software.
In other, less business-y areas, though, the TravelMate has a few shortcomings. Shoppers looking for anything more than portability out of the chassis may be disappointed. While most of the TravelMate is made of magnesium-aluminum alloy, it has a bit of a plasticky feel — and while the keyboard is sturdy, there’s considerable flex in the screen. And then there’s the aesthetic: the P6 is far from the prettiest computer you can buy for $1,199.99. It’s almost entirely black, with very few accents (and the ones it has are a drab gray color). And the bezels around the 16:9 screen are quite chunky by modern standards. Plus, the 16:9 aspect ratio is falling out of fashion for a reason — it’s cramped for multitasking, especially on a 13- or 14-inch screen — and the panel maxed out at 274 nits in my testing, which is a bit too dim for outdoor use.
The color is called “mild black.”
The TravelMate looks and feels like it was made a bit better than budget fare. But it also looks and feels closer to an Aspire 5 than it does to a top ThinkPad. For context, you can get an Aspire 5 with identical specs to this TravelMate model for just over $700. Another comparison: the Swift 5, a gorgeous consumer laptop that’s even lighter than the TravelMate, can be purchased with comparable specs for just $999.99. This is all to emphasize that you’re sacrificing a bit of build quality (as well as some extra money) for the TravelMate’s weight and business-specific offerings.
The touchpad is also not my favorite. For one, I had some palm-rejection issues. Those didn’t interfere with my work per se, but it was still unnerving to see my cursor jumping around the screen while I was typing. In addition, the touchpad on my unit had a bit of give before the actuation point, meaning one click required me to make (and hear) what felt like two clicks. And its off-center placement meant that I was constantly right-clicking when I meant to left-click, and I had to consciously reach over to the left side in order to click with my right hand. Finally, the click itself is shallow and far from the most comfortable.
I also didn’t love the power button. It contains a fingerprint sensor, which worked quite well. But the button itself is stiff and very shallow. I know this sounds like a small nitpick, but it was really irksome and made turning the TravelMate on in the morning more of a hassle than it could’ve been.
Some TravelMate models support facial recognition, but my model did not.
The TravelMate model that I received to review is sold out everywhere I’ve looked as of this writing. The closest model to it is listed at $1,199.99 (though it’s cheaper through some retailers) and comes with a Core i5-10310U, 8GB of RAM, and 256GB of SSD storage. My unit is the same, but it has a Core i5-10210U. Those processors don’t have a significant performance difference, so my testing here should give you a good idea of what to expect from that model. You can also buy a model with a Core i7-10610U, 16GB of memory, and a 512GB SSD for $1,399.99. Both configurations run Windows 10 Pro and include a 1920 x 1080 non-touch display.
For my office workload of emails, spreadsheets, Zoom calls, etc., the TravelMate did just fine. I sometimes heard the fans spinning at times when my load wasn’t super heavy, but the noise wasn’t loud enough to be a problem. Note that this processor has Intel’s UHD graphics, rather than its upgraded Iris Xe graphics, which means the system wouldn’t be a good choice for gaming, video software, or other graphics work.
But there’s one area where the TravelMate really impressed, and it’s one that’s quite useful for travelers: battery life. Running through my daily workload at 200 nits of brightness, my system averaged nine hours and 15 minutes of continuous use. That’s almost twice what the budget Aspire 5 got with my same workload. It also beats the Swift 5 and the pricier ThinkPad X1 Nano. If your workload is similar to (or lighter than) mine, you should be able to bring this device around an airport or conference for a full work day without being attached to a wall.
The notebook can charge up to 50 percent in less than 45 minutes.
One performance complaint, though: this thing comes with bloatware. My unit was pre-installed with all kinds of junk, including games (Amazon was pinned to the taskbar) and other software like Dropbox. Most annoyingly, it came with Norton, which bugged me with annoying pop-ups all the time and also seemed to impact battery life: the TravelMate consistently lasted around an hour longer after I uninstalled the program. It doesn’t take too long to uninstall everything, but I’m still morally put off by the idea of so much cheap crapware being loaded onto a laptop that costs over $1,000. And it’s especially troubling to see on a business laptop, because it can expose users to cybersecurity risk.
The TravelMate line is filling a pretty specific niche, and it fills it just fine. If you’re a frequent business traveler who needs a light device with plentiful ports and all-day battery life, you’re shopping in the $1,199 price range, and you’re willing to overlook a mediocre touchpad, dim 16:9 display, and other hiccups, then the P6 will be a better choice for you than something like a pricier and heavier Dell Latitude or the shorter-lived and port-starved ThinkPad X1 Nano.
That said, the P6 has enough drawbacks that I think the bulk of customers would be better served by other laptops. Those who like the Acer brand may like some of Acer’s other offerings — especially those who don’t need the business-specific security features. The Swift 5 is lighter, nicer-looking, and more affordable than the TravelMate, with a better touchpad, screen, and processor. And budget shoppers can find much of what the TravelMate offers in any number of cheaper laptops. The Aspire 5 and the Swift 3 don’t have the TravelMate’s battery or port selection, but they do improve upon its touchpad, audio (in the Aspire’s case), and looks (in the Swift’s case). And, of course, there’s a litany of other laptops in this price range — from HP’s Spectre x360 to Dell’s XPS 13 — that are excellent in almost every way and also offer 3:2 screens.
Ultimately, the TravelMate isn’t a bad laptop — but if it’s the best laptop for you, you probably know who you are.
(Pocket-lint) – GoPro put a colour screen on the front of the Hero 9 Black, bringing it more in line with the DJI Osmo Action, and while it was at it decided we needed a bigger battery too. That means you can finally see yourself when you’re filming, and you can shoot for longer.
With that said, its predecessor – the Hero 8 Black – was and still is a great action camera. So should you stump up the extra for the 9 or will the Hero 8 do everything you need it to?
squirrel_widget_2670590
Design and Displays
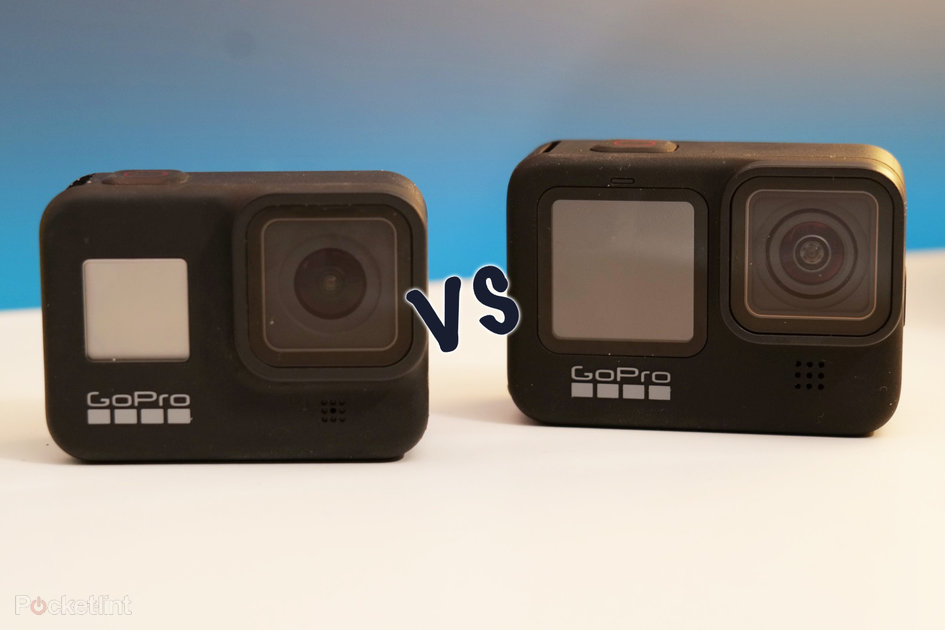
Hero 8: 66.3 x 48.6 x 28.4mm
Hero 9: 71.0 x 55.0 x 33.6mm
Hero 8: Monochrome status screen on the front
Hero 9: Colour live preview screen on the front
Both: Built-in mounting arms
Both: Colour touchscreen on the back, Hero 9 larger
Both: Waterproof to 10m
The Hero 8 Black was an important product for GoPro, freeing the company from the constraints of needing to fit its tech into a specific size body, just so it would fit in the mounting accessories. Instead, it built-in mounting arms to the bottom of the camera, allowing you to mount it to all the accessories, without a clip-on shell, and that has returned in the Hero 9.
That’s seen GoPro increase the size of its flagship action camera by a noticeable – but not huge – amount. It’s a few millimetres taller, wider and thicker than the 8 Black, but the trade-off should prove worth it for the bigger battery and more powerful internals. Plus, the bigger screen and colour screen on the front.
Speaking of those displays, the latest model’s front screen is full colour and can be used as a live preview display, while the 8 Black has the more traditional monochrome status display which only shows you status information.
The best GoPro: Which should you buy today?
Both cameras feature a similar design in terms of button and port placement. They both have the shutter button on the top and the mode/power button on the left edge. However, the mode/power button on the 9th gen protrudes more from the surface and is much easier to press and to feel without looking. The Hero 8’s button is flush with the surface, and so virtually impossible to find by touch.
Just underneath that, the Hero 9 also has a speaker designed to pump out water, similar to the feature Apple has used in its watches for a while. So if you do take it underwater to test its 10m depth resistance, it will expel any water that seeps into the speaker channels.
Video capture and streaming
Hero 8: Up to 4K/60 FHD/240 footage
Hero 9: Up to 5K/30, 4K/60, FHD/240
Both: 1080p live streaming
Both Heros support a wide range of resolution and frame-rate combinations at various focal lengths, thanks to the ‘digital lenses’ that are built into the software.
As far as resolution goes, the Hero9 is the champ here. It can shoot up to 5K resolution at a 16:9 ratio with wide, linear and narrow ‘lenses’. At 4K resolution, it can go up to 60 frames per second and up to 240 frames per second at 1080p. It can also shoot at 2.7k resolution, and various resolutions using up to4K at 4:3 ratio. Hero 8 is similar, except it maxes out at 4K resolution. It also doesn’t feature horizon levelling feature available at certain settings.
Both cameras can be used for live streaming and both can do so at 1080p resolution. Both also use a combination of EIS and algorithms to stabilise footage using a feature called HyperSmooth. With the Hero 9, that’s been boosted further, making it even smoother than before while also offering the horizon levelling feature. What’s more, if you buy the additional Max lens you get horizon levelling on everything, even when you rotate the camera 360-degrees.
Stills and performance
Hero 8: 12MP stills
Hero 9: 20MP stills
Both: SuperPhoto + HDR
Both: RAW support
Hero 8: 1220mAh battery
Hero 9: 1720mAh battery
Both: GP1 chip
There are two big performance upgrades with Hero 9: Photo resolution and battery life. It has a 20-megapixel sensor versus the 12-megapixel sensor on the previous model. Similarly, it has a higher capacity battery, with an additional 500mAh on top of the 8th gen’s 1220mAh battery to give a total of 1720mAh.
GoPro says you’ll get an extra 30% video capture time from that battery, and that is definitely useful when it comes to action cameras. There’s nothing worse than running the battery flat during a downhill biking session.
Both cameras have the same image/data processor – called the GP1 – and they both support RAW image capture as well as GoPro’s advanced HDR image processing.
squirrel_widget_168058
Price
Hero 8: $299 with a subscription ($349 without)
Hero 9: $399 with a subscription ($499 without)
The most cost-effective way to buy a new Hero camera is with an annual GoPro subscription. If you buy Hero 8 with the subscription, the camera will cost you $299/£279, while Hero 9 is $399/£329. If you buy the cameras without the subscription, the Hero 8 is $349/£329 and Hero 9 is $499/£429.
Given the added value of the subscription – which gets you unlimited cloud storage, a replacement camera when yours breaks and accessory discounts – it makes complete sense to opt for that with the lower upfront outlay. You get 12 months subscription paid for in advance with that price. GoPro is obviously hoping users stick around for more than a year and keep subscribing afterwards.
Conclusion
Given the price difference, the Hero 8 Black is actually very good value for money. It’s $100/£100 cheaper than the Hero 9 but does a lot of the same stuff.
With that said, with its new colour screen, higher resolution sensor and longer battery life the additional outlay is definitely worth it for the Hero 9. Especially when you consider that its price with the subscription is only a little higher than the price of the Hero 8 Black without a subscription.
If you want the best action camera going, grab the Hero 9. If you’d rather save the cash, or if you’re coming from an older model like the Hero 5 or Hero 6, the Hero 8 will do you just fine and is still a major upgrade on those two.
LumiCube from Abstract Foundry is the latest Kickstarter hoping to dress your Raspberry Pi in the finest RGB LEDs, but underneath the razzle dazzle there is quite a bit of tech for your money.
Image 1 of 3
(Image credit: Abstract Foundry)
Image 2 of 3
(Image credit: Abstract Foundry)
Image 3 of 3
(Image credit: Abstract Foundry)
LumiCube features three sides of RGB LEDs, 192 individually controllable RGB LEDs to be exact. We’re not sure if these are just WS2812 “Neopixels” or APA102 “Dotstar” LEDs, but no matter the tech, they look great. The laser-cut acrylic enclosure is designed for the Raspberry Pi 3 and Raspberry Pi 4, which can fit neatly inside the enclosure with just the ports on display.
For the lowest pledge, you get the enclosure, a 2W speaker, microphone and the RGB LED panels, but for a little more money you can add a 2-inch 320 x 240 resolution IPS screen, buttons and a light and gesture sensor. Or you can add a temperature / humidity sensor, pressure sensor and an inertial measurement unit (IMU) sensor, which can measure acceleration forces and gestures.
Controlling the cube is made possible thanks to a Python library written to abstract the complexities of working with the sensors and the RGB panels. For example, to scroll text across the three RGB panels, you just need to type a single line of Python!
So what can you use the cube for? It is much more than a desk toy. With the simple Python code and the extra sensors, you can get live traffic, weather, news scrolling across the panels, create your own home assistant or create a custom controller using the IMU and gestures.
Pledges start from £80, approximately $110, and as of writing LumiCube has already smashed its target of £5,000 ($7,000) and is now at £25,000 ($35,000) with 41 days still left on the campaign.
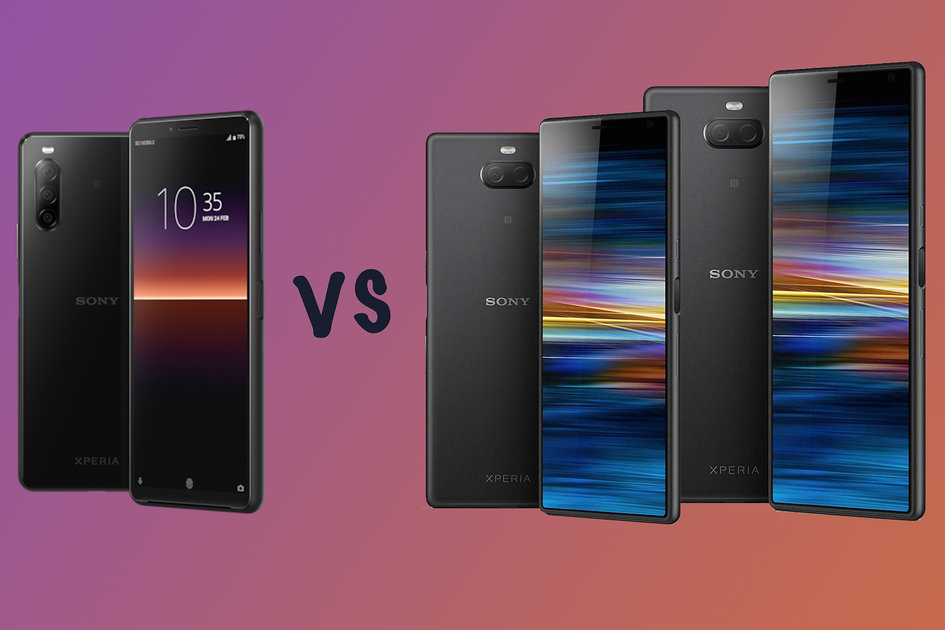
(Pocket-lint) – Sony Mobile refreshed its phone line up in 2020 with the Xperia 1 II and the Xperia 10 II. The latter succeeded the Xperia 10 and Xperia 10 Plus that arrived in 2019, offering just one device in the mid range Xperia portfolio rather than two.
The design was refined and specifications were improved for the 2020 model, but what else differs between the Xperia 10 II, the Xperia 10 and the Xperia 10 Plus.
Here are their specifications compared to help you decide which mid-range Xperia might be the right one for you. Keep in mind that the third generation Xperia 10 III is expected to appear at some point this year too, so you might want to wait.
squirrel_widget_3686026
Design
Xperia 10 II: 157 x 69 x 8.2mm, 151g, IP65/68
Xperia 10: 156 x 68 x 8.4mm, 162g
Xperia 10 Plus: 167 x 73 x 8.3mm, 180g
The Sony Xperia 10 II, the Xperia 10 and the Xperia 10 Plus all share similar design traits, but the Xperia 10 II is more premium, offering a glass rear over the metal backs seen on the Xperia 10 and Xperia 10 Plus.
The camera housing on the rear of the Xperia 10 II has also been repositioned to the top left, just like the Xperia 1 II, moving away from the horizontal housing found on the the Xperia 10 and Xperia 10 Plus.
All three devices have rounded edges and a tall, slender look though and they all feature a 21:9 aspect ratio display. The Xperia 10 II is IP65/68 water and dust resistant however, like the flagship Xperia 1 II, while the Xperia 10 and Xperia 10 Plus offer no water resistance.
Display
Xperia 10 II: 6-inch, OLED, Full HD+, 21:9
Xperia 10: 6-inch, LCD, Full HD+, 21:9
Xperia 10 Plus: 6.5-inch, LCD, Full HD+, 21:9
The Sony Xperia 10 II comes with a 6-inch display, matching the size of the Xperia 10. The Xperia 10 Plus has a slightly larger display at 6.5-inches, though all three models have the same Full HD+ resolution.
The Xperia 10 II differs in terms of panel technology too though. Like the Xperia 1 II, the Xperia 10 II has an OLED display for vibrant colours and deep blacks. The Xperia 10 and Xperia 10 Plus both have LCD displays.
All three devices have a 21:9 aspect ratio display, as mentioned above.
As you would expect from a succeeding device, the Xperia 10 II improves on the internals of the Xperia 10 and Xperia 10 Plus. The 2020 device runs on the Qualcomm Snapdragon 665 processor, supported by 4GB of RAM as standard.
The Xperia 10 and Xperia 10 Plus both run on the Qualcomm Snapdragon 630 processor with 3GB of RAM as standard for the smaller model and 4GB of RAM as standard for the Plus model. Both come with 64GB of internal storage, while the Xperia 10 II comes with 128GB.
All three models support microSD for storage expansion but the Xperia 10 II will take cards up to 1TB, while the Xperia 10 and Xperia 10 Plus will only support cards up to 512GB.
In terms of battery capacities, the Xperia 10 II wins here too. It offers a 3600mAh battery, while the Xperia 10 has a 2870mAh battery and the Xperia 10 Plus has a 3000mAh battery. All models offer Sony technologies like Stamina Mode however.
Camera
Xperia 10 II: Triple rear, 8MP front
Xperia 10: Dual rear, 8MP front
Xperia 10 Plus: Dual rear, 8MP front
The camera department is another area the Xperia 10 II improves over its predecessors, at least on paper. There’s a triple lens rear camera on the Xperia 10 II consisting of an 8-megapixel ultra wide-angle sensor, a 12-megapixel wide angle and an 8-megapixel telephoto sensor. There’s also a night mode.
The Xperia 10 meanwhile, has a dual camera consisting of a 12-megapixel sensor and an 8-megapixel sensor, while the Xperia 10 Plus has a 13-megapixel sensor and an 8-megapixel sensor on the back.
All three devices have an 8-megapixel front camera.
Price
The Sony Xperia 10 II costs £319 in the UK.
When they launched in 2019, the Xperia 10 started at £299, while the Xperia 10 Plus started at £349, but you’ll likely find them cheaper now.
squirrel_widget_147110
Conclusion
Sony simplified its mid-range Xperia in 2020, by only offering one device rather than the two offered in 2019 and that’s a good thing. The Xperia 10 II offers a more advanced processor, larger battery, better camera capabilities (on paper at least) and a nicer design than the devices it succeeds.
As we mentioned at the beginning, the Xperia 10 III is expected to appear at some point in the next few months, so you might want to hold off to see what that device brings. Otherwise, unless you can find the Xperia 10 or 10 Plus significantly cheaper, the Xperia 10 II is the better choice.
(Pocket-lint) – Sony Mobile revealed the second generation of its flagship Xperia 1 4K smartphone in Febraury 2020. Following the naming structure of the Sony Alpha cameras, the Xperia 1 II offers a very similar design to its predecessor but with a few upgrades.
Here’s how the Sony Xperia 1 II and the Sony Xperia 1 compare to help you work out which to buy and whether to upgrade. Keep in mind that the Xperia 1 III is also expected to appear at some point in the next few months.
squirrel_widget_2707912
What’s the same?
Display
Triple rear camera
Fingerprint sensor
The Sony Xperia 1 II offers the same Omnibalance design we have come to expect from Sony Xperia devices, with a metal frame sandwiched between two glass panels like the Xperia 1. There are some differences, which we will go into in a minute, but it’s clear the Xperia 1 II and Xperia 1 are part of the same family.
Both devices are IP65/68 water and dust resistant and both have a 6.5-inch CinemaWide display with a 4K resolution and a 21:9 aspect ratio. The Xperia 1 II and Xperia 1 also both have a triple rear camera, single front camera, fingerprint sensor and a number of Sony technologies including Stamina Mode for the battery.
What’s different?
Despite looking similar and sharing many of the same technologies, there are a few differences between the Xperia 1 II and Xperia 1 which are worth considering if you are planning to upgrade or choosing between the two models.
Design
Xperia 1 II: 166 × 72 × 7.9mm, 181g
Xperia 1: 167 x 72 x 8.2mm, 178g
The Xperia 1 II has squarer edges than the Xperia 1, though the overall tall and slender look is shared between the two handsets, with both measuring 72mm in height.
The Xperia 1 II is ever so slightly narrower and slimmer than the Xperia 1 however, and a little heavier. It also sees the reintroduction of the 3.5mm headphone jack and it repositions the rear camera housing from the centre to the top left of the handset, as it was on previous Xperia handsets before the Xperia 1.
Although the Xperia 1 II and the Xperia 1 have the same size and resolution display, the Xperia 1 II adds a couple of extras. Both devices have the Creator mode “powered by CineAlta”, which is designed to deliver a true representation of colours like a Master Monitor, and they are both HDR compatible.
The Xperia 1 II has also a feature called Motion Blur Reduction though, which aims to deliver visuals like a 90Hz display.
Camera
Xperia 1 II: Triple rear + ToF sensor, single front
Xperia 1: Triple rear, single front
Both the Xperia 1 II and the Xperia 1 feature a triple rear camera made up of three 12-megapixel sensors, though the Xperia 1 II adds a Time of Flight sensor too. It also builds on the camera features offered by the Xperia 1, including a Photo Pro mode with a visual layout that reflects the user interface of the Sony Alpha 9.
There’s also a 20fps burst mode that can give you autofocus and auto exposure with subject tracking through the burst.
Both the Xperia 1 II and the Xperia 1 have an 8-megapixel front camera.
The Xperia 1 II runs on the Qualcomm Snapdragon 865 with the X55 modem, allowing for 5G connectivity. The Xperia 1 meanwhile, runs on the Qualcomm Snapdragon 855 and offers 4G LTE connectivity.
There is also a little extra RAM in the Xperia 1 II at 8GB compared to 6GB in the Xperia 1 and the 2020 device offers double the internal storage too at 256GB over 128GB. Both handsets have microSD support for storage expansion, but the Xperia 1 II supports up to 1TB cards, while the Xperia 1 supports up to 512GB cards.
Battery
Xperia 1 II: 4000mAh battery, wireless charging
Xperia 1: 3330mAh battery, no wireless charging
The Xperia 1 II comes with a larger battery capacity than the Xperia 1, offering a 4000mAh cell over the 3330mAh battery in the 2019 model. That’s not the only differences in the battery department though.
The Xperia 1 II finally sees Sony offer wireless charging – a feature the Xperia 1 notably leaves off its spec sheet, despite many competitors offering the technology. USB Type-C charging is on board both devices and both have technology like Sony’s Stamina Mode as we mentioned previously.
Price
The Xperia 1 II costs £1099 in the UK, which is pricier than what the Xperia 1 first retailed at.
The Xperia 1 cost £849 when it first arrived. You’ll likely find it available cheaper now though.
squirrel_widget_261774
Conclusion
The Sony Xperia 1 II builds upon the Xperia 1, offering a more advanced processor, more RAM, more storage and a larger battery – all of which you would expect from a succeeding flagship. Sony has also refined the design though, reintroduced the 3.5mm headphone jack and enhanced the camera capabilities.
The display is pretty much the same between the two handsets and the software experience will be pretty much identical too, aside from a few extra features on the Xperia 1 II.
On paper, the Xperia 1 II is the device to go for, but consider that the Xperia 1 III will likely appear at some point this year, and depending on what features are most important to you, you might consider the some compromises if you can find the Xperia 1 at a decent price now.
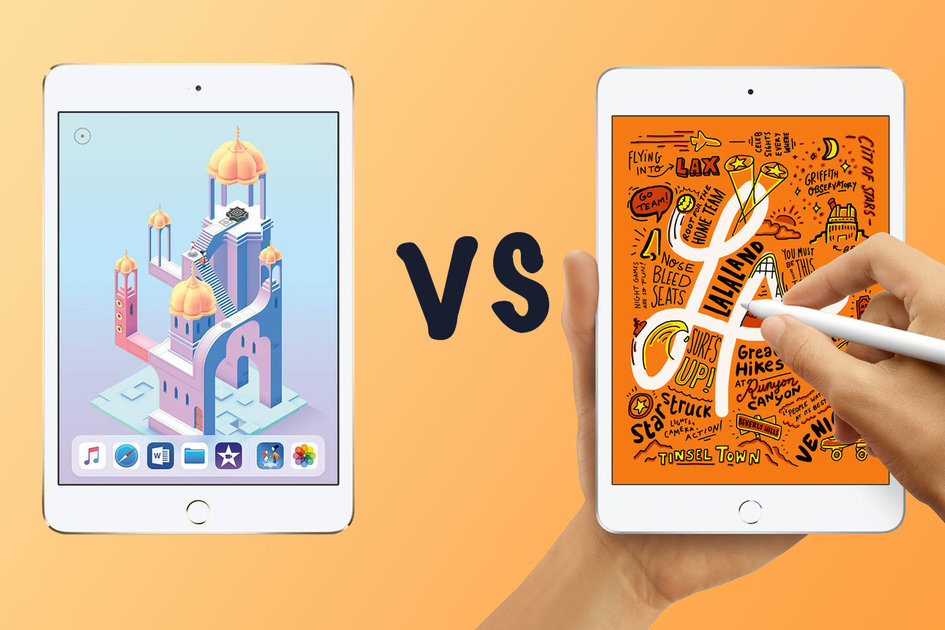
(Pocket-lint) – After four years, the Apple iPad mini 4 was succeeded by the iPad mini 5 in March 2019.
The current iPad mini is a 7.9-inch tablet that offers the same design as its predecessors, but a major upgrade in terms of its capability.
This is how the iPad mini 4 and the iPad mini 5 compare. What’s the same, what’s different and should you upgrade?
iPad mini 4 vs iPad mini 5: Price
The iPad mini 4 cost £319 when it was still available. It is now discontinued, though you might find it through second-hand vendors and some resellers.
The iPad mini 5 starts at $399 in the US or £399 in the UK for the 64GB model or £549 in the UK and $549 in the US for the 256GB model so it’s quite a bit more expensive than the iPad mini 4.
squirrel_widget_148287
What’s the same between the iPad mini 4 and the iPad mini 5?
They might be several years apart, but there are a couple of similarities between the iPad mini 4 and its successor, the iPad mini 5.
Design
Touch ID
203.2 x 134.8 x 6.1mm
Silver, Space Grey, Gold
The iPad mini 4 and the iPad mini 5 share the same design, as well as the same measurements. Both offer an aluminium body with curved edges and rounded corners and both come in Silver, Space Grey and Gold colour options.
On the front, the display features bezels at the top and the bottom and Apple’s Touch ID fingerprint sensor is positioned at the bottom. Unlike the iPad Pro models, the iPad mini 5 does not get Face ID.
Display size and resolution
7.9-inches
2048 x 1536 resolution
Both the iPad mini 4 and the iPad mini 5 have a 7.9-inch display with a 2048 x 1536 pixel resolution for a pixel density of 326ppi. The two devices also both opt for a Retina LED backlit IPS LCD screen.
Rear camera
8MP, f/2.4
1080p video
Both the iPad mini 4 and the iPad mini 5 have an 8-megapixel rear camera with a f/2.4 aperture. They both have HDR for photos and they both offer 1080p video, but the iPad mini 5 does offer some improvements.
Speakers
Stereo speakers
Both the iPad mini 5 and the iPad mini 4 offer stereo speakers, which are situated at the bottom on the device next to the Lightning port.
Battery
10 hours
The iPad mini 4 and the iPad mini 5 have the same battery capabilities, promising up to 10 hours of surfing the web on Wi-Fi, watching video or listening to music. The iPad mini 5 performs better in the real world though, thanks to the upgraded processor over the mini 4.
Software
iOS 12
Both the iPad mini 4 and the iPad mini 5 are capable of running the latest iOS build – iPadOS 14. The iPad mini 5 offers a couple of extra features though, and it is a smoother, faster experience too.
What’s different between the iPad mini 4 and the iPad mini 5?
They might look the same on the surface, but there are several differences beneath the hoods of the iPad mini 4 and iPad mini 5.
Processor
iPad mini 5: A12 Bionic chip
iPad mini 4: A8 chip
As you would expect, the iPad mini 5 updates the processing power of the iPad mini. It has the A12 Bionic chip under its hood, while the iPad mini 4 has the A8 processor so there are some big improvements in speed between the two mini models.
Storage capacities
iPad mini 5: 64GB/256GB
iPad mini 4: 16GB/32GB/64GB/128GB
The iPad mini 4 was originally available in 16GB, 32GB, 64GB and 128GB storage options. The iPad mini 5 launched in two models with a 64GB option and a 256GB option. None of the iPad mini models offer microSD support.
Front camera
iPad mini 5: 7MP, 1080p video
iPad mini 4: 1.2MP, 720 video
The iPad mini 5 has a 7-megapixel front FaceTime HD camera with an f/2.2 aperture. It is capable of recording 1080p video and it offers a Retina Flash and wide colour capture.
The iPad mini 4 meanwhile, has a 1.2-megapixel FaceTime HD camera, offering 720p video.
Display technology
iPad mini 5: Apple Pencil, True Tone
iPad mini 4: No Apple Pencil, no True Tone
The iPad mini 5 and mini 4 might share the same display size and resolution but the iPad mini 5 offers Apple Pencil support, which the iPad mini 4 does not.
You’ll also find Apple’s True Tone technology on the iPad mini 5, along with a p3 wide colour gamut, neither of which the iPad mini 4 offers.
Conclusion
The Apple iPad mini 5 and mini 4 might look the same, but the iPad mini 5 offers several hardware upgrades.
For those with an iPad mini 4, you’ll likely notice quite a big difference in performance if you upgrade to the mini 5, along with a more capable front camera, Apple Pencil support and the option of more storage.
It’s an expensive upgrade though and all the differences are under the hood rather than on the surface, so some may find it hard to justify.
For those looking to choose between the iPad mini 4 and the iPad mini 5, the 5 is the one to go for if you have the budget. You might find the iPad mini 4 still around in some places, but remember the tech underneath is now several years old and it’s possible there will be a new iPad mini in the not too distant future.
Keeping fit is hard for a lot of people, especially if you’re still avoiding health clubs (or were never a fan to begin with). A year after many of us started staying home, we’re still looking for ways to stay in shape and stay healthy.
We asked the staff of The Verge what they were using to keep fit and healthy during the pandemic and got the following answers.
Fitness videos and websites
Yoga With Adriene
If you’re looking to try yoga, I really recommend the 30-day challenges offered by Adriene Mishler’s YouTube channel, Yoga With Adriene. She’s very welcoming and makes my wife and I, who are absolute yoga beginners, feel like we are doing a great job whenever we show up to the mat. Plus, in later videos, her incredible dog, Benji, shows up and flops around. — Jay Peters, news writer
305 Fitness
I’ve never been so sedentary in my life than this past winter. If I had a tracker monitoring my fitness / movement, the past several months would be a sad, low pit on the graph… thank you, New York winter! Sometimes, when I’d muster up some energy, I’d do a 305 dance cardio video with the instructor, Sadie. Her energy made me smile and dancing alone in my apartment made me laugh, which is a plus during this time. The music is great and the 40 minutes goes by fast because you’re basically just dancing. — Alix Diaconis, director
Hiking Project
Hiking Project
I’ve always been partial to hiking and other outdoor activities, but the pandemic has made them even more attractive — it’s easy to social distance when there’s less than 20 people around and you’ve got the entire side of a mountain to explore. Hiking Project (and its counterparts and alternatives like MTB Project, AllTrails, and Trailforks) has been instrumental in helping me find new and longer hikes to do — and in keeping me from getting lost while doing them. I’ve also been playing with the Guthook Guides app as an exercise in daydreaming. — Mitchell Clark, news writer
Fitness equipment
Saris Fluid Indoor Bike Trainer
Saris Fluid 2 TrainerPhoto: Saris
I wanted to do indoor bike exercising, but I don’t have the space for an indoor bike, so I wanted to use a bike I already have. My setup is Apple Fitness Plus and a Saris Fluid trainer — I have the original model, but there’s a slightly updated model that comes with a smart sensor that can speak to some smartphone apps. Apple Fitness Plus can’t read it, but other indoor bike apps like Zwift or Garmin can.
The Saris is great because I don’t have to remove my wheel to use it, it’s not hideously loud, and it’s made in Wisconsin. If you’re looking at getting something like this, my very strong advice is to buy it from a local bike shop. I did, and they gave me great advice on compatibility with my bike, including directing me away from a fancier, incompatible trainer and hooking me up with a new axle from the Robert Axle project so my bike would work with the Saris. — Dieter Bohn, executive editor
Exerpeutic Folding Magnetic Upright Exercise Bike
Exerpeutic Folding Magnetic Upright Exercise Bike Photo: Exerpeutic
While walking is a good way to do at least some daily movement, it’s all too easy to shrug and put the thought aside if the weather is wet, cold, or just generally unpleasant. I decided that an exercise bike might help, but we don’t have much room in our small and very crowded home. Finally, I decided on the Exerpeutic Folding Magnetic Upright Exercise Bike. It’s nowhere near as flashy as the Peloton — it’s not “smart” at all — but I can now pedal in my living room while watching streaming content on my TV, fold it up, and put it away until tomorrow. — Barbara Krasnoff, reviews editor
The Stick Original muscle massager
The StickPhoto: Power Systems
An embarrassingly big part of my life pre-pandemic was massages. Biking and running around NYC makes you sore! And apparently sitting in my apartment also makes me sore, somehow. This hard foam roller is not a massage, but it’s a darn good replacement and much cheaper, too. It’s hard, but flexible, which is very effective for working out knots. Plus, it’s easy to use because of the grips, unlike traditional foam rollers that are just cylinders of styrofoam. — Alix Diaconis
PowerBlock Sport 24 Adjustable Dumbbell
PowerBlock Sport 24 Adjustable Dumbbell Photo: PowerBlock
While I missed all the machines at the gym, I knew that I was never going to be able to fit any of them into my apartment. However, the PowerBlock Sport adjustable dumbbells let me keep doing at least some amount of strength training, without taking the massive amounts of space a regular set of weights would. Having access to weights is a lifesaver for me — I’ve found that the only reliable way for me to stave off a repetitive strain injury is doing dumbbell rows. The one downside is that I went with the non-expandable version and, not to literally flex, after using them for a year I’ll probably need to upgrade them — I’m starting to use the heaviest setting available. — Mitchell Clark
Fitness footwear
Saucony Peregrine 11 trail runners
Saucony Peregine II Photo: Saucony
I invite you to click through and look at these Trapper-Keeper-ass shoes. Really, just get their vibe. I’ve spent a lot of the pandemic hiking — hell, I even took up running — and these trail runners from Saucony are really, really good. They’re grippy on uncertain terrain without being too heavy or stiff, so whether I want to jog on some dirt or knock out a long hike, these are my go-tos. Obviously, the shoe that works best for you will vary based on your foot and gait and so on, but if you’re thinking of taking up hiking, trail runners are lighter than hiking boots and often more comfortable. Plus, you can wear some genuinely shocking neon. — Liz Lopatto, deputy editor
Cairn Pro II Adventure Sandals
Cairn Pro II Adventure SandalsPhoto: Bedrock Sandals
If you want to go hiking and, like me, find hiking boots unbearably uncomfortable (especially in the summertime), I can give Bedrock Sandals two thumbs up for being ultra-comfortable and durable hiking shoes that will keep being comfortable even after a river crossing or five (and for being versatile enough to bike in and wear to the beach or grocery store). — Mitchell Clark
If you buy something from a Verge link, Vox Media may earn a commission. See our ethics statement.
If you’ve used a ThinkPad before, you probably know 90 percent of what to expect from the ThinkPad X1 Nano. All of the staples are here. It’s got the black carbon fiber chassis, the discrete buttons on top of the touchpad, the mechanical privacy shutter, the ThinkPad logo on the palm rest, and (of course) the red pointer nub in the middle of the keyboard.
But one thing is unique about the X1 Nano: it’s the lightest ThinkPad Lenovo has ever made. Starting at just 1.99 pounds, the Nano isn’t technically the lightest laptop on the market. But it’s still one of the best combinations of portability, build quality, and performance that you can buy.
Lenovo has made a few other useful tweaks as well, though they’re not tweaks you’ll necessarily notice when you’re looking at the machine. There’s not much to overthink here: it’s a smaller, lighter ThinkPad. Lenovo didn’t reinvent the wheel, but the updates it made succeed in keeping the Nano current among its rapidly innovating peers.
The keyboard is “nearly full-sized.”
Here’s what’s new with the Nano, in addition to its lightweight build. It has a 16:10 screen, a feature that a number of this year’s ThinkPads are adopting for the first time. It has a new 11th Gen Intel processor, and it’s certified through Intel’s Evo program (which is the chipmaker’s way of verifying that a laptop includes its latest features like Thunderbolt 4, Wi-Fi 6, instant wake, and fast charging). And there are a few enhanced security features, including a match-on-chip fingerprint reader and a dTPM 2.0 chip, which will mostly be notable for business users.
What looms over that verdict, of course, is the Nano’s price. Technically, it starts at $2,499 and maxes out at $3,719. The good news is that Lenovo’s products are very often heavily discounted, and the current sale prices at the time of publish range from $1,149 to $2,231.
The Nano is highly customizable. It comes with a Core i5-1130G7, a Core i5-1140G7, a Core i7-1160G7, or a Core i7-1180G7, all of which support Intel’s vPro. You can also select 8GB or 16GB of RAM, 256GB through 1TB of SSD storage, and a touchscreen or non-touch screen (both with 2160 x 1350 resolution). There’s even a Linux option. My review model (which runs Windows 10 Pro) is in the middle, with a quad-core Core i7-1160G7, 16GB of memory, 512GB of storage, and the non-touch display. Folks interested in the touchscreen should note that those models are heavier (2.14 pounds) and a bit thicker as well.
You’re paying a premium for the Nano’s weight and the extra business features. A comparable Dell XPS 13 to my test model, for example, is $1,599.99 and 2.64 pounds (over half a pound heavier than this unit).
That said, the Nano’s weight is astounding. I feel like I’m carrying nothing while I’m holding it, even one-handed. I’d easily haul it in my purse or throw it into my backpack and forget that it’s there. For a few comparisons: it’s half a pound lighter than the ThinkPad X1 Carbon Gen 9. It’s close to a pound lighter than the ThinkPad X13, as well as the latest MacBook Air. These are already laptops known for their portability, and the Nano is noticeably slimmer.
The laptop achieves this without sacrificing durability, which is often a concern with ultra-light devices. The chassis feels sturdy — there’s just a tiny bit of flex in the keyboard and screen, and I’d be very comfortable jerking it around in a briefcase. Lenovo says the Nano has been “tested against 12 military-grade certification methods,” so there’s also that.
I’m also very happy with the 16:10 display, which is about the same height as a typical 14-inch 16:9 screen. In addition to the extra vertical space it provides, it’s sharper than a 1080p display, and it delivers a nice picture.
There’s also a Dolby Atmos speaker system, which includes two upward-firing and two downward-firing woofers. The laptop comes preloaded with Dolby Access, which is one of my favorite audio apps. You can swap between presets for Movies, Music, and other scenarios (as well as custom profiles), and the settings make an audible difference. You can also personalize the four-microphone array for different uses, including conference calls and voice recognition.
My one quip with the chassis is the keyboard. It’s a fine keyboard, and the little red nub is there if you want to use it. But the Fn and Ctrl keys are swapped from the locations where you’ll find them on other laptop keyboards — every time I meant to hit Ctrl, I hit Fn. After a week of use, I have not yet adjusted to this.
Now, I want to be very clear: I know this is the way ThinkPad keyboards have been laid out since the dawn of time. I also know you can swap the two keys in BIOS. Still, if you’re not currently a ThinkPad user, you should note that you’ll either need some time to get used to this keyboard layout or you’ll be using mislabeled keys.
The port selection is also limited, though that’s not unique among thin devices. You get two USB-C ports and an audio jack, and they’re all on the left side.
Performance-wise, the X1 Nano did an excellent job. It’s not what you’d want to buy for demanding tasks like heavy gaming or video editing, but it kept up with my gaggles of Chrome tabs, spreadsheets, and streaming apps without a stutter. I never heard any noise out of the machine or felt noticeable heat, even when I was running fairly taxing loads.
“Anti-fry circuitry” ensures that USB-C chargers send the correct voltage.
As mentioned earlier, the Nano has a number of new security features that are coming to 2021 ThinkPads across the line. The one I found most useful was the presence-sensing tool, which automatically locks the device when you’re not in front of it and unlocks it when you’re back. ThinkPads aren’t the only business laptops to adopt this technology, but it is convenient and worked well in my testing. You can also turn it off if it creeps you out. Elsewhere, there’s a match-on-sensor fingerprint sensor next to the touchpad (the qualifier means that fingerprint enrollment, pattern storage, and biometric matching all happens directly within the sensor). The sensor also uses AI to distinguish between real and fake fingers, in case that was a concern of yours.
The one feature that isn’t quite stellar here is the battery life. I averaged 6 hours and 38 minutes between charges with my daily workflow (around a dozen Chrome tabs with office stuff like emailing, Slack, Google Docs and Sheets, occasional Spotify and YouTube streaming, with brightness around 200 nits). That’s fine, and not unexpected since the Nano only has a 48Whr battery, but I often see over seven hours out of machines at this price. It means that if your workload is similar to mine, you may not make it through a full workday on a charge. The 65W charger took 43 minutes to juice the device up to 60 percent.
In the ThinkPad X1 Nano, Lenovo is playing to its strengths. You’re getting a comfortable keyboard and touchpad, a red nub, and a capable processor in a sturdy system that’s built to last. The Nano brings a new factor to the table — a chassis that’s (just) under two pounds. The target audience here is clear: business users who like the traditional ThinkPad look and feel and are willing to pay more for an ultralight machine.
The main compromises you’re making are the battery life and port selection. Neither of these is an absolute disaster for the Nano, but they mean that a chunk of users may find competing business laptops more practical. There are a number of ultraportable business laptops with superb battery life, more useful ports, and comparable weight (such as Asus’ ExpertBook B9450 and HP’s Elite Dragonfly). That said, for users who are attached to the ThinkPad brand and want the lightest of the light, the X1 Nano will deliver.
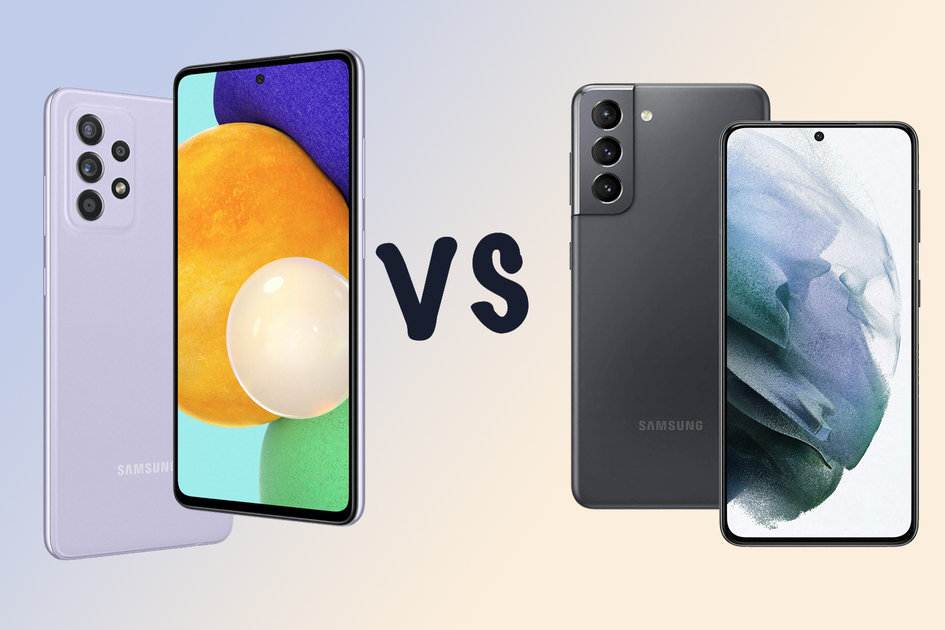
(Pocket-lint) – Samsung announced three new Galaxy A devices during an event in March, sitting below the Galaxy S21 series in terms of cost, but borrowing some of its key features and specs, for nearly half the price.
You can read about how the Galaxy A52 5G, A52 and A72 compare to each other in our separate feature, but here we are focusing on how the Galaxy A52 5G compares to the flagship Galaxy S21 and Galaxy S21+.
Design
Galaxy A52 5G: 159.9 x 75.1 x 8.4mm, 189g
Galaxy S21: 151.7 x 71.2 x 7.9mm, 169g
Galaxy S21+: 161.5 x 75.6 x 7.8mm, 200g
The Samsung Galaxy A52 5G has a flat display with a centralised punch hole camera at the top. On the rear, there is a rectangular camera housing with four lenses, three of which are more prominent. The camera housing is positioned in the top left corner as an island.
The A52 5G has a plastic rear, is IP67 water and dust resistant and it comes in four different colour options.
The Galaxy S21 and Galaxy S21+ meanwhile, also both offer plastic rears and flat displays with a centralised punch hole camera at the top of the screen. They have a rectangular camera housing on the rear with three prominent lenses, but the housing is a different colour to the rear and wraps around into the frame of the devices, offering a slightly different look to the A52 5G.
The Galaxy S21 comes in four colour options, while the Galaxy S21+ is available in five options. Both devices are IP68 rated for water and dust.
All three devices have under-screen fingerprint readers.
Display
Galaxy A52 5G: 6.5-inches, 2400 x 1800 pixels, 120Hz
Galaxy S21: 6.2-inches, 2400 x 1080 pixels, 48-120Hz
Galaxy S21+: 6.7-inches, 2400 x 1080 pixels, 48-120Hz
The Samsung Galaxy A52 5G has a 6.5-inch Super AMOLED display with a 2400 x 1080 resolution, which delivers a pixel density of 405ppi.
It offers a maximum brightness of 800nits and it comes with a 120Hz refresh rate, but it doesn’t support HDR.
The Galaxy S21 has a smaller 6.2-inch display, which also has a 2400 x 1080 resolution, resulting in a slightly sharper pixel density of 424ppi. The Galaxy S21+ has a larger 6.7-inch display, again with a 2400 x 1080 resolution, for a slightly softer pixel density of 393ppi.
Both the Galaxy S21 and S21+ have a maximum brightness of 1300nits, support HDR10+ and come with an adaptive refresh rate of 48Hz to 120Hz.
The Samsung Galaxy A52 5G runs on the Qualcomm Snapdragon 750G processor, supported by 6GB or 8GB of RAM and 128GB or 256GB of storage. It offers microSD support for storage expansion up to 1TB – something the S21 series doesn’t offer.
There’s a 4500mAh battery capacity under the hood, which supports 25W fast charging but there is no wireless charging or reverse wireless charging on board.
The Galaxy S21 and S21+ both run on either the Qualcomm Snapdragon 888 chipset, or the Exynos 2100, depending on the region. There is 8GB of RAM support and storage options of 128GB and 256GB but neither supports microSD, as mentioned.
The Galaxy S21 has a 4000mAh battery, while the Galaxy S21+ has a 4800mAh battery. Both support fast wired and wireless charging.
All three models being compared in this feature are 5G enabled.
Galaxy S21/21+: Triple rear (main, ultra wide, telephoto), 10MP front
The Samsung Galaxy A52 5G comes with a quad rear camera. This is made up of a 64-megapixel main camera with optical image stabilisation (OIS) and an aperture of f/1.8, along with a 12-megapixel ultra wide-angle lens with a f/2.2 aperture, a 5-megapixel depth sensor with an f/2.4 aperture and a 5-megapixel macro sensor with an f/2.4 aperture.
On the front, there’s a 32-megapixel camera with f/2.2 aperture.
The S21 and S21+ both have a triple rear camera, made up of a 12-megapixel main sensor with 1.8µm pixel size, f/1.8 aperture and OIS, a 12-megapixel ultra-wide sensor with 1.4µm and f/2.2, and a 64-megapixel telephoto sensor with 0.8µm, f/2.0 and OIS.
There’s a 10-megapixel, 1.22µm, f/2.2 front camera.
Price
Galaxy A52 5G: £399/€429
Galaxy S21: £769/€849
Galaxy S21+: £949/€1049
The Samsung Galaxy A52 5G will cost £399 in the UK and €429 in Europe.
The Galaxy S21 starts at £769 in the UK and €849 in Europe.
The Galaxy S21+ starts at £949 in the UK and €1049 in Europe.
squirrel_widget_4139130
Conclusion
The Samsung Galaxy A52 5G is almost half the price of the Galaxy S21, and less than half the price of the S21+.
It doesn’t have an adaptive refresh rate, a telephoto lens for optical zoom, the top-of-the-range processor, HDR support or wireless charging, but that’s pretty much all it misses out on compared to the more expensive S21 and S21+ in terms of specs.
The A52 5G still offers a 120Hz refresh rate, a display size in the middle of the S21 and S21+, 5G capabilities, a larger battery capacity than the S21 and it has microSD support, which the S21 and S21+ do not offer. Its camera isn’t as good as the S21 however so bear that in mind.
For the money, it is well worth considering the A52 5G over the two flagship models though, depending on what features matter to you most.
(Pocket-lint) – Samsung announced the sub-flagship Galaxy A52 5G, Galaxy A52 and Galaxy A72 smartphones at an event in March, all of which sit below the company’s flagship S21 series, but offer a few of its great features and some of its design traits.
We’ve covered off how the Galaxy A52 5G compares to the Galaxy S21 in a separate feature, but here we are looking at how the Galaxy A52 devices and A72 compare to each other to help you work out which Samsung Galaxy A device could be right for you.
Design
A52 5G: 159.9 x 75.1 x 8.4mm, 189g
A52: 159.9 x 75.1 x 8.4mm, 189g
A72: 165 x 77.4 x 8.4mm, 203g
The Samsung Galaxy A52 5G, Galaxy A52 and the A72 all share a very similar design. The Galaxy A72 is the larger and heavier of the three devices, but it also offers a larger display.
All three offer a centralised punch hole camera at the top of their screens, they all have a rectangular camera housing on the rear with a quad camera offering three large lenses and one smaller lens and they all come in the same four colour options.
All three devices are also IP67 water and dust resistant and they all feature flat displays and under-screen fingerprint readers.
Display
A52 5G: 6.5-inch, Super AMOLED, Full HD+, 120Hz, 800nits
A52: 6.5-inch, Super AMOLED, Full HD+, 90Hz, 800nits
A72: 6.7-inch, Super AMOLED, Full HD+, 90Hz, 800nits
The Samsung Galaxy A52 5G comes with a 6.5-inch Super AMOLED display with a Full HD+ resolution. It’s Samsung’s Infinity-O display and it offers a 120Hz refresh rate, like the Galaxy S21 series, though it isn’t adaptive.
The Galaxy A52 LTE model has the same size and resolution display as the 5G model but it has a 90Hz refresh rate instead. Both the 4G and 5G models have a maximum brightness of 800nits.
The Galaxy A72 meanwhile, has a slightly larger 6.7-inch Super AMOLED display, which is also Samsung’s Infinity-O display like the A52 models. It also offers a Full HD+ resolution, 800nits maximum brightness and a 90Hz refresh rate like the standard A52 model.
The Samsung Galaxy A52 5G runs on the Qualcomm Snapdragon 750G processor, while the Galaxy A52 and Galaxy A72 both run on the Qualcomm Snapdragon 720G chipset. The Galaxy A52 5G is 5G-enabled, as you might have guessed, while the A52 and A72 are both LTE.
Both the Galaxy A52 5G and Galaxy A72 come in a choice of 6GB or 8GB of RAM with 128GB or 256GB storage. The Galaxy A52 has a choice of 4GB, 6GB or 8GB of RAM, with storage options of 128GB and 256GB. All three devices have microSD support for storage expansion up to 1TB.
In terms of battery capacity, the Galaxy A52 5G and Galaxy A52 4G have a 4500mAh battery, while the Galaxy A72 has a slightly larger 5000mAh capacity. All three devices have stereo speakers with Dolby Atmos.
There’s no wireless charging on board any of the models.
Camera
A52 5G: Quad rear (64MP main + 12MP ultra wide + 5MP depth + 5MP macro), 32MP front
A52: Quad rear (64MP main + 12MP ultra wide + 5MP depth + 5MP macro), 32MP front
A72: Quad rear (64MP main + 12MP ultra wide + 8MP telephoto + 5MP macro), 32MP front
The Samsung Galaxy A52 5G, A52 and Galaxy A72 all come with a quad rear cameras but their compositions differ.
The Galaxy A52 5G and Galaxy A52 both have a 64-megapixel main camera with an f/1.8 aperture and OIS, a 12-megapixel ultra wide-angle lens with f/2.2 aperture, a 5-megapixel depth sensor with f/2.4 aperture and a 5-megapixel macro sensor with f/2.4 aperture.
The Galaxy A72 meanwhile, has the same 64-megapixel main camera, along with the same 12-megapixel ultra wide-angle sensor and the same 5-megapixel macro lens. It swaps the depth sensor for an 8-megapixel telephoto lens though, offering 3x optical zoom, OIS and an aperture of f/2.4.
All three devices have the same 32-megapixel front camera with an aperture of f/2.2.
Price
The Samsung Galaxy A52 5G will cost £399 in the UK and €429 in Europe. The Galaxy A52 LTE model won’t come to the UK but will cost €349 in Europe.
The Samsung Galaxy A72 is slightly more expensive, costing £419 in the UK and €449 in Europe.
Conclusion
The Samsung Galaxy A72 is the most expensive of the three devices being compared in this feature, offering the largest display, largest battery and a telephoto lens for 3x optical zoom.
It misses out on a slightly more advanced processor compared to the A52 5G, 5G capabilities and the 120Hz refresh rate display though, while the A52 5G trades the telephoto lens of the A72 for a depth sensor.
Meanwhile, the standard A52 – which won’t come to the UK – is a mix between the A52 5G and the A72, offering the same camera, display, design and battery as the A52 5G, but with the LTE capabilities, 90Hz refresh rate display (albeit smaller) and processor as the A72.
The decision between these devices will therefore likely come down to which features matter to you most. Do you want a fast refresh rate and 5G? Then the A52 5G is the one for you. If you want a big display, big battery and optical zoom capabilities, but you’re happy to lose 5G and the faster refresh rate display, you’ll want to pay the £20 extra for the A72.
(Pocket-lint) – Despite being well known for invoking nostalgic memories of big wooden speaker cabinets and crackling vinyl, Klipsch is a brand that has adapted with the times. Its first pair of true wireless earbuds was such a great-sounding pair that it became one of our favourites for pure music enjoyment.
The second-generation – the aptly named Klipsch T5 II True Wireless – comes with lots of refinements in terms of design and performance, and also comes in two Sport models, one with exclusive McLaren F1 design. In this review, we’re focusing on the regular model.
Design and build
IP67 water- and dust-resistant
Colours: White / Gunmetal
Physical control button
6 pairs of oval tips
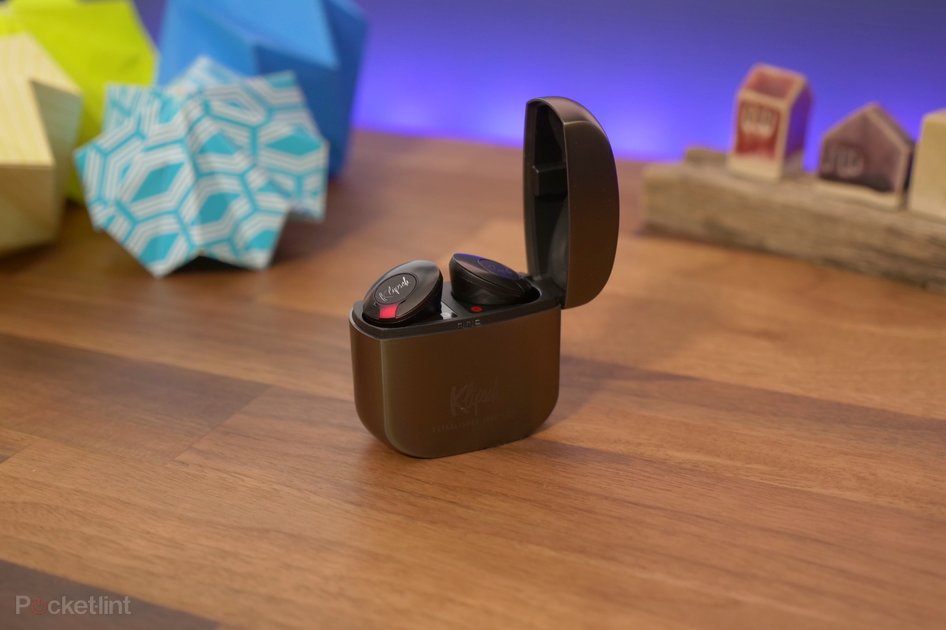
Charging case
It’s in the design department you’ll notice the biggest difference between the T5 and the T5 II. Starting with the first thing you get to: the case. Thankfully, the main ethos remains same, as it still looks friggin’ cool – almost like a chunky Zippo lighter. It’s smaller and thinner than the previous version, but there’s a solidity and durability to it. It feels like it might hurt you if you dropped it on a toe, and gives a reassuring clank when you open and shut the lid.
Pocket-lint
As for the ‘buds, these almost keep to the same essence too. It’s a similar hard-to-describe shape, featuring a tapered oval design but, again, the second-gen is slimmer, smaller and lighter than the originals. That also means that in the non-Sport model, there’s nothing holding these ‘buds in your ears except for the redesigned oval silicone tip.
The tips extend out from underneath the main body in an unconventional design, but once stuck inside the entrance of our ear canal, we found the fit was secure and steady. These ‘buds never felt like they’d fall out – and didn’t gradually push their way out either. Since the silicon tips are soft and thin, they give just the right amount of pressure. In our ears, the pre-applied tips were the perfect fit, but the T5 II comes with six different sizes, so you should easily find a pair that works for you.
Another interesting change is that there’s one single button on the outside, which depresses really easily to ensure that when you press, it gives easily and doesn’t lead to that feeling that you’re just pushing an earbud deeper into your ear. The button gives in once it feels even the remotest bit of resistance, which makes good sense.
Pocket-lint
Around the edge of that button is a metal collar, which makes up that outer surface. It’s more than just decoration though, it’s an external antenna to ensure there’s nothing getting in the way of that connection between the ‘buds and what you’re connecting them to.
The main takeaway here is that the T5 II is a lightweight and secure package. Not so secure that we’d recommend using these in-ear in the gym or when out running, but that’s what the Sport models are for instead.
Despite that, with an IP67 water- and dust-resistance rating, the ‘buds should survive pretty much anything anyway. Whether inside your ears, or inside their own metallic bunker/charging case.
Sound
5mm dynamic moving coil micro speaker
10Hz – 19kHz frequency response
EQ control
With frequency response as low as 10Hz, the 5mm drivers inside the Klipsch ‘buds produce sound you wouldn’t expect to hear from such small drivers. Of course, human hearing only really goes as low as 20Hz at a push – but it’s that control at the lower end of the sound spectrum where these earphones definitely excel.
Pocket-lint
With the equaliser (EQ) set to its default flat mode, there’s still plenty of bass, without it being overwhelming, but – more importantly – you still get clean and bright notes at the top end.
We love how acoustic bass drum kicks retain that feel of air moving around the kick pedal or inside the drum every time the skin is struck by the pedal. Or in songs like Hey Ma by Bon Iver, you get the full airy feel of the bass and mid notes swelling near the beginning or, later on, the muted bass note plucking. What’s more, in that same track, the subtle percussive noises are clear without dominating the primary elements of the track.
The Klipsch T5 II is adept at tackling any genre of music, and will give you the right feel from those acoustic songs, but is sonically strong with more synthesised tracks too. Crank up Leon’s Better in the Dark and enjoy the way the bass sounds when the synth and bass drum strike at the same time, without crumbling.
Pocket-lint
Of course, you can adjust the EQ, so if you need even more bass you can get it, but we found there was plenty from the default setting. In fact, we never felt the need to tweak the default sound profile. But it’s nice of Klipsch to give that option for those users who have preferences.
Features, performance and calls
8 hours playback + 24 more hours in the case (32 hours total)
Quad mic system for external noise cancelling during calls
Bluetooth 5.0 + signal boosting external antenna
Transparency mode
To get the first thing out of the way: there’s no active noise-cancelling (ANC). An increasing staple feature in the world of premium in-ears, but we’ve often argued that with a good set of well-fitted in-ears, it’s not as noticeable as it would be on over/on-ear cans. Passively, the T5 II does a good job of blocking out noise thanks to those soft tips.
Pocket-lint
Although ANC isn’t a feature here, you do still get an audio transparency mode, which uses mics around the ‘buds’ casing to let in and amplify noise from around you. Using the Klipsch Connect app you can switch it on and select how much transparency you want – it works pretty well but isn’t always all that effective once you have music playing.
It’s also worth noting that the ‘buds don’t feature any automatic play/pause feature when you remove them from your ears. There’s no proximity sensor for this, which is a bit of a shame.
On the plus side, you do get to pair the T5 II with up to eight different devices – although only one can be connected at a time.
With those external antennae doing their job, we found the wireless connectivity to be very strong. Walking from room to room and leaving the music source where it was, we struggled to make these in-ears drop connection. It’s a similar story with voice calls: you get strong performance here as well, with calls coming through clearly.
The best Lightning headphones 2021 for your iPhone or iPad
By Dan Grabham
·
Pocket-lint
As battery life goes, it’s very unlikely you’ll ever need to worry about it much. With a maximum of eight hours outside the case, thee T5 II will comfortably get you through your commute to work – well, when we all eventually return to work – and the case will keep recharging in the interim another four times over. That’s well over a full day of non-stop listening time.
Verdict
The first-generation Klipsch T5 was one of our favourite pairs of true wireless earbuds. The second generation takes what was great and refines it, making for a truly stunning pair of ‘buds.
Sure, a few advanced features might be absent – there’s no proximity sensors or active noise-cancelling – but in all the ways that matter, the T5 II performs really well. For music lovers, at this price, you’ll struggle to find anything that sounds better or packaged in as neat and stylish a product.
If you love music, we think you’ll love the sound produced by the Klipsch T5 II. There’s little to rival the quality on offer here.
Also consider
Pocket-lint
Grado T220
squirrel_widget_3658156
Grado has a similar approach to Klipsch – in that it’s all about the sound – and the T220 sounds fantastic. In fact our first listen left our jaw on the floor, it was that good. It has some downsides though, like a finicky design and sensitive touchpad.
Read the review
Pocket-lint
Bose QuietComfort Earbuds
squirrel_widget_3492116
If you want all the bells and whistles in a great sounding pair of buds, Bose has the ones for you. QC Buds have excellent noise-cancelling, great sound overall, plus a comfortable and secure fit.
Read the review
Writing by Cam Bunton. Editing by Adrian Willings.
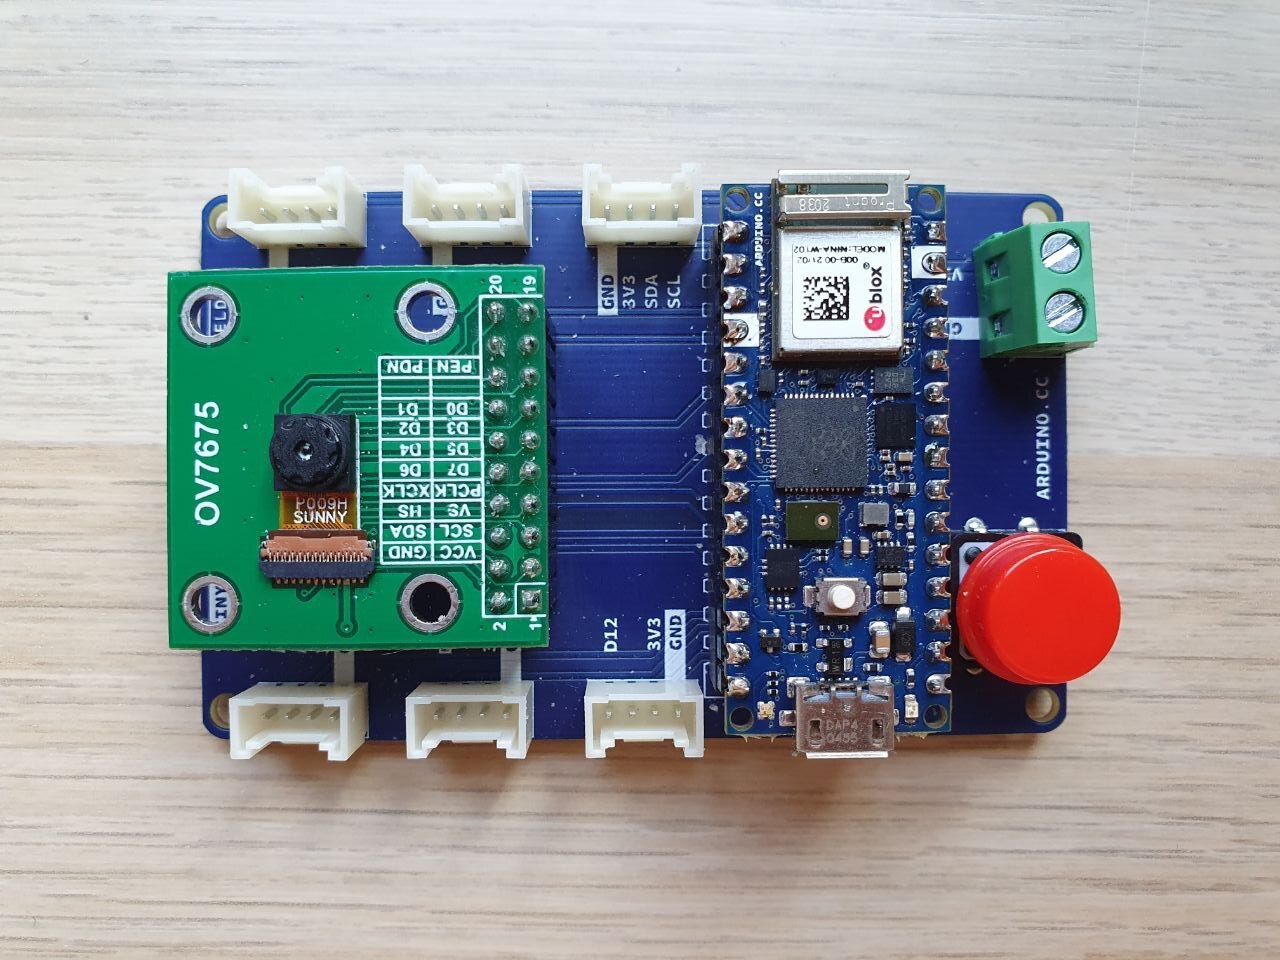
Raspberry Pi Pico board partners are slowly releasing their RP2040 ‘Pi Silicon’ based boards. So far, we have seen boards from Pimoroni and Adafruit, but hot on their heels is the Arduino Nano RP2040 Connect. In a recent tweet, we see Arduino using this board in a computer vision carrier board.
Experimenting with computer vision on the upcoming #Arduino Nano #RP2040 Connect! 👀 Loving this hot slice of @Raspberry_Pi silicon, @EbenUpton! 💖 pic.twitter.com/3Q1tFNbQfQMarch 17, 2021
See more
The Arduino Nano RP2040 Connect will be the first partner board, based upon Raspberry Pi’s RP2040 SoC, to come with WiFi and Bluetooth via a ublox NINA-W102 module. A 9-axis IMU sensor and microphone are icing on the cake for what could be the leading RP2040 for IoT.
With this latest tweet, we see an OV7675 640 x 480 camera capable of up to 30fps is used for computer vision and machine learning projects, some of which Arducam is also working on. The tweet shows the Arduino Nano RP2040 Connect on a custom carrier board that also provides six Grove style connectors, one of which is labeled for I2C use. Judging by the quality of the PCB and silkscreen printing, we hazard a guess that this is a prototype of an accessory that may be available to support the Arduino board.
The Arduino Nano RP2040 Connect looks to be the go-to RP2040 board for IoT applications. It can be programmed using the Arduino Create web editor, and support will be added to the Arduino IDE via a future update. As this is an RP2040 board, it will also support MicroPython and possibly CircuitPython should there be a demand.
There is still no indication on price or availability, but we will review this board and many other RP2040 boards from other partners.
We use cookies on our website to give you the most relevant experience. By clicking “Accept”, you consent to the use of ALL the cookies.
This website uses cookies to improve your experience while you navigate through the website. Out of these, the cookies that are categorized as necessary are stored on your browser as they are essential for the working of basic functionalities of the website. We also use third-party cookies that help us analyze and understand how you use this website. These cookies will be stored in your browser only with your consent. You also have the option to opt-out of these cookies. But opting out of some of these cookies may affect your browsing experience.
Necessary cookies are absolutely essential for the website to function properly. This category only includes cookies that ensures basic functionalities and security features of the website. These cookies do not store any personal information.
Any cookies that may not be particularly necessary for the website to function and is used specifically to collect user personal data via analytics, ads, other embedded contents are termed as non-necessary cookies. It is mandatory to procure user consent prior to running these cookies on your website.