After putting the Mirror Maze system together last fall, I needed a break from all the work that goes into a high-end custom build. Plus, I had plenty of PC cases to review. So when Singularity Computers reached asking if we were interested in checking out its Spectre III chassis, I didn’t immediately jump at the chance. But the more I thought about the case, the more I envisioned just what a system in this stunning case could look like, and the itch to build just wouldn’t go away. So I agreed to take on the case, started getting together a list of other parts I’d need and, well, here we are.
I’ve been planning ‘Blue Shift’ for the last few months, and in contrast to what we would usually do, this build doesn’t use the latest next-gen hardware. I don’t have a Ryzen 5000 CPU or an RTX 3000 GPU, and I’d rather the limited stock of those parts go to one of our readers. With everything going under waterblocks in this build anyway, does it really matter if the silicon is hiding underneath is the absolute latest and greatest?
Because this is a more fun (and far more complex) build than we typically do for case reviews, I’ll slow the pace down and look at each step in detail. I’m also leaving the full parts list till the end, because it’s last-generation hardware, and regardless, this build is all about cooling and aesthetics. So without further ado, lets dig in.
What is the Singularity Computers Spectre III?
Most cases cost about $100, stepping up to $200 if you’re shopping premium, and $300 if you’re shopping for a premium ITX case. But Singularity Computers’ Spectre III is a jaw-dropping $1400.
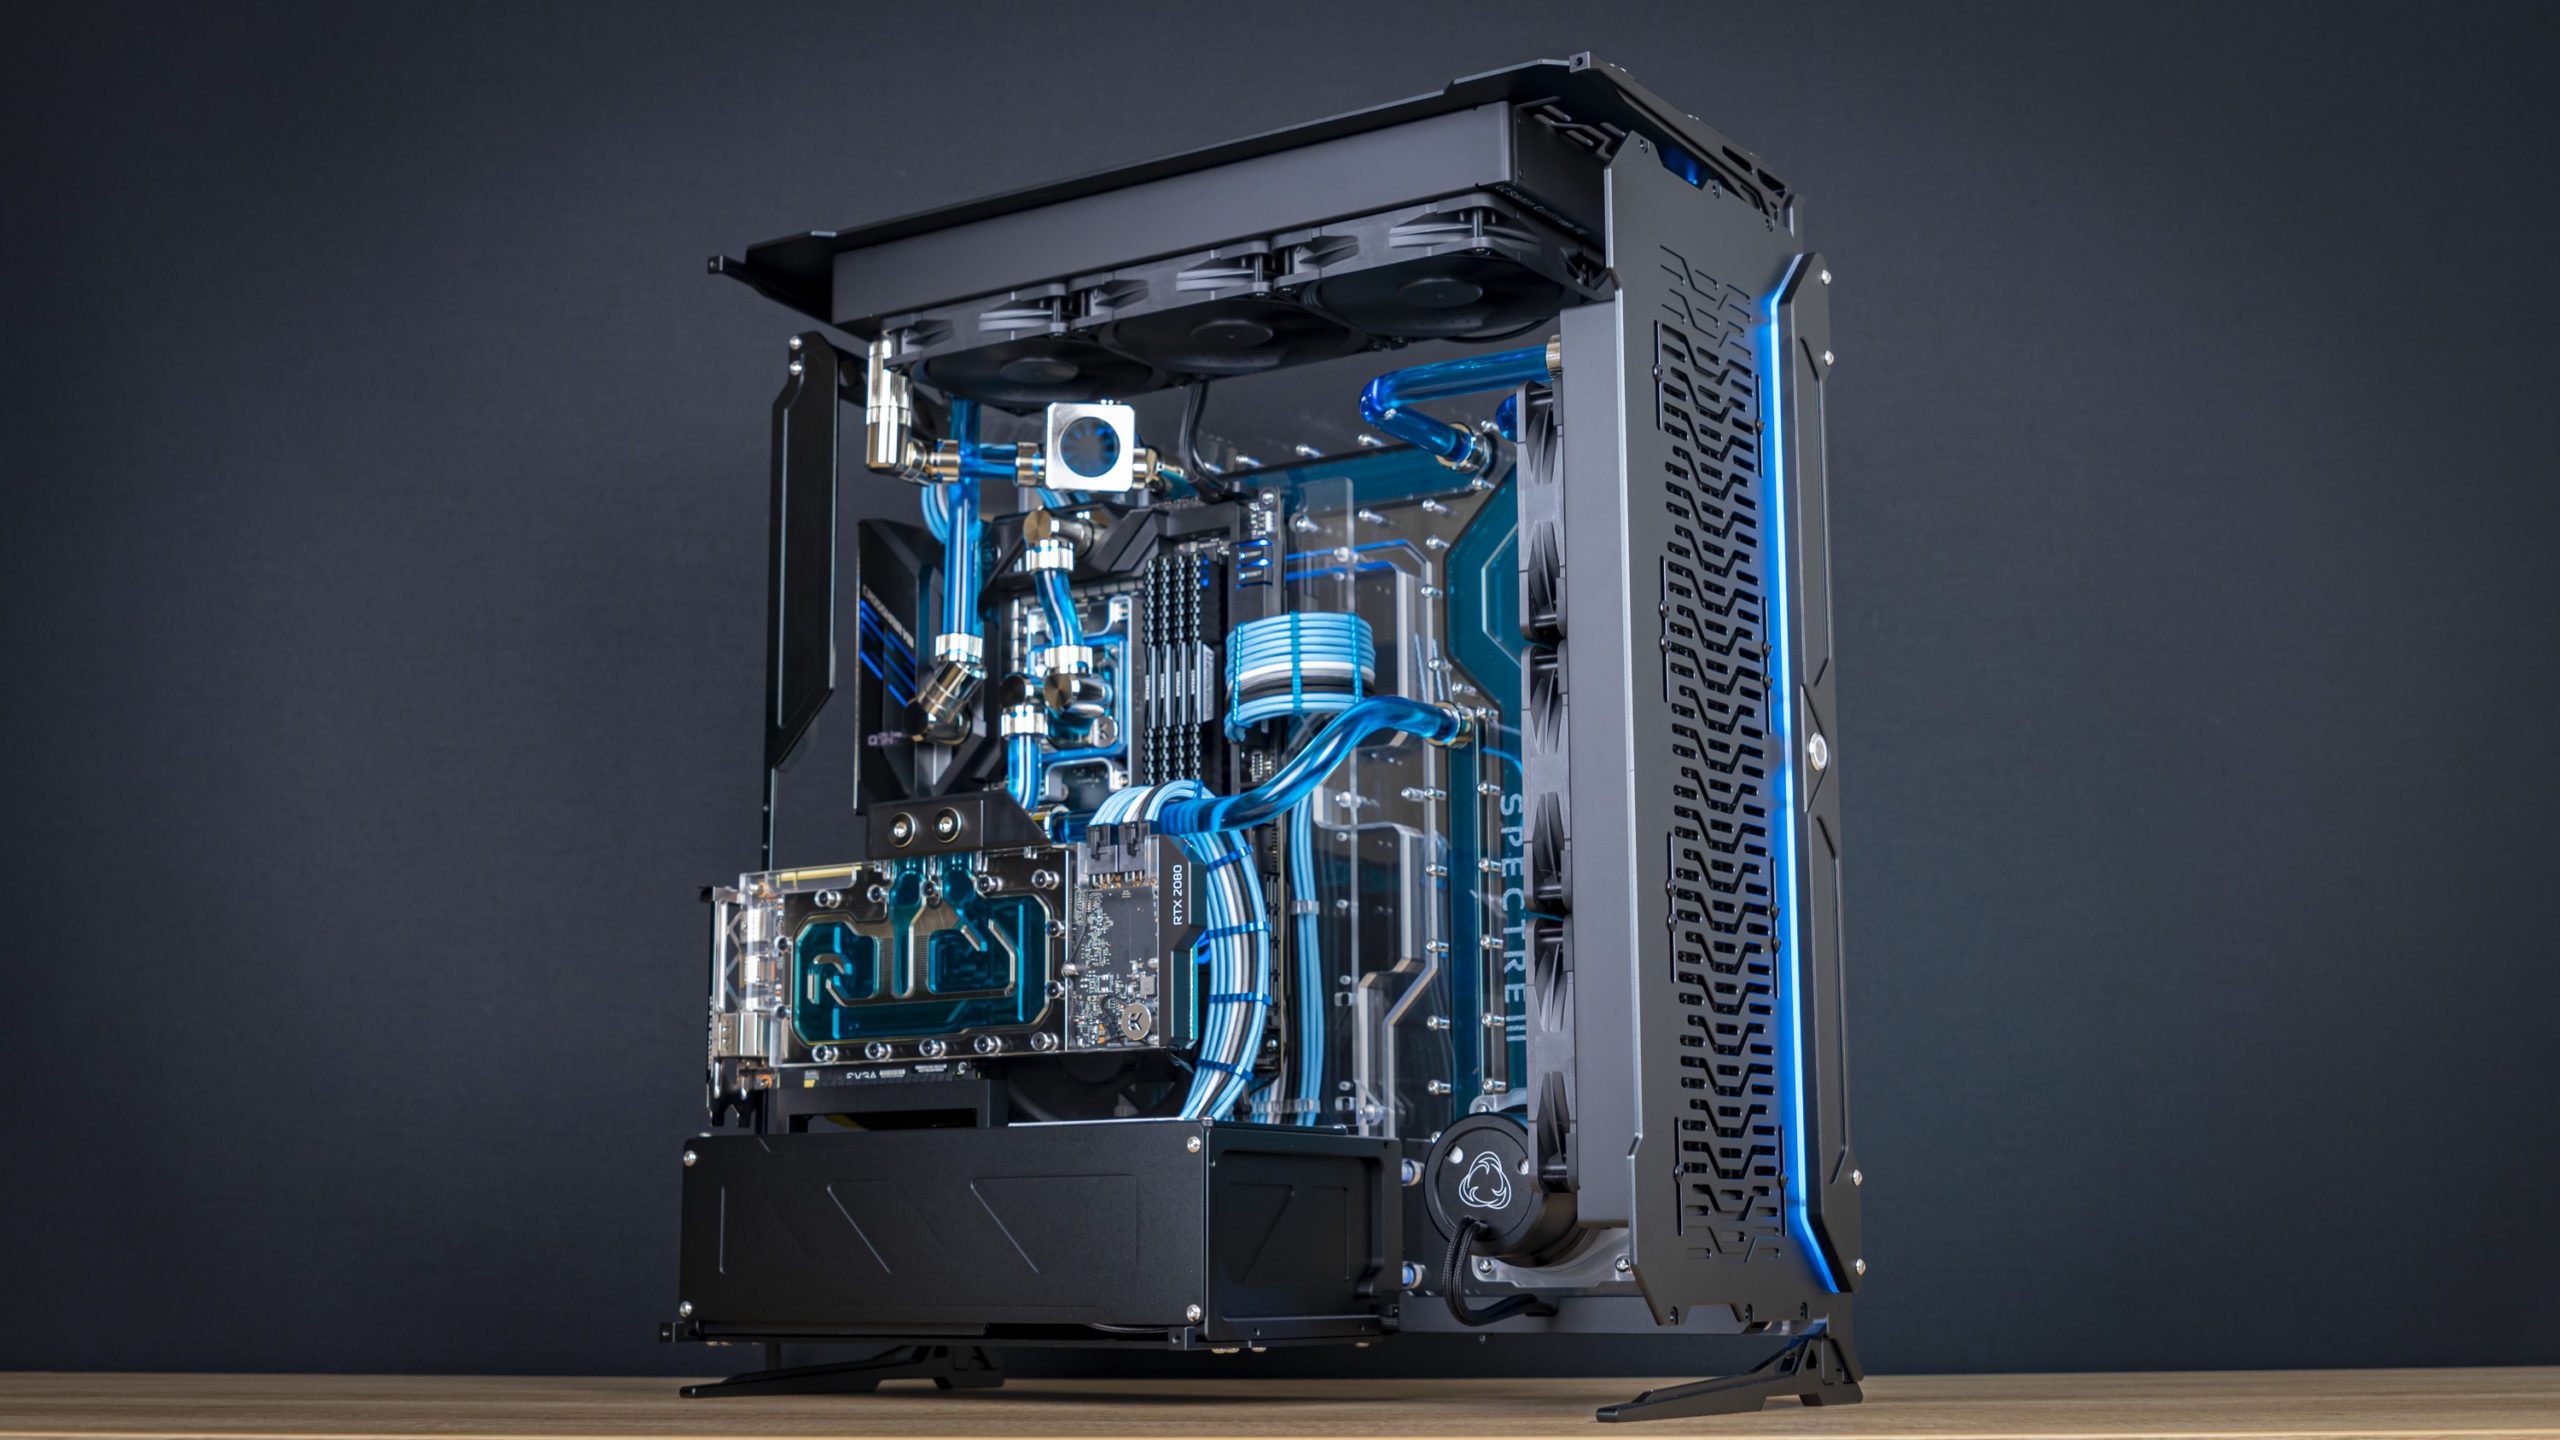
That’s expensive. Really expensive. But the Spectre III is also unlike most other cases out there. For one, it’s designed solely for custom liquid cooling. And instead of being a sealed box for your parts, it’s an open chassis meant to show off your hardware as attractively as possible. Featuring CNC-machined, anodized aluminum and an absolutely massive acrylic reservoir/distribution plate, this case really is unlike anything else that’s out there.
The case also comes flat packed. For details on what that looks like and how to assemble the chassis, check out our Assembling Singularity Computers’ Spectre III feature.
Theme Reveal
If you haven’t guessed already from the build’s name (Blue Shift), the central color theme for this build is going to be blue. Red is a color that I feel is overused in gaming product design. I could have chosen green, but settled on blue as a classic choice with oddly calming qualities.
Of course, I could have chosen any number of other colors, or gone with opaque or exotic cooling fluids, but out of respect for the Spectre III’s absolutely stunning, material-focused design I decided to dial the unconventional styling of the Mirror Maze build back and go for a more classic and timeless theme. Because of this, I’ll be sticking to EKWB’s Nickel-plated Torque fittings, paired with transparent blue fluid – a classic color combination that you simply cannot go wrong with.
Step 1: Preparing the CPU Block
Yep, you read that right. We have to prepare the CPU block. Not because there’s anything inherently wrong with EKWB’s Magnitude CPU block, but in service of the Blue Shift theme. So, I popped off the top of the block so that I could swap the accent plate from the pre-installed silver color, to blue.
Image 1 of 4
Image 2 of 4
Image 3 of 4
Image 4 of 4
This plate sits below the acrylic cover, which makes it perhaps a bit scary to replace as it requires not only breaking the factory-tested seal of the CPU block’s internal gasket, but also re-tightening the acrylic afterwards. Acrylic can crack easily, so I was careful not to overtighten the block’s top upon re-installation. But you shouldn’t be getting into custom watercooling with this amount of acrylic if you’re aren’t prepared to take things slow and steady.
Step 2: Motherboard Preparation
I already had the 12-Core AMD Ryzen 9 3900X, 32GB of Corsair memory, and two 1 TB Samsung SSDs installed onto the Asus ROG Crosshair VIII Formula motherboard, but I had two other things I still needed to do here: install the CPU block and disconnect the chipset fan.
Image 1 of 2
Image 2 of 2
You see, as this is an open system, I wanted it to be as quiet as possible. The chipset fan, which sadly shows up on nearly all AMD X570 motherboards, generally isn’t very loud compared to most systems, but I found that in the Mirror Maze system, it was the loudest component, and that was in a closed chassis. So naturally, I did the only sensible thing: tear the board apart so that I could disconnect it. Whether this is wise with regards to thermals remains to be seen, but I’ll be sure to touch on that again in the testing section later on.
Meanwhile, while I had the motherboard’s shroud off anyway, I also routed the EKWB Magnitude CPU block’s D-RGB cable underneath it for a tidier end result.
Step 3: Motherboard Installation
Image 1 of 2
Image 2 of 2
Dropping the motherboard into the Spectre III case was simple. First, I had to install the standoffs. The holes for these are pre-threaded in the acrylic, so I had no fear of having to work these in. Then, I placed the case on its back, laid the motherboard in place, and fastened it with the required screws. I also connected up the GPU riser cable.
Step 4: GPU Installation
Image 1 of 3
Image 2 of 3
Image 3 of 3
Installation of the GPU was a breeze too. It simply slotted right into the GPU riser I had installed earlier and fastened with a spacer and two screws on the IO bracket. I already had the waterblock installed on the GPU from the last build, but if you’re curious how to go about that, check out our how to install a GPU waterblock feature using this specific card.
Step 5: Radiator Installation
I then proceeded to install the radiators. First, I installed the Noctua NF-A12 Chromax.Black.Swap fans onto them, using four black anti-vibration grommets per fan. I made sure to pay careful attention to where I wanted to route my cables: behind the radiators.
Then, I dropped the radiators into place. For the front radiator, I aligned its height to have its ports match the height of the ports on the distribution plate so that I could easily achieve clean tubing runs here later. The top radiator I simply placed in the middle, where I liked it most aesthetically, though I did have to move this later in the build to line up with ports.
Of course, at this point I also had to tidy up the cables for the fans. Luckily, the Spectre III comes with a neat little fan and RGB hub, which has D-RGB and PWM fan inputs, with outputs for six PWM fans and three D-RGB devices. I connected up all six fans here, along with the three RGB strips of the Spectre III.
Then, I shoved all the cables neatly behind the radiators, using zip ties where necessary to keep things in place and looking tidy. These zip ties can be fixed in place using the long screws the fans use to attach to the radiator.
Image 1 of 2
Image 2 of 2
Step 6: PSU Installation
Image 1 of 2
Image 2 of 2
For power, I went with the new be quiet! Dark Power 12 power supply. On-hand we have a 750W unit, which isn’t overly powerful, but it’s perfectly enough for powering our Ryzen 9 3900X and RTX 2080 Super, along with the six fans and RGB devices in our system.
Step 7: Cable Management
Image 1 of 2
Image 2 of 2
Because I’m planning on using an external power supply when filling time comes, I’m happy to get all the cables installed at this stage already. So, I removed the cover on the rear and got to work.
First, I test-fit the cable combs to ensure I was using the correct ones. They come with an adhesive backing, which I removed to stick them in place. Then, I proceeded to install the custom Cablemod ModFlex cables with Pro aluminum combs, which was an oddly meditative task. It was time-consuming, but with a beautiful end result.
Image 1 of 2
Image 2 of 2
That said, although I’m pleased with the end result, in hindsight I would get cables with more combs. For this set of Cablemod cables, I got three aluminum combs on the 24-pin ATX cable, two on the EPS cable, and five on the PCIe power cable. I’d bump those numbers up by one more just so you can chuck a comb at the bottom of the cable, after the Spectre III’s cable management system near the power supply, as it’s quite a messy view going into there, and one comb on each cable could do wonders to tidy it up without making a lot more work of it.
Image 1 of 2
Image 2 of 2
I also connected up the D-RGB cables of the CPU and GPU blocks using an EKWB D-RGB splitter, connecting it to the bottom D-RGB header of the motherboard. I also hooked up the power button, power LED, and water pump headers at the bottom of the motherboard. The case does not have any front IO, so there was none of that to worry about.
At this point, the system was looking great, and I decided to call it a day. Building the custom loop would have to wait for the next day. But for you, that’s just a click away to the next page.