I have been in the modding scene since 2005, creating mostly scratch build projects out of wood, acrylic and aluminum. The most notable of these have been Sangaku, Yuugou and Chiaroscuro with Chiaroscuro having been completed back in 2008. After a long hiatus, I completed Morphosis for the Cooler Master World Series 2019 and, for the Cooler Master World Series 2020 contest, which just announced winners in March 2021, I built something really special.
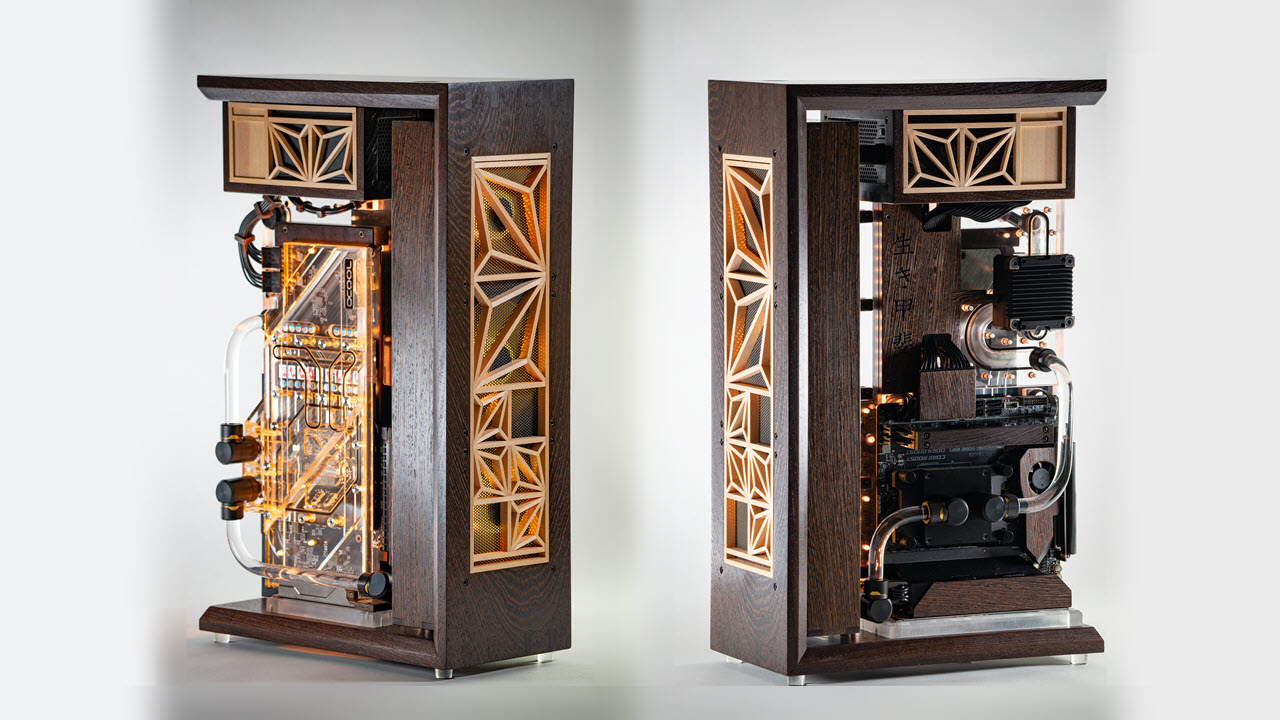
Meet Ikigai (生き甲斐) a Japanese concept meaning “a reason for being”, my latest case mod project. The word refers to having a meaningful direction or purpose in life, constituting the sense of one’s life being made worthwhile, with actions (spontaneous and willing) taken towards achieving one’s ikigai resulting in satisfaction and sense of meaning to life. In other words, It means I really enjoy building computer cases and I devoted four months of my life to bringing this case to fruition working most nights and weekends. It’s a passion project in every sense.
The case started as a simple concept, like most of my cases. I wanted a vertical tower style case with less than 20 liters of volume that would take up little space on my desk, one that is water cooled and combines my love of handmade wood joinery, and Japanese design aesthetics. It also uses CNC machining techniques and integrates the water cooling and electrical systems. Like I said, simple. I also wanted to keep the case open to show off every component, making sure that every angle of the case was aesthetically pleasing.
Components
| Motherboard | MSI B550I Gaming Edge Wifi |
| CPU | AMD 5600X |
| GPU | MSI AMD Radeon 5700 Gaming X |
| PSU | Cooler Master 650 SFX |
| Memory | G Skill Ripjaws V 3600mhz 32GB |
| Storage | Western Digital SN750 1 TB, SN550 1 TB |
| Watercooling | Alphacool GPU Block |
| Radiator Optiumus CPU Block | |
| EKWB fittings and tubing | |
| Fans | Cooler Master SF360R |
Proof of Concept Models
Before I began my build, I prototyped with some basic, non-functional wooden models. While the models might not be functional, they are to scale. I wanted to stay under 20L so I needed to be sure to make use of every mm of space. I decided on a central acrylic panel which would contain the watercooling distribution panel, hide the cabling, and allow the components to be attached. The top section would hold a SFX power supply and the back would have room for a 360mm radiator with full size fans to provide ample cooling power. I went through several iterations of these wood models because, even though I was modeling in cad, things change once you have the real hardware, in the real world and it’s all part of my design process.
Image 1 of 2
Image 2 of 2
With some of the final components arriving, I could mock up the case more accurately. Here I have the radiator and fan assembly in along with the motherboard and graphics card to check for clearances in the watercooling. This would all be hard piped PETG tubing and I was trying to avoid any surprises later on by planning ahead.
Image 1 of 3
Image 2 of 3
Image 3 of 3
Wenge Dovetail Joints
After at least 3 practice mockup cases, I finally had my final dimensions nailed down and it was time to start the final case design. I wanted a wood that was beautiful in its own right with a modern-looking grain that didn’t distract from the clean lines of the case design. I decided on Wenge as my wood of choice, a very hard, dense, and brittle wood which seems to be a cross between charcoal and concrete. It was difficult to work with by hand but sharp tools plus perseverance made it happen.
Case Joinery
I started with the main mitered dovetails of the case by first making a practice joint out of cherry. By doing this, I not only made a visual reference that I could use later to avoid confusion but I dusted off the mental cobwebs; it’s been a long time since I’ve done a joint like this.
I wanted the grain to flow around the case so I cut the entire frame out of one piece of wood, matching the grain around the case as it went along. This also meant my joints would need to be good the first time around or the grain wouldn’t match up.
Image 1 of 2
Image 2 of 2
I used a dovetail guide by Lee Valley to make the dovetail cutting easier. Here I am cutting the tails first.
Image 1 of 2
Image 2 of 2
With the first side cut, I transferred the lines to the next piece with a marking knife. By using the kerf of the joint as a guide, I can be sure the knife marks will be exact.
Next, I repeated this process to make the pins of the dovetail joint, making sure I am cutting on the correct side of the line. A little pencil marking helps with this also.
Once all of the cuts were made, I used a coping saw to remove the bulk of the waste. Then I used a guide block and chisels to creep up to my marking knife lines.
Once the main part of the joinery was done, I cut the miters on all four corners with a crosscut handsaw.
To ensure the accuracy of the miters I made a guide block and used a chisel to sneak up on my lines, ensuring a perfect 45 degree angle. Given how hard this wood was, I had to resharpen my chisels multiple times for this to work well.
After quite a bit of time spent cleaning up the joints, testing and refitting as I went, while trying not to break them, I ended up with tight fitting joints. This process took about two days and a lot of patience.
Image 1 of 2
Image 2 of 2