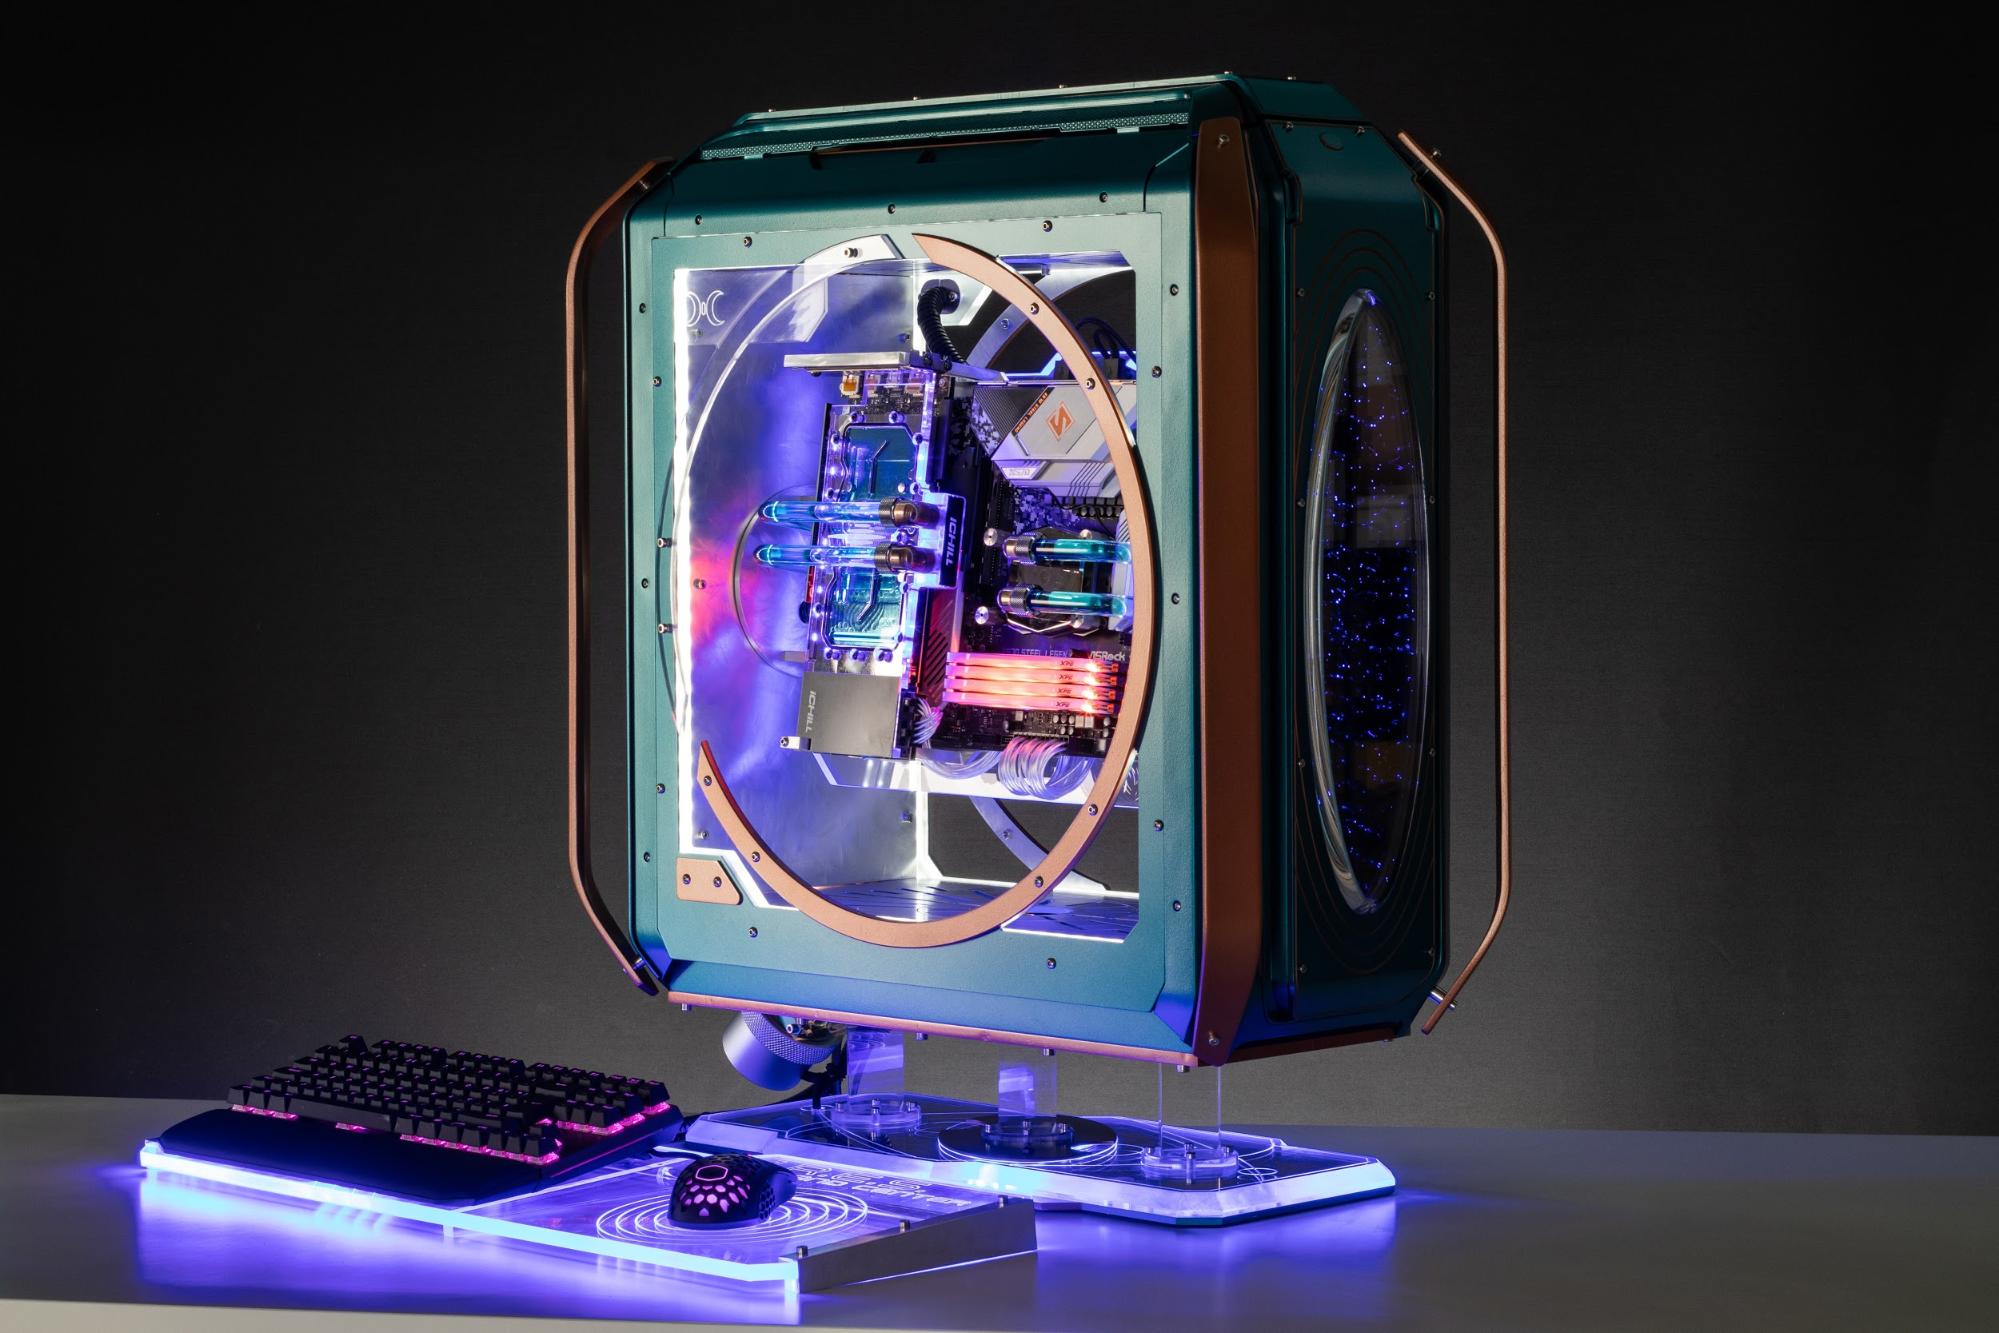
Project A.R.E.S. (Astral Robot Enclosure Systems) tells a story:
Starship Copper Nebula, named so for its peculiar color, is tapped for space program A.R.E.S. The starship comes in contact with some sort of organic alien technology, which starts to merge with it, covering the external structure and contaminating the propellant.
This story continues through colors and lines, from the blue and copper shades and curved lines representing alien technology, to the aluminum and silver shades and straight lines embodying human technology. Three astronauts at the back, impersonated by the hex-shaped reservoirs, look into the void while trying to communicate with the alien being. Up front is a mirror, which reflects Copper Nebula’s destination
Eventually, the humans and aliens succeed in communicating and join each other in a common cause: survival.
When I built Project A.R.E.S. for the latest Cooler Master Case Mod World Series. My goal was to take the Cooler Master Cosmos C700M, (which we list in our Best PC Cases list) and re-think it from the ground up, following this sci-fi design language. My biggest inspiration — mainly for the mod’s color scheme and the starry face at the front of the case — came from Robot in Netflix’s Lost in Space show.
The finished product took about six months and ultimately won Best Tower of the Year in Cooler Master’s contest, is usually what matters most. But I take a lot of pride in how I actually accomplish this kind of work and in inspiring people to start pushing boundaries. By detailing the making of Project A.R.E.S., I hope to do just that. Let’s get started!
Case and Components
Here are the PC components I recruited for Project A.R.E.S.:
- Case: Cooler Master Cosmos C700M
- CPU: AMD Ryzen 7 3700X
- Graphics Card: Inno3D iChill Frostbite RTX 2070 Super
- Motherboard: ASRock X570 Steel Legend
- RAM: Adata XPG Spectrix D60G (32GB)
- SSD: Adata XPG Spectrix S40G (512GB)
- Cooling: Bitspower custom watercooling components, 2x Cooler Master SF360R
- Power Supply: Cooler Master V850
- Other: CableMod custom small form factor cables
As mentioned, the base of this project is the Cooler Master’s Cosmos C700M. You’re seeing two of those because I actually replaced the bottom panel of one with a second top panel (taken from the second case), for symmetry purposes.
The first step in making such an intricate mod is tearing the case apart, particularly the internals, which will be completely reworked. After that, I flipped the case 90 degrees in order to have the handle bars at both the front and back instead of at the top and bottom, where they were originally.
The C700M case has an amazing feature that helped a lot with these extreme modifications: threaded holes on all sides of the frame. This allows you to easily mount any kind of custom panel or bracket.
Next, I took some aluminum L-profiles and cut them to length to fit all around the case’s frame. This made it easier to add internal panels to close up all sides.
Image 1 of 2
Image 2 of 2
Custom Back Panel
Since the internals were still in the design phase at this point, I proceeded to cut the first custom panel for A.R.E.S., the back panel. I used 5mm acrylic, cut and engraved on my CNC router. The peculiar shape created a challenge, as I had a lot of curved corners and, simply, weird angles to replicate. To tackle this, I first cut an MDF (medium density fiberboard) prototype to trace down the measurements and ensure their accuracy.
After that, I went to cut the real thing.
Image 1 of 1
Due to the unique shape of the C700M, I had to bend the back panel’s top and bottom using a heat gun. For accuracy, I used the original panels from the C700M as a template.
Image 1 of 2
Image 2 of 2
You might be wondering about the three circles in the panel. Those are there to show off the Bitspower Water Tank Hexagon reservoirs and to provide a sort of space helmet look. Ultimately, I used ornaments to complete the look.
Image 1 of 2
Image 2 of 2
Going back to the internals, I cut the two top and bottom grills out of 5mm acrylic to allow airflow to the pair of 360mm radiators and fans. I tried to keep Project A.R.E.S.’ insides as clean as possible to let enough air through. The final design is basically open-air though, and there are other entry points for air as well, so it wasn’t a big issue to begin with.
Image 1 of 2
Image 2 of 2
Rotating Hardware Panel
One of the most eye-popping features of Project A.R.E.S. is undoubtedly the rotating system for its main components. Below is an early 3D concept:
The central design was so difficult to work out, and I went through tens of attempts before landing on one that actually worked. I eventually made the rotating hardware panel’s side wall and rotating bracket out of 5mm aluminum.
Image 1 of 2
Image 2 of 2
To fix the central acrylic panel, I made four brackets out of 8mm aluminum and screwed them onto the two rotating discs.
Image 1 of 2
Image 2 of 2
Next, I added a small pocket to the side walls, so I could insert two small ball bearings.
This is how it looks without the central piece:
The Floating Effect
On to more aluminum milling. I started making the base and pedestal so that I could start having a clearer look on the final shape of the whole thing.
First was the 8mm aluminum panel, which attached to the bottom of the case, thanks to two other strips that I cut, drilled and threaded.
Image 1 of 3
Image 2 of 3
Image 3 of 3
In order for the pedestal to give Project A.R.E.S. the illusion that it’s floating I called in three 40 x 40mm acrylic blocks. But to avoid having to drill holes in them and ruin the magic, I made six acrylic discs that I glued to the blocks and had them serve as mounting holes.
Image 1 of 2
Image 2 of 2
The main part of the pedestal is made out of 15mm acrylic. The trickiest part about constructing this piece was definitely creating the huge chamfered edges. I was able to create the look by using a tridimensional toolpath on the CNC router.
Since my machine isn’t very sturdy, it tends to chutter and leave undesirable finishes on the surface. So I took my orbital sander and got to work with some elbow grease to finish up that big chamfer.
Image 1 of 2
Image 2 of 2
I left a frosted finish so that the edges could catch some light coming from the central LED strip.
Since I didn’t really trust the acrylic to hold all the weight, I added a 5mm aluminum plate under it and a small channel to route the cable from the RGB strip to the back of the pedestal.
At this stage, here’s what Project A.R.E.S. looked like: