No matter how many keys your keyboard has, you can always use a dedicated keypad with buttons for executing macros, launching your favorite apps or, if you’re a streamer, initiating functions in OBS. Many users swear by the Elgato Stream Deck lineup of macro keypads, but these devices are expensive.
With Raspberry Pi Pico, some inexpensive hardware and the right script, you can create your own Stream Deck-like macro keypad, plug it in via USB and use it to make your life easier in OBS or for any tasks. Once completed, the macro keypad will be seen as a USB keyboard by your operating system, allowing it to work with any computer, no drivers or special software required.
What you need to build a Raspberry Pi Pico-Powered Stream Deck
- Raspberry Pi Pico
- Mechanical Key switches (i.e. Cherry MX brown)
- Key Caps (Compatible for Cherry MX)
- 30 Gauge Wires
- 3D printed Case (using this design)
Setting Up Raspberry Pi Pico’s Firmware
To get our Raspberry Pi Pico-powered stream deck working, we will be using Circuit Python as the programming language, because it has a built-in USB HID library. To use Circuit Python on a Pico, you must first flash the appropriate firmware.
1. Download the Circuit Python UF2 file.
2. Push and hold the BOOTSEL button and plug your Pico into the USB port of your Raspberry Pi or other computer. Release the BOOTSEL button after your Pico is connected.
This will mount the Pico as a Mass Storage Device called “RPI-RP2”.
3. Copy the UF2 file to the RPI-RP2 volume.
Your Pico should automatically reboot and will be running Circuit Python.
Adding Code for Pico-Powered Stream Deck
I have written custom code to make the Pico act as a stream deck / macro keypad. Here’s how to install it.
1. Download the project zip file from Novaspirit Github.
2. Transfer the contents of the zip file to “CIRCUITPY” volume and overwrite the existing files.
3. Reboot the Pico and it should load the macro keys code.
3D Printing Pico-Powered Stream Deck Case
If you want to use our case, you need to 3D print it or have it printed by a service such as All3DP. Download our design files and use these CURA settings.
- PLA
- 15% infill
- 3 line wall thickness
- No Support needed
- 0.2 Layer height (use 0.1 layer height for higher quality)
- Print separately with two different colors
Image 1 of 2
Image 2 of 2
Assembling Your Pico-Powered Stream Deck
Now it’s time to assemble the stream deck / maco keypad and solder everything into place.
1. Start by placing the Cherry MX-compatible key switches on the top plate of the 3D-printed case.
2. You will connect wires as follows. More details below.
Image 1 of 2
Image 2 of 2
3. Connect all the top left pins on the switches together with a single wire and connecting it to Pin 36, the 3V3 pin on the Pico.
4. Solder a short wire to each one of the right pins to prep the connections we are going to make to individual GPIO pins.
5. Solder the required wires to the appropriate pins on the raspberry pi pico
5. Snap the case together.
Image 1 of 2
Image 2 of 2
Setting up the macro keys
The keys are set up in a way to utilize Ctrl+function keys starting from Button 1 (Top left) Control + F7 to Button 6 ( bottom right) Control + F12. These keys can be altered from the code.py as needed. But i’m going to show you a few ways to utilize the default mapping with the examples below for both program shortcuts and OBS.
Setting Up Macro for Program Shortcuts
If you want to use a key on Raspberry Pi Pico-powered stream deck to launch an app in Windows , here’s how.
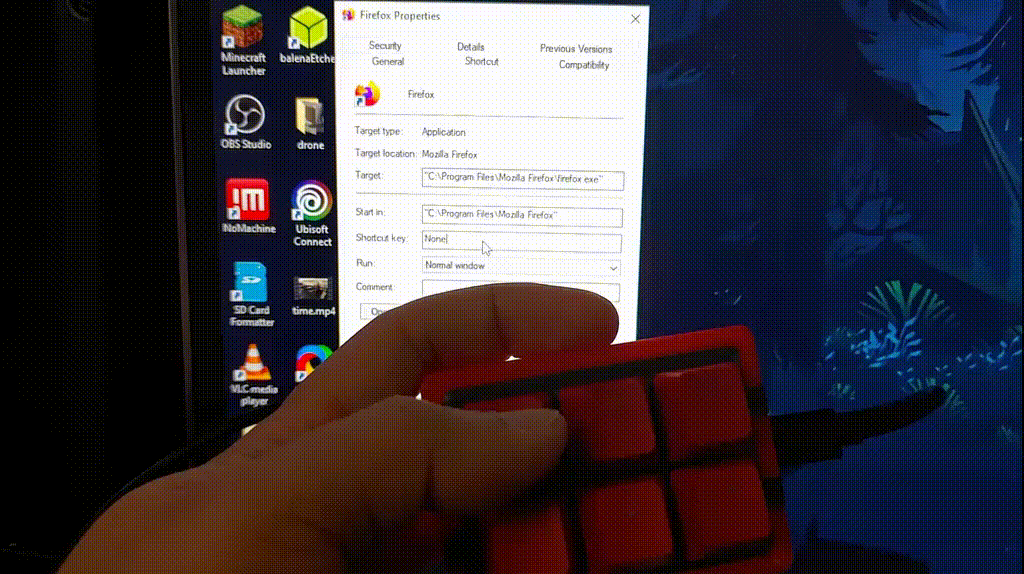
1. Right click a shortcut and select “properties.”
2. Select the “Shortcut key” field in the Shortcut tab.
3. Press any of the macro keys and you’ll see its keyboard combo (ex: CTRL + F7 for key 1) appear in the box.
4. Press “OK” and your new macro has been assigned to the key pressed.
Setting Up Macros for OBS
1. Open OBS and navigate to “Settings.”
2. Select the “Hotkeys” setting and scroll down to the scene you want to assign a macro for.
3. Select “Switch to scene” on the scene you want to macro and press the appropriate key on your stream deck to assign it.
4. Press “OK” and the macro keys will be assigned to those scenes.