The number of keystrokes we record in a day is huge. From messaging apps to coding or writing that next novel, the sheer number of key presses is hard to calculate. But what if we could save a little time and our aching joints by creating a shortcut keypad?
Pimoroni’s Keybow 2040 is a 16-key keyboard which can be programmed in CircuitPython to act as a USB keyboard. Each single key can be programmed to launch an application, control audio levels, switch scenes in OBS or paste funny cat pictures to Twitter.
In this how-to, we will set up Keybow 2040 to be a general purpose keyboard with page navigation keys, OBS shortcuts and two hot keys to launch common applications.
Our shortcut keyboard was designed to scratch an itch. To augment our existing keyboard, and add extra features such as OBS scene switching and application launchers. Your layout will be a reflection of your needs, so use this guide as a foundation from which to build a personalized layout.
For This Project You Will Need
- A Pimoroni Keybow 2040
Setting Up Your Keybow 2040
Pimoroni has a full guide on how to set up your Keybow 2040, and the build process is fantastically simple, requiring only a screwdriver and a few minutes of effort. Keybow 2040 comes with CircuitPython and all of the necessary libraries pre-installed. Should you need to install CircuitPython and the libraries, then Pimoroni has a tutorial that you can follow.
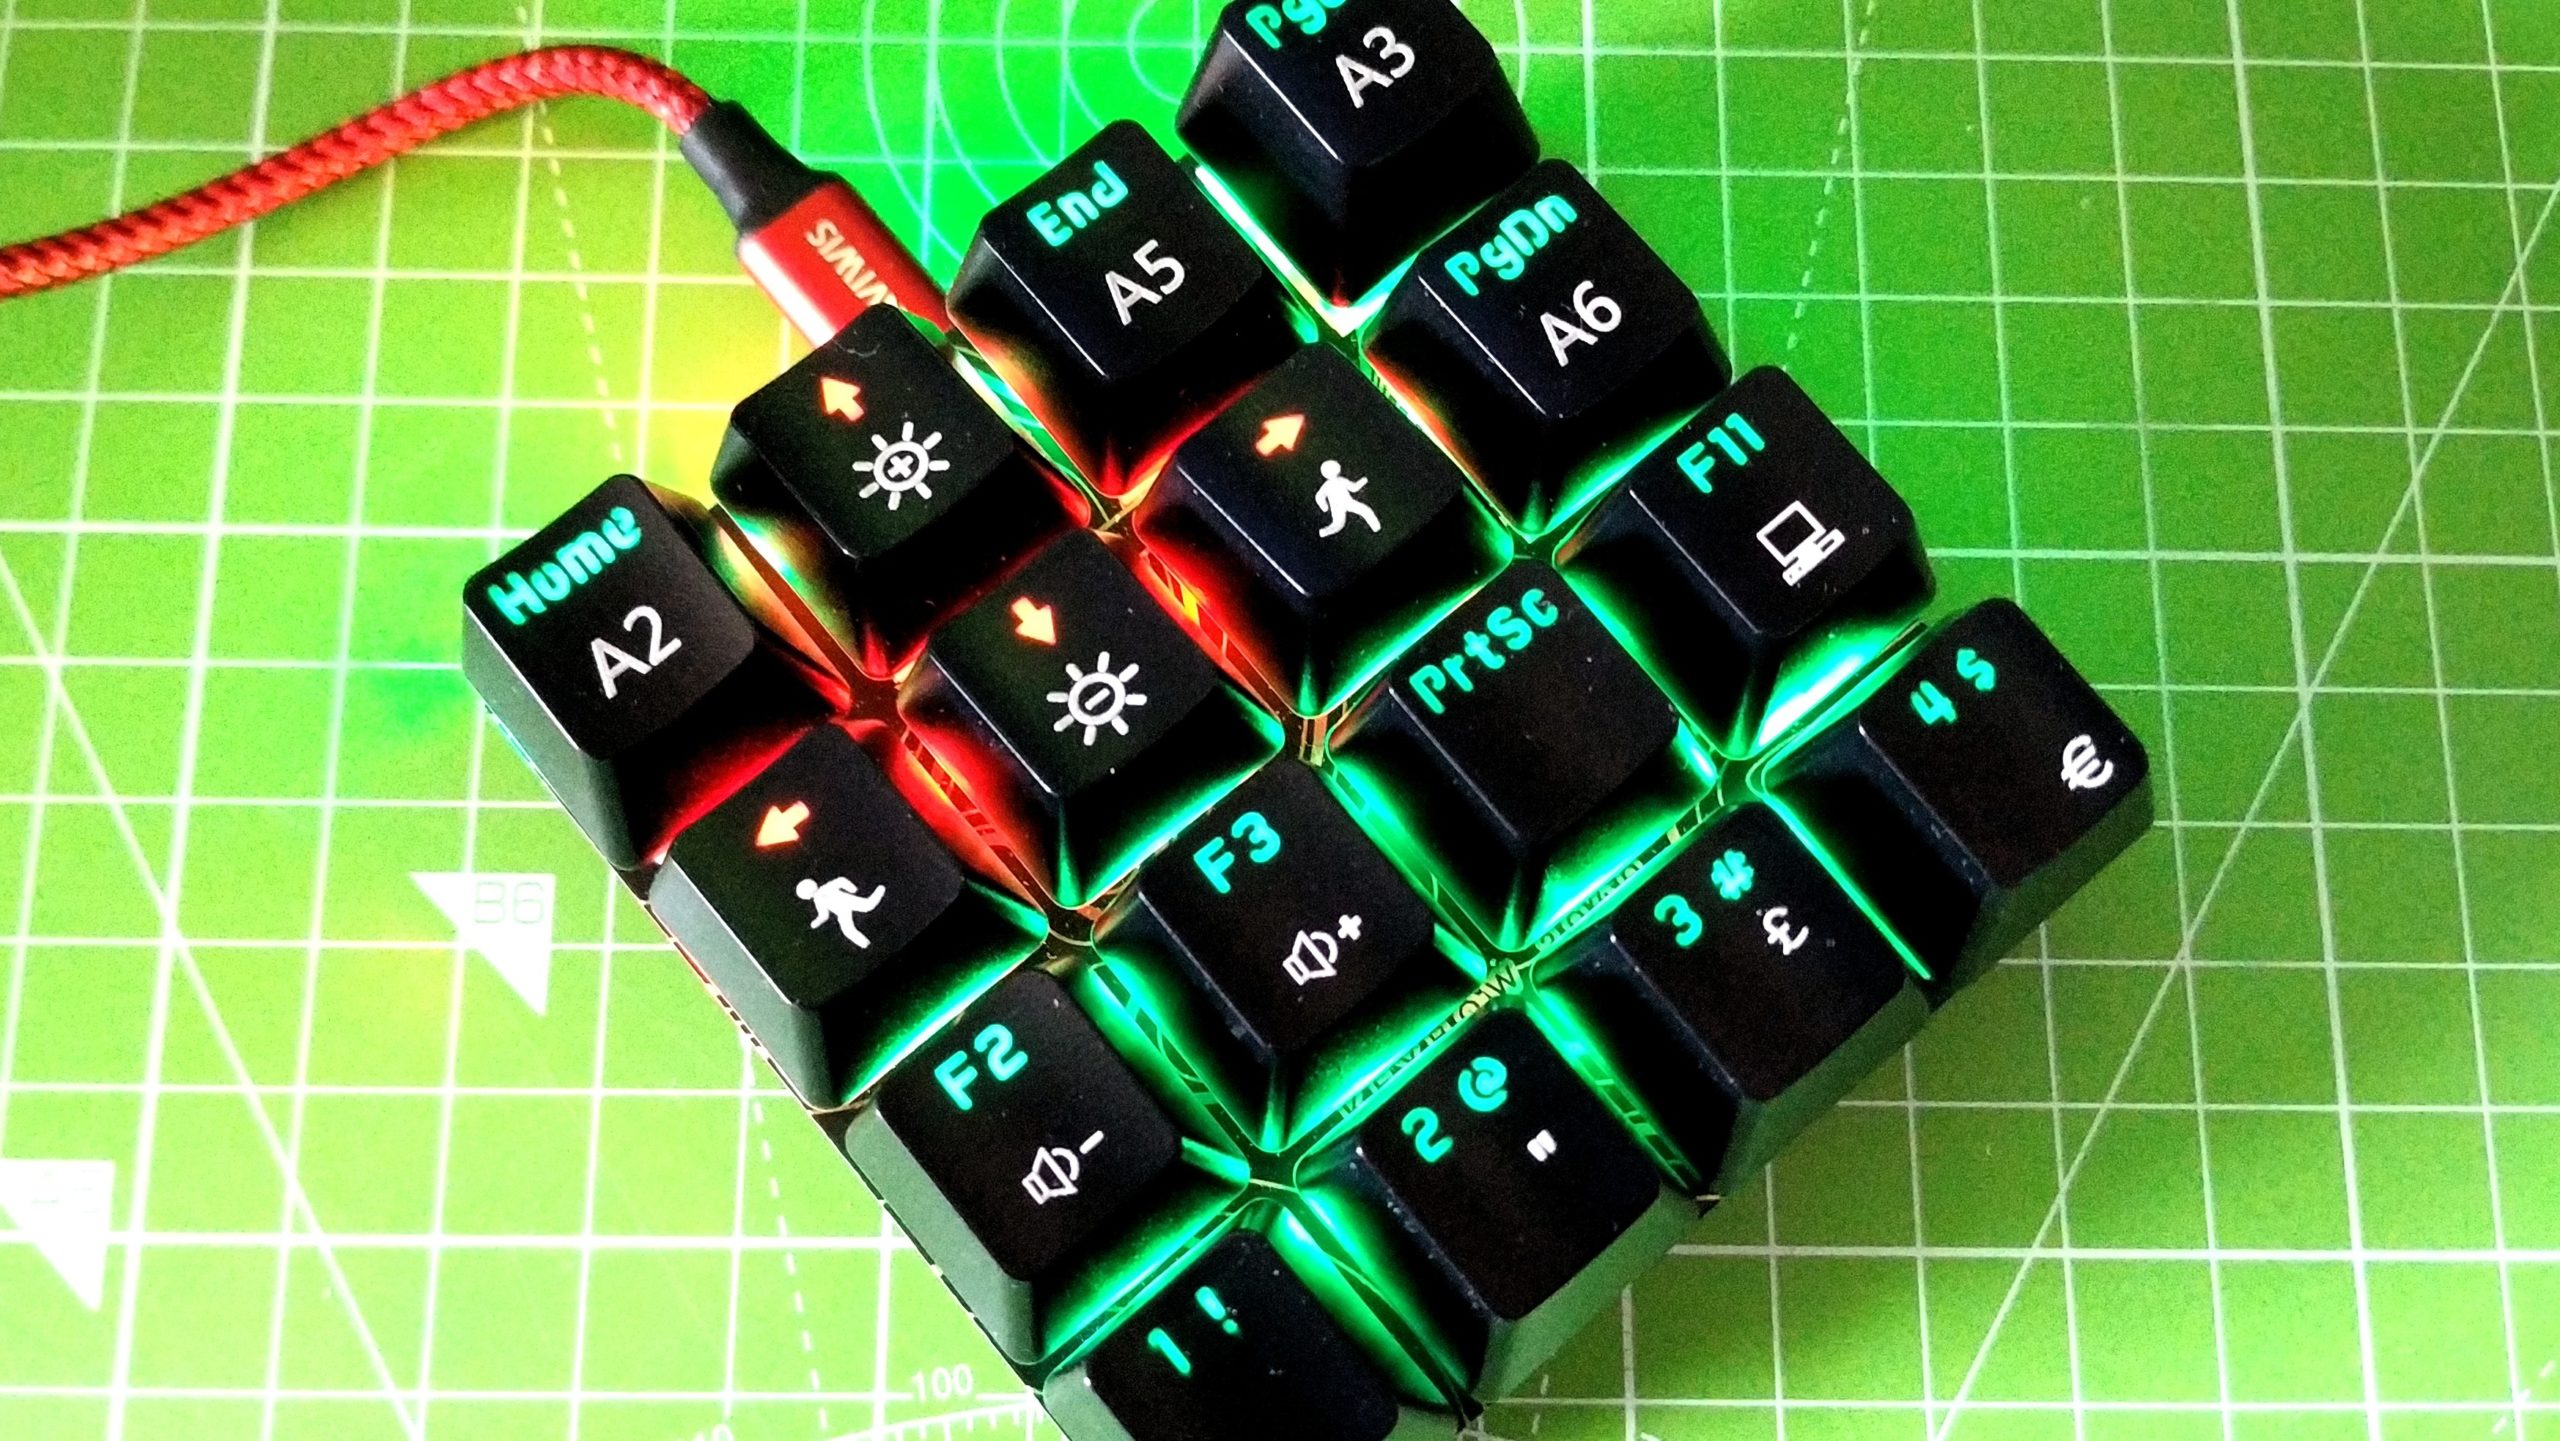
Rather than use the included keycaps we sourced some MX compatible caps from a spare keyboard. We then placed the caps on the keyboard to our desired layout.
The top row is basic navigation, home, arrow up, end and page up. The second row is the remaining arrow keys, and page down. Third row controls our volume, up and down, launches the screenshot tool and opens a terminal / command prompt. The final row is reserved for OBS, moving between four scenes. Obviously, if you’re trying this at home, you can use whatever keycaps you want and assign them to whatever functions you want, whether that’s launching an app, performing an action in a program like OBS or controlling media playback.
Keybow 2040 uses a numbering system which sees key 0 at the bottom left of the board, and key 15 at the top right. When using the Keybow CircuitPython library we will use these numbers to set up what each key will do, and how it will light up.
Programming Your Keybow 2040 Shortcut Keys
The code for this project is written in CircuitPython which is very similar to MicroPython and Python 3.
1. Connect your Keybow 2040 to your computer via a USB-C cable. A new device, CIRCUITPY will appear.
2. Using your preferred editor, open code.py found in the CIRCUITPY drive. We recommend Microsoft’s Visual Studio Code, Thonny or Mu code editors.
3. Delete any text in the file.
4. Import four libraries. The first is board, which enables us to use the GPIO on the RP2040 chip. The second is Keybow2040 which is an abstraction to make controlling the Keybow 2040 easier. Import time to control the pace of the code. Finally import usb_hid which will allow us to send keyboard shortcuts as if we had a USB keyboard.
import board
from keybow2040 import Keybow2040
import time
import usb_hid
5. Import three libraries to enable Keybow 2040 to act as a keyboard, with a US layout, and enable keystrokes to be generated by code.
from adafruit_hid.keyboard import Keyboard
from adafruit_hid.keyboard_layout_us import KeyboardLayoutUS
from adafruit_hid.keycode import Keycode
6. Import two libraries that will enable the Keybow 2040 to send Consume Control codes, typically used for media keys.
from adafruit_hid.consumer_control_code import ConsumerControlCode
from adafruit_hid.consumer_control import ConsumerControl
7. Keybow uses I2C to communicate with the RP2040. We need to tell the code that we are using I2C, and create an object keybow that we can easily reference. Then we use that object to create another object, keys which makes interacting with the keyboard much easier.
i2c = board.I2C()
keybow = Keybow2040(i2c)
keys = keybow.keys
8. Create three objects, keyboard, used to create a USB human interface device (HID) and layout which sets the keyboard to use a US layout. The third object is consumer and enables us to send special key presses, typically assigned to media keys such as volume control.
keyboard = Keyboard(usb_hid.devices)
layout = KeyboardLayoutUS(keyboard)
consumer = ConsumerControl(usb_hid.devices)
9. Create two lists: default and wasd. These lists will store the key numbers that will later be used to light specific keys. As you may have guessed, wasd refers to movement keys, in our case they map to the cursor keys.
default = [0,1,3,4,5,8,9,11,12,13,14,15]
wasd = [2,6,7,10]
10. Create a loop to constantly run the main code.
while True:
11. Inside the forever loop create a for loop that will iterate through the default list, setting the LED for each numbered key to green. Each time the for loop iterates, the value of i changes to the next item in the list, from 0 to 1,3…15. Note that Keybow 2040 uses G R B (Green, Red, Blue) LEDs so bright green is 255,0,0.
or i in default:
        keybow.keys[i].set_led(255,0,0)
12. Create another for loop. This time to set the color of the cursor keys to red, so we can easily locate them.
    for i in wasd:
        keybow.keys[i].set_led(0,255,0)
13. Use a conditional test to check if a key is pressed. The first key is key 0, located in the bottom left corner. When this key is pressed we want it to press the SHIFT + A keys, releases the keys, then light the key red for 0.1 seconds. This shortcut changes scenes in OBS when we present The Pi Cast show.
 if keys[0].pressed:
        keyboard.send(Keycode.SHIFT, Keycode.A)
        keybow.keys[0].set_led(0, 255, 0)
        keyboard.release_all()
        time.sleep(0.1)
14. Set a condition for key 1, located one key up from the bottom left. When this key is pressed it sets all of the LEDs to purple (red and blue mixed) then sends a media key command to lower (decrement) the volume. The keys are released and a short sleep reduces the risk of key debouncing. Repeat this process for all of the keys that you wish to map. If you need a template, the complete code for this project is at the bottom of this how to.
  elif keys[1].pressed:
        keybow.set_all(0, 255, 255)
        consumer.send(ConsumerControlCode.VOLUME_DECREMENT)
        keyboard.release_all()
        time.sleep(0.01)
15. Key 9 on the keypad has a PrtSc keycap, and this key will trigger the Windows Snipping Tool. Configure this key to set all of the LEDs blue when pressed, and then we instruct CircuitPython to press three keys at once. These keys are Control, ALT and P. We then release the keys, and pause the code for a moment.
 elif keys[9].pressed:
        keybow.set_all(0, 0, 255)
        keyboard.send(Keycode.CONTROL, Keycode.ALT, Keycode.P)
        keyboard.release_all()
        time.sleep(0.1)
16. Repeat the conditional process for all 16 keys. The process of identifying a key and setting the actions to be taken when it is pressed are repeated for all sixteen keys. The final key is key 15 (we started at 0) and when this key is pressed it sets all the LEDs to blue, then sends a Page Up key press before releasing the keys and pausing for a moment.
 elif keys[15].pressed:
        keybow.set_all(0, 0, 255)
        keyboard.send(Keycode.PAGE_UP)
        keyboard.release_all()
        time.sleep(0.1)
17. In order to keep keybow looking for input we need to tell it to update at the end of each loop. If this is missing, the code will not work as expected.
keybow.update()Save the code.py file and Keybow 2040 will restart and run your code, in a few seconds you can press the keys and make short work of most tasks but we still have a little work to do.
Adding Keyboard Shortcuts to Launch Windows Apps
If you’re using Windows, you’ll need to create keyboard shortcuts so that when you hit one of the keys on the keypad, the OS knows to launch a program such as the Snipping Tool (for pressing the Prtsrc key on our keypad) or the CMD prompt after we hit the Terminal key on our keypad. Note that Windows’ built-in keyboard shortcut method wants CTRL+ALT + [a letter or number] so the Prtsrc key on our keypad will actually be firing CTRL+ALT + P, for example. Repeat these steps for any keyboard keys that launch programs.
1. Search for the app (ex: “snipping tool”) in the Windows search box. Don’t launch it.
2. Right click on the program icon and select “Open File Location”
3. Right click on the l shortcut icon and select “Properties.”
4. Click on the Shortcut Key field and enter the keyboard combo (CTRL + ALT + P in our case for Prtsrc). This will set the shortcut key for that command which matches the code for that key.
Setting Up OBS Shortcut Keys
To set up OBS shortcuts we need to open OBS, and then click on Settings >> Hotkeys to assign a keypress to a Scene.
Complete Code Listing
Note that this code includes shortcuts for all 16 keys, which you may want to use for different functions in your project.
import board
from keybow2040 import Keybow2040
import time
import usb_hid
from adafruit_hid.keyboard import Keyboard
from adafruit_hid.keyboard_layout_us import KeyboardLayoutUS
from adafruit_hid.keycode import Keycode
from adafruit_hid.consumer_control_code import ConsumerControlCode
from adafruit_hid.consumer_control import ConsumerControl

# Set up Keybow
i2c = board.I2C()
keybow = Keybow2040(i2c)
keys = keybow.keys

# Set up the keyboard and layout
keyboard = Keyboard(usb_hid.devices)
layout = KeyboardLayoutUS(keyboard)
consumer = ConsumerControl(usb_hid.devices)
default = [0,1,3,4,5,8,9,11,12,13,14,15]
wasd = [2,6,7,10]

while True:
    for i in default:
        keybow.keys[i].set_led(255,0,0)
    for i in wasd:
        keybow.keys[i].set_led(0,255,0)
    if keys[0].pressed:
        keyboard.send(Keycode.SHIFT, Keycode.A)
        keybow.keys[0].set_led(0, 255, 0)
        keyboard.release_all()
        time.sleep(0.1)
    elif keys[1].pressed:
        keybow.set_all(0, 255, 255)
        consumer.send(ConsumerControlCode.VOLUME_DECREMENT)
        keyboard.release_all()
        time.sleep(0.01)
    elif keys[2].pressed:
        keybow.set_all(255, 0, 0)
        keyboard.send(Keycode.LEFT_ARROW)
        keyboard.release_all()
        time.sleep(0.01)
    elif keys[3].pressed:
        keybow.set_all(255, 0, 0)
        keyboard.send(Keycode.HOME)
        keyboard.release_all()
        time.sleep(0.1)
    elif keys[4].pressed:
        keyboard.send(Keycode.SHIFT, Keycode.B)
        keybow.keys[4].set_led(0, 255, 0)
        keyboard.release_all()
        time.sleep(0.1)
    elif keys[5].pressed:
        keybow.set_all(0, 255, 255)
        consumer.send(ConsumerControlCode.VOLUME_INCREMENT)
        time.sleep(0.01)
    elif keys[6].pressed:
        keybow.set_all(255, 0, 0)
        keyboard.send(Keycode.DOWN_ARROW)
        keyboard.release_all()
        time.sleep(0.01)
    elif keys[7].pressed:
        keybow.set_all(255, 0, 0)
        keyboard.send(Keycode.UP_ARROW)
        keyboard.release_all()
        time.sleep(0.01)
    elif keys[8].pressed:
        keyboard.send(Keycode.SHIFT, Keycode.C)
        keybow.keys[8].set_led(0, 255, 0)
        time.sleep(0.1)
    elif keys[9].pressed:
        keybow.set_all(0, 0, 255)
        keyboard.send(Keycode.CONTROL, Keycode.ALT, Keycode.P)
        keyboard.release_all()
        time.sleep(0.1)
    elif keys[10].pressed:
        keybow.set_all(255, 0, 0)
        keyboard.send(Keycode.RIGHT_ARROW)
        keyboard.release_all()
        time.sleep(0.01)
    elif keys[11].pressed:
        keybow.set_all(255, 0, 0)
        keyboard.send(Keycode.END)
        keyboard.release_all()
        time.sleep(0.1)
    elif keys[12].pressed:
        keyboard.send(Keycode.SHIFT, Keycode.D)
        keybow.keys[12].set_led(0, 255, 0)
        time.sleep(0.1)
    elif keys[13].pressed:
        keybow.set_all(0, 0, 255)
        keyboard.send(Keycode.CONTROL, Keycode.ALT, Keycode.T)
        keyboard.release_all()
        time.sleep(0.1)
    elif keys[14].pressed:
        keybow.set_all(0, 0, 255)
        keyboard.send(Keycode.PAGE_DOWN)
        keyboard.release_all()
        time.sleep(0.1)
    elif keys[15].pressed:
        keybow.set_all(0, 0, 255)
        keyboard.send(Keycode.PAGE_UP)
        keyboard.release_all()
        time.sleep(0.1)
    keybow.update()