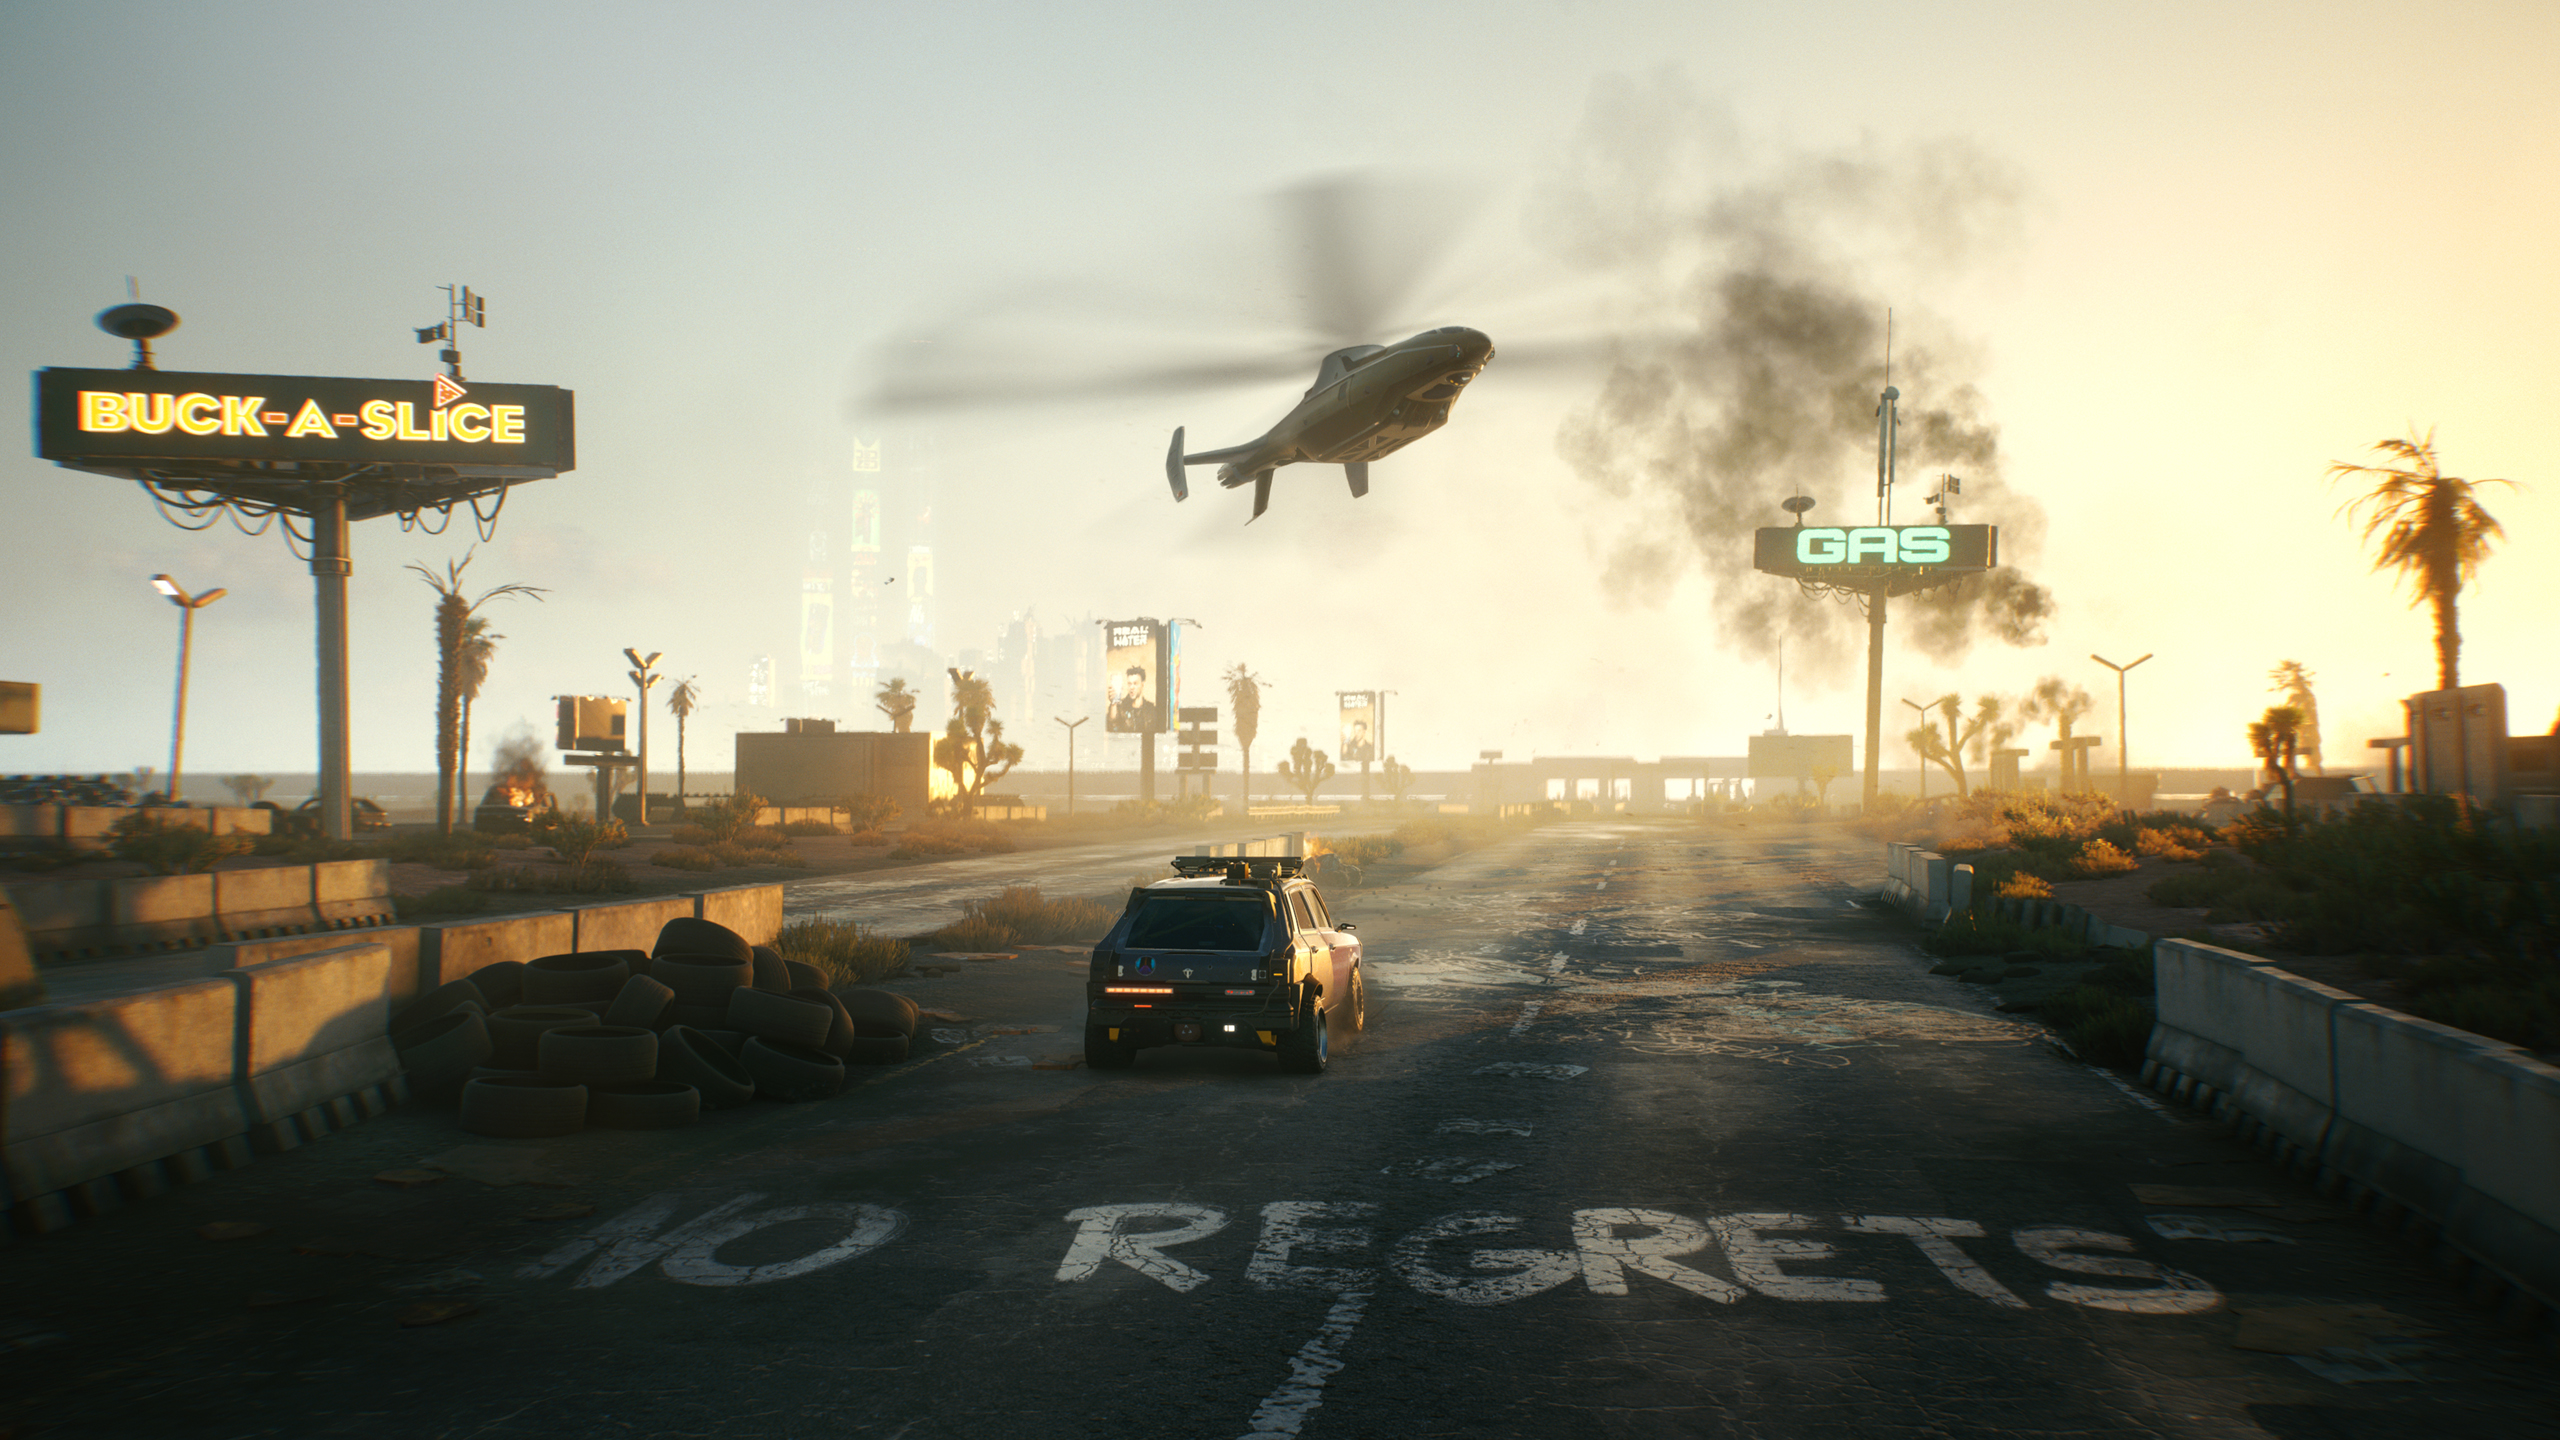
Based on the technology platform RED Engine , Cyberpunk 500 is set to become an important benchmark for video game graphics. Made by those who have already amazed the world with The Witcher 3: Wild Hunt , or CD Projekt RED, Cyberpunk 2077 offers a vast open world without sacrificing not only detail but also the new generation effects in Ray Tracing . The latter is present not only on the reflections , as we have already been accustomed to several games, but also in the shadows and especially in the global illumination (something similar had already been seen in Metro Last Light) and in diffused lighting .
Evaluate an engine like that of Cyberpunk 500 is certainly not easy. The first feeling that it returns is that it is something new compared to the previous videogame panorama, in terms of polygonal density and realism. With the debut of the next generation consoles, PlayStation 5 and Xbox Series X , it is not automatic that there is a real new generation also for the graphic technologies behind the games. In short, we have the hardware but not the software immediately, as always happens with every generational renewal.
Click to view the screenshot at 4K resolution
For these reasons Cyberpunk 2077 was immediately identified as the true new generation. Although developed by an independent team, such as the Polish CD Projekt RED, thanks to the excellent work done in the past Cyberpunk 2077 is a project supported by a very expensive investment, which allowed it to go further on the technological side, as well as on the content side. CDPR is also financed by the Polish government and by a number of investors who have rewarded its peculiar relationship with the fanbase and its effort to innovate, without necessarily paying attention to the immediate economic return.
Let’s start ours technical analysis with the performance comparison between GeForce and Radeon of the new generation. Compared to the recent benchmarks carried out here in the newsroom, the GeForces seem in slightly better shape, and slightly outperform the Radeons. In any case, however, Cyberpunk 500 is revealed on a stable and well optimized PC, with a solid frame rate in almost all occasions.
Not only for the technology, but also for the gameplay, Cyberpunk 2077 recalls recent Rockstar Games titles, Grand Theft Auto V and Red Dead Redemption 2 , and with these it clashes not only on the ability to process large game worlds but also from the point of view of their population. That is, it is not enough for a world to be large and full of things, but it must also be alive, and to some extent unpredictable.
And the world of Cyberpunk 2077 has many surprises in store. The long wait for this RPG has been rewarded with an extremely engaging adventure , capable of capturing the player with an excellent narrative component workmanship and with a traditional gameplay, but that has been able to catch us off guard on more than a few occasions.
The beating heart of CD Projekt RED production is precisely Night City, a setting that is nothing short of surprising for what concerns its complexity, not to mention the artistic goodness that we find in every corner. This futuristic megalopolis reflects the new face of society: it is a world marked by technology – which has reached the point of being able to alter human bodies with grafts of all kinds – and by violence, so widespread as to be on the agenda. The large corporations take advantage of this depravity to freely exercise their power, moving the threads of politics and, therefore, of the authorities.
We will catapult into this world taking the form of V, the protagonist of Cyberpunk
. It will be up to the players to determine the appearance, gender and origins of the next star of Night City, taking advantage of a detailed editor for the creation of the character and, above all, the background system. V can choose the Street Life , spending it alongside the most dangerous criminals in the city and the authorities that hinder them – those who do not I’m on the payroll, at least. The path of the Corporative is no less peaceful, having to cover up the terrible crimes committed by their corporation and watching their backs from rival organizations: the war is always around the corner. The Nomad has the freedom guaranteed by the Badlands on his side, but will soon give up that privilege to embrace the wilder life of Night City.
Whatever your “life path”, in the end V will take only one path: that of the mercenary, an outlaw who will clash with the same corporations that hold the power and with the criminal gangs that control the megalopolis. In order to gain a certain reputation we will take part in all kinds of missions: we will improvise hit men, thieves, swindlers; we will do what it takes to become big shots, to be remembered.
The role-playing component of Cyberpunk 500 is as complex as it is deep , and don’t forget to pay homage to Mike Pondsmith’s original RPG. Behind our alter ego hides an articulated tree of skills from which dozens of talents flourish, those related to combat, stealth and to technological knowledge. We will be able to unleash our fury holding a rifle or a katana or act in the shadows as a real netrunner, eliminating the enemy defenses after having violated their systems. Players will be free to choose the most suitable approach, for any situation, as well as the ability to carry conversations with the eccentric personalities of Night City – even a simple word will be enough to alter the outcome of a mission.
To complete V’s story you will need between 25 and 30 hours of play , but the overall duration of the experience offered by Cyberpunk 2077 goes far beyond these figures. There are hundreds of activities to take part in, such as the (surprising) side missions scattered around Night City and its surroundings, not to mention the numerous tasks proposed by our dear Fixers.
The same city will charm you with its decadent technological beauties, stealing a few extra hours while you wander in search of a new system with which to strengthen your body. Night City can really bewitch you, but this will also and above all depend on the capabilities of your hardware and how much time you have wasted putting your hand to the graphics settings.
Regarding the implementation of the Ray Tracing, this gives realism and fidelity to the game images, especially as regards the reflections, which are generated on the basis of what actually happens in real time in the game scene. They are in high definition and also take into account light sources outside the game screen, which is very difficult to manage with traditional rasterization. Let’s start to see what are the graphics options available in Cyberpunk 2077 , with 6 presets Quality: Low, Medium, High, Ultra, Medium Ray Tracing and Ultra Ray Tracing.
CD Projekt RED has worked with NVIDIA to ensure that in Cyberpunk 2077 there are state-of-the-art ray-traced effects and that the DLSS can do its job, improving performance. As is known, it is not so much NVIDIA that deliberately wants to insist on Ray Tracing, but this technology is part of a path of improvement of all the graphics components of games dictated by Microsoft, as has always happened in the history of the evolution of graphics for video games. . With the DirectX Ray Tracing (DXR) feature included in the DirectX API 12, Microsoft has indeed introduced Ray Tracing in Windows 10 in a agnostic mode with respect to the hardware platform. In Cyberpunk 2077, in addition to the DLSS, we also find FidelityFX CAS for the improvement of the definition of distant objects with respect to the observation point. We examine it in the course of the article.
Click to view the screenshot in full screen
Low
Average
High
Ultra
Ray Tracing
Ray Tracing, as fans now know well, it is clearly noticeable on surfaces that behave like a mirror or on the supe shiny rfici. Before Ray Tracing this type of reading was managed with screen-space reflections, which returned enjoyable images but with some inaccuracies. In particular, they are not able to update the reflections generated by moving objects for each frame and do not contemplate reflections coming from objects that are outside the game screen, that is the portion of the environment framed. All this can lead to discontinuity of color in the reflections or the lack of certain objects, especially those that are behind the silhouette of the character played by the player.
on the left you will always find the version without Ray Tracing, on the right with Ray Tracing in the more complete variant.
Reflections in Ray Tracing, combined with denoising, remedy all these imperfections with artifact-free and physically correct reflections. This means that the reflections are carefully managed according to the type of surface on which they are located, which can be semi-glossy or rough, from glass to brushed metals.
Also note that unlike what we saw in Watch Dogs: Legion , where Ray Tracing was limited only to reflections and particularly reflective surfaces, in Cyberpunk 2077 you have benefits at the level of the entire game screen. In this comparison, in fact, we notice a visual improvement on the wet surface, as well as on the puddles, and, as we will see better shortly, also as regards the shadows and the diffused lighting.
Click to view the screenshot in full screen
Notice how the reflections on the cars are managed differently with Ray Tracing enabled: indeed, we would do better to say that they are there and are dynamic in the latter case, while they disappear completely in the absence of Ray Tracing.
Click to view the screenshot in full screen
Click to view the screenshot in full screen
In the graphic options menu of Cyberpunk 2077 we find three types of options related to Ray Tracing: reflections, shadows and lighting. As for the shadows , the environmental occlusion contributes to the visual rendering of the contact surfaces between objects and the ground, giving the scene a sense depth. Without environmental occlusion, in fact, we would have a sensation of floating in the air for all the objects in the scene. We are talking about a shading technique that determines the amount of light that must fall on the objects in the scene, simulating the rendering of the shadows in the points where the geometries are in contact.
Click to view full screenshot screen
In Cyberpunk 2077, the environmental occlusion managed by Ray Tracing is more faithful because it does not darken excessively areas of the screen that do not require such treatment, which can result in an unnatural appearance for certain objects. Note that with Ray Tracing enabled, the edges of the shadows appear realistically softened (soft shadows). In addition, the overall complexity of the image increases, as does its fidelity level.
Ray Tracing in Cyberpunk 2077 not only improves the ambient occlusion, but also gives a pleasant richness in terms of blackening of the shadows where necessary, high detail resolution without aliasing and more consistent detail. Both the shadows of nearby objects and those of distant objects are handled correctly and they intersect each other correctly.
Complement of the ambient occlusion can be considered the global illumination . We are talking about a lighting technique that models the way in which the light is dispersed on various surfaces, bounces and indirectly illuminates the other objects in the scene. When a ray of light hits a surface, thanks to Ray Tracing the surrounding objects receive realistic indirect lighting. Also, if the contact surface or light source is colored, that precise color will naturally spread over the surrounding objects.
Click to view the screenshot in full screen
Global Illumination without Ray Tracing
Ultra Lighting
Insane Lighting
This is the theory, because, to the naked eye, in the case of the sun’s rays it is difficult to distinguish which may be the correct colors for indirect lighting on various objects. What is certain is that on a theoretical level with Ray Tracing we have visually more correct scenes. Indeed, going a little further, this is precisely the true essence of Ray Tracing in a final analysis, that is the accurate calculation, starting from the final pixel, of the color of the latter taking into account all the bounces made previously by the bright rays. Naturally this type of management involves a very important consumption of processing resources: it corresponds to the Insane setting of the Ray Tracing lighting item in the Cyberpunk graphic options menu 2077. On our ultra-pumped test system with Intel Core i9 – 10900 K, 16 GB DDR4 RAM – 4000 and SSD drives, in the case of the new GeForce RTX 3090 cannot be reached 30 frames per second in 4K.
In the absence of Ray Tracing, the sun simply illuminates a building or a character, while with Ray Tracing enabled as regards the option of global illumination, sunlight realistically bounces off structures or the ground, absorbing its color and reflecting it naturally on the surrounding environment. The result is a soft and slightly colored light.
With the following comparison, which analyzes the case of global illumination that filters a closed environment, you can see how the lighting is more realistic and credible.
In the case of this underpass, note instead how the light bouncing off the bridge is darker and more efficient the ambient occlusion effect.
Click to view full screenshot screen
Some might think that a management system is useless ‘global illumination like that if it then impacts so much on performance. From another point of view, the path to make the virtual scene completely coherent on the physical and lighting level is very important in the field of 3D graphics. Cyberpunk 500 offers all sorts of different settings, allowing those who prefer smooth visuals to configure the game accordingly, and those who like visual accuracy to resort to items like the Insane setting.
Click to view the screenshot in full screen
The Cyberpunk Engine 2077 contemplates Ray Tracing also for diffused lighting . This is best seen in areas where there are emissive lights that project light onto each other and surrounding areas. The best way to see diffuse lighting, in other words, is to look at some of the many bright neon signs found around Night City. Diffuse ray-traced lighting is able to capture the color of neon lights and transmit it to surrounding objects and small surfaces.
Note in this particular case how the yellow light coming from the neon below is diffused. The diffused lighting managed by Ray Tracing not only gives a sense of realism, but is definitely captivating.
But it’s not just about having more captivating images with Ray Tracing: indeed, in many other cases the light management is more balanced and credible.
Cyberpunk 2077 does not consider only i neon as emissive lights, but it also does this with the whole sky, as sunlight is scattered from the atmosphere. This affects the entire game world, ensuring the correct occlusion of buildings and objects on the road.
The DLSS in Cyberpunk 2077 is available in five variants: Auto, Quality, Balanced, Performance and Performance Ultra. Each of these options affects the resolution of the DLSS effect rendering, with the Auto option automatically setting the optimal DLSS mode based on the selected resolution and available computing resources. During our tests, even in the presence of a very armored platform with the GeForce RTX 3090, we noticed that Auto often corresponds (if not always) to the Performance setting, which is one of the more efficient in terms of performance gain.
Click to view the screenshot full screen
DLSS No
DLSS Quality
DLSS Balanced
DLSS Performance
DLSS Ultra Performance
DLSS helps restore image information that is lost because the object is too far from the viewing point or why applying anti-aliasing is not as effective. As we have already seen in the case of Watch Dogs: Legion , there are no qualitative differences based on the application of the DLSS, which therefore manages to restore the original image quality in all cases without compromising on quality. Except for Ultra Performance, which makes details slightly more washed out and does a less precise job in terms of anti-aliasing. That said, Performance Ultra also allows you to recover a considerable portion of performance and is designed for the game in 8K , therefore with images natively at a remarkable resolution.
While Ray Tracing serves to increase image fidelity, DLSS (Deep Learning Super Sampling) reduces the performance loss that normally the processing of the complex algorithm underlying the Ray Tracing involves. DLSS is handled by the latest generation GeForce hardware via Tensor Cores. It is based on a deep learning neural network trained on tens of thousands of very high resolution images rendered offline by a supercomputer. These images are fed to the machine at a very low frame rate and for each pixel they are subjected 64 different samples.
Based on such shrewd training, and which has gone on for many hours, the neural network can apply what it has learned to low resolution images. It does so through an artificial intelligence model managed locally by the PC through the NVIDIA drivers.
Below is the performance result with DLSS enabled and disabled with the GeForce RTX 3090: mind-blowing, especially the performance gain with Ray Tracing and Crowd Global Illumination enabled. In other words, once again DLSS conveys the idea that processing on GeForce cards benefits from calculations performed upstream and not in real time, proving to be crucial to be able to play in Ray Tracing.
Among the graphic options of Cyberpunk 2077 we also find FidelityFX CAS, both in static and dynamic version. In the latter case it intervenes on the native rendering resolution in order to improve performance, while in the first case it improves the definition of objects far from the observation point.
FidelityFX Content Adaptive Sharpening is the hardware-agnostic dynamic sharpening filter to improve visual details in all circumstances, useful in this case to allow players to capture any detail even in dark areas. The contribution of FidelityFX CAS is interesting here, because it not only increases the level of detail by adjusting the contrast ratio, but improves the overall sharpness of the image.
Finally, let’s close with the analysis of the various presets present in Cyberpunk 2077, already mentioned, and what is the performance impact on the various video cards involved of our discussion.
Click to view the screenshot in full screen
The comparison represents a kind of summary of what we said in the course of the article. The Ray Tracing options make the difference in terms of image quality, even more so than the various texture quality settings, albeit present but with a relative impact on both quality and performance. Once again it is the shadows that give a decidedly different look to the various presets.
Low
Average
High
Ultra
Medium Ray Tracing
Ray Tracing Ultra
As regards the Medium Ray Tracing preset, the Ray is obviously activated Tracing, but only for Shadows and Lighting, set to Medium detail. Ray tracing reflections, on the other hand, are disabled. The DLSS is on Auto. Ultra ray tracing activates reflections, shadows and global illumination, set to Ultra. The DLSS is still on Auto.
As for the textures, the benchmark also confirms what we had perceived with the qualitative analysis: it seems that CDPR has not done a job of scaling on this component, and that the various quality settings for the textures have no effect.
Finally we went to touch the CPU and RAM operating values from the BIOS, to verify how Cyberpunk 2077 behaves in critical conditions. At Full HD resolution, we went to change the core and thread values of ours 10900 K, experiencing a drop in performance only starting from the 4 core / 8 thread setting. As for the RAM, as expected since Night City is populated by many objects, characters, cars and more, there is a significant performance drop by removing an 8 GB module from our test platform. No variation in performance, however, with the memory at different frequencies.
To conclude, therefore, it must certainly be said that Cyberpunk 2077 is not an indifferent job , and that the Ray Tracing options significantly improve more areas of its game screens, and are not limited to a single effect as happens with many other titles. At the same time, however, it must be stressed that something did not go the right way in the development of this game. The first disappointing demos shown at E3, the constant postponements and the crunch problems that have plagued the development team are clear signs that completing such a complex job, like that necessary for a game as large as Cyberpunk 2077, it is difficult even for a tea m passionate like CD Projekt RED.
Cyberpunk 2077 gives the feeling that many technologies prepared for The Witcher 3 have required an almost total rewrite . Managing a city full of structures and population is not like managing the vast expanses of The Witcher 3. Many aspects of the game have been affected, starting with the artificial intelligence, which is very deficient in a multitude of occasions.
CDPR has also revised the physics, which is now more dynamic and affects a large number of Night City objects. Even in this case, however, some interactions are not convincing, for example between cars and the city, or between cars between them. On the one hand, it is normal that a free roaming game with such a large world has inevitable imperfections (Bethesda “teaches” from this point of view), but the impression remains that the development of Cyberpunk 2077 has been extremely troubled.
And this is evident for the console versions of the game, which have noticeable performance issues. If on PC and on Google Stadia Cyberpunk 500 is still well optimized and smooth with the right hardware, on PS4 and Xbox One it doesn’t run well, and in many sections of the game it falls below 20 fps. CDPR has several times postponed the release, in an attempt to bring the performance of the console versions closer to the PC one, but evidently did not succeed on day one. And for this she apologized to her fans.
In short, the relationship of trust she had established with the fanbase was slightly cracked. The real point of the question is: in today’s tech world is it still feasible to develop such a complex product? Nothing to say about the role-playing depth or the quality of the cyberpunk setting, which will make all fans happy. Cyberpunk 2077 offers dozens of hours of gameplay and a remarkable experience customization capacity. With maximum involvement, where optional activities, as it should be in a role-playing game, are essential to be able to support the main mission and achieve the goal.