razer’s-orochi-v2-wireless-gaming-mouse-has-astoundingly-long-battery-life

Razer’s Orochi V2 wireless gaming mouse has astoundingly long battery life

Razer’s new $69.99 Orochi V2 is a wireless gaming mouse that promises extremely long battery life. It can apparently last up to 950 hours on a single AA battery when it’s in Bluetooth mode or up to 425 hours if you toggle its wireless switch to use the 2.4GHz Hyperspeed mode that can deliver lower-latency performance.

Alternatively, you can use an AAA battery for a slightly lighter weight. Razer says you’ll get approximately a third of the longevity this way compared to an AA battery. Still, it’s nice that either size of battery can power this mouse for many, many hours. Razer includes a USB-A dongle near the battery slots, which is accessible by lifting up on the mouse’s magnetically attached shell.

Good battery life is useful for any kind of workload, but it’s especially nice to have for gaming, which is what the Orochi V2 was designed for. This mouse feels similar in some ways to the Razer Basilisk X Hyperspeed — another budget-friendly battery-powered mouse with two wireless modes. The Orochi V2 has a textured scroll wheel, angular main mouse buttons that are slightly concave to keep your fingers steady in-game, and two thumb buttons. It’s a smaller mouse overall than the Basilisk X Hyperspeed, yet Razer built it to cater to several grip styles, including claw, palm, and fingertip grips. It is symmetrically designed, though not ambidextrous. A concave thumb rest and the two thumb buttons cater to right-handed gamers.

It can hold a AA battery or a AAA battery but not both.
Image: Razer

As for the specs, the Orochi V2 comes in matte black or white and weighs around 71 grams with a AA battery or 64 grams with a AAA battery. It features mechanical mouse switches that have a 60-million click lifespan and uses Razer’s 18K DPI 5G optical sensor. The mouse’s underside features PTFE feet that help it glide easily across a mousepad. Near the scroll wheel, the Orochi V2 has a DPI switcher to adjust sensitivity. It doesn’t have any LEDs, aside from the power indicator next to the DPI-switching button.

The Orochi V2 in black is available at Razer and Walmart. The white-colored model is selling at Amazon, Best Buy, and Razer. If you want a different color or design, Razer is launching a site where you can create an Orochi V2 with a custom look, picking from (according to the company) “over 100” different designs. The customized model costs $89.99 — a $20 premium over the standard option.

A sampling of the designs you can get on the Orochi V2 for an extra $20.
Image: Razer

The company has also released universal grip tape for your tech. It’s a $9.99 kit filled with different sizes of textured tape that you can stick to a mouse, keyboard, controller, or anything else you want to add some grip to. That’s available on Amazon now.

how-to-use-circuitpython-on-a-raspberry-pi

How To Use CircuitPython on a Raspberry Pi

CircuitPython is a programming language designed to simplify experimenting with low cost boards, typically microcontroller boards made by Adafruit. CircuitPython can also be used on the Raspberry Pi and via two projects we introduce how to use CircuitPython with the Raspberry Pi. The first project is the humble LED, controlling how to blink an LED enables us to understand how we communicate and control components. The second project involves using additional components connected to the GPIO via a jumper wire to Stemma QT connector.

CircuitPython on the Raspberry Pi is transferable to other devices, such as Adafruit’s QT Py RP2040, Feather RP2040 and Pimoroni’s Keybow 2040, along with the Raspberry Pi Pico. So the skills learned here are applicable to any board that can run CircuitPython 

For This Project You Will Need

  • Any model of Raspberry Pi, but for best results use a 3 / 4
  • The latest Raspberry Pi OS

 Project 1

  • A breadboard
  • LED
  • 330 Ohm Resistor (Orange-Orange-Brown-Gold)
  • 2x male to female jumper wires

 Project 2

  • Adafruit MPR121 Capacitive Touch Sensor
  • 4x female to female jumper wires
  • 2x crocodile clips
  • 2x fruit
  • StemmaQT to breadboard leads

Installing CircuitPython 

1. Open a terminal and update, then upgrade the software on your Raspberry Pi.

$ sudo apt update
$ sudo apt upgrade

2.  Upgrade setuptools, a Python toolkit to manage Python package installations. 

$ sudo pip3 install --upgrade setuptools

3. Change directory to your home directory and then use pip3 to install Adafruit’s Python Shell tool. The command “cd ~” is shorthand for the home directory. 

cd ~
$ sudo pip3 install --upgrade adafruit-python-shell

4. Download Adafruit’s installation script and then run the script to configure CircuitPython. During the installation it may state that you are using Python 2, it will prompt you to update, this is safe to say Yes to. 

$ wget https://raw.githubusercontent.com/adafruit/Raspberry-Pi-Installer-Scripts/master/raspi-blinka.py
$ sudo python3 raspi-blinka.py

Blinking an LED 

(Image credit: Tom’s Hardware)

The humble flashing LED is always the first test for a new electronics project. It enables us to be certain that our code is working and that our wiring is sound. For this project we shall wire up an LED to GPIO 17 via two jumper wires and a 330 Ohm resistor. The wiring for this project looks as follows. 

1. Open the Thonny editor and import three libraries of code. The first is “time” and this is used to control the pace of our code. The next two, “board” and “digitalio” are CircuitPython specific libraries. Board enables us to interact with the GPIO, digitalio is used to control the state of a GPIO pin. 

import time
import board
import digitalio

2. Using an object, led, we tell CircuitPython which GPIO pin we are using, and that it is an output. Our LED is connected to GPIO 17, which in CircuitPython is board.D17.

led = digitalio.DigitalInOut(board.D17)
led.direction = digitalio.Direction.OUTPUT

3. Create a while True loop which will turn the LED on (led.value = True) and off (led.value = False) every 0.1 seconds. 

while True:
    led.value = True
    time.sleep(0.1)
    led.value = False
    time.sleep(0.1)

Your code should look like this 

import time
import board
import digitalio

led = digitalio.DigitalInOut(board.D17)
led.direction = digitalio.Direction.OUTPUT

while True:
    led.value = True
    time.sleep(0.1)
    led.value = False
    time.sleep(0.1)

Save the code and click Run to start it. The LED should now flash on and off every 0.1 seconds. With the test complete we can move on to Project 2.

Using a Capacitive Touch Sensor With CircuitPython 

(Image credit: Tom’s Hardware)

The next project requires a little more equipment, but it is no more difficult than controlling an LED. In this project we shall use an MPR121 capacitive touch sensor and a few crocodile clips to enable us to use conductive objects as inputs. 

The MPR121 is designed for microcontroller boards that have a Stemma QT connector, but with a little ingenuity we can make it work on a Raspberry Pi. The classic MPR121 example project is a banana piano, where touching a banana triggers a note to be played. For our simplified version, we will have two pieces of fruit, and each will turn the LED from the previous project, on and off.

To use the MPR121 touch sensor we will need to install an additional piece of software. Open a terminal and enter the following command.

$ sudo pip3 install adafruit-circuitpython-mpr121

(Image credit: Tom’s Hardware)

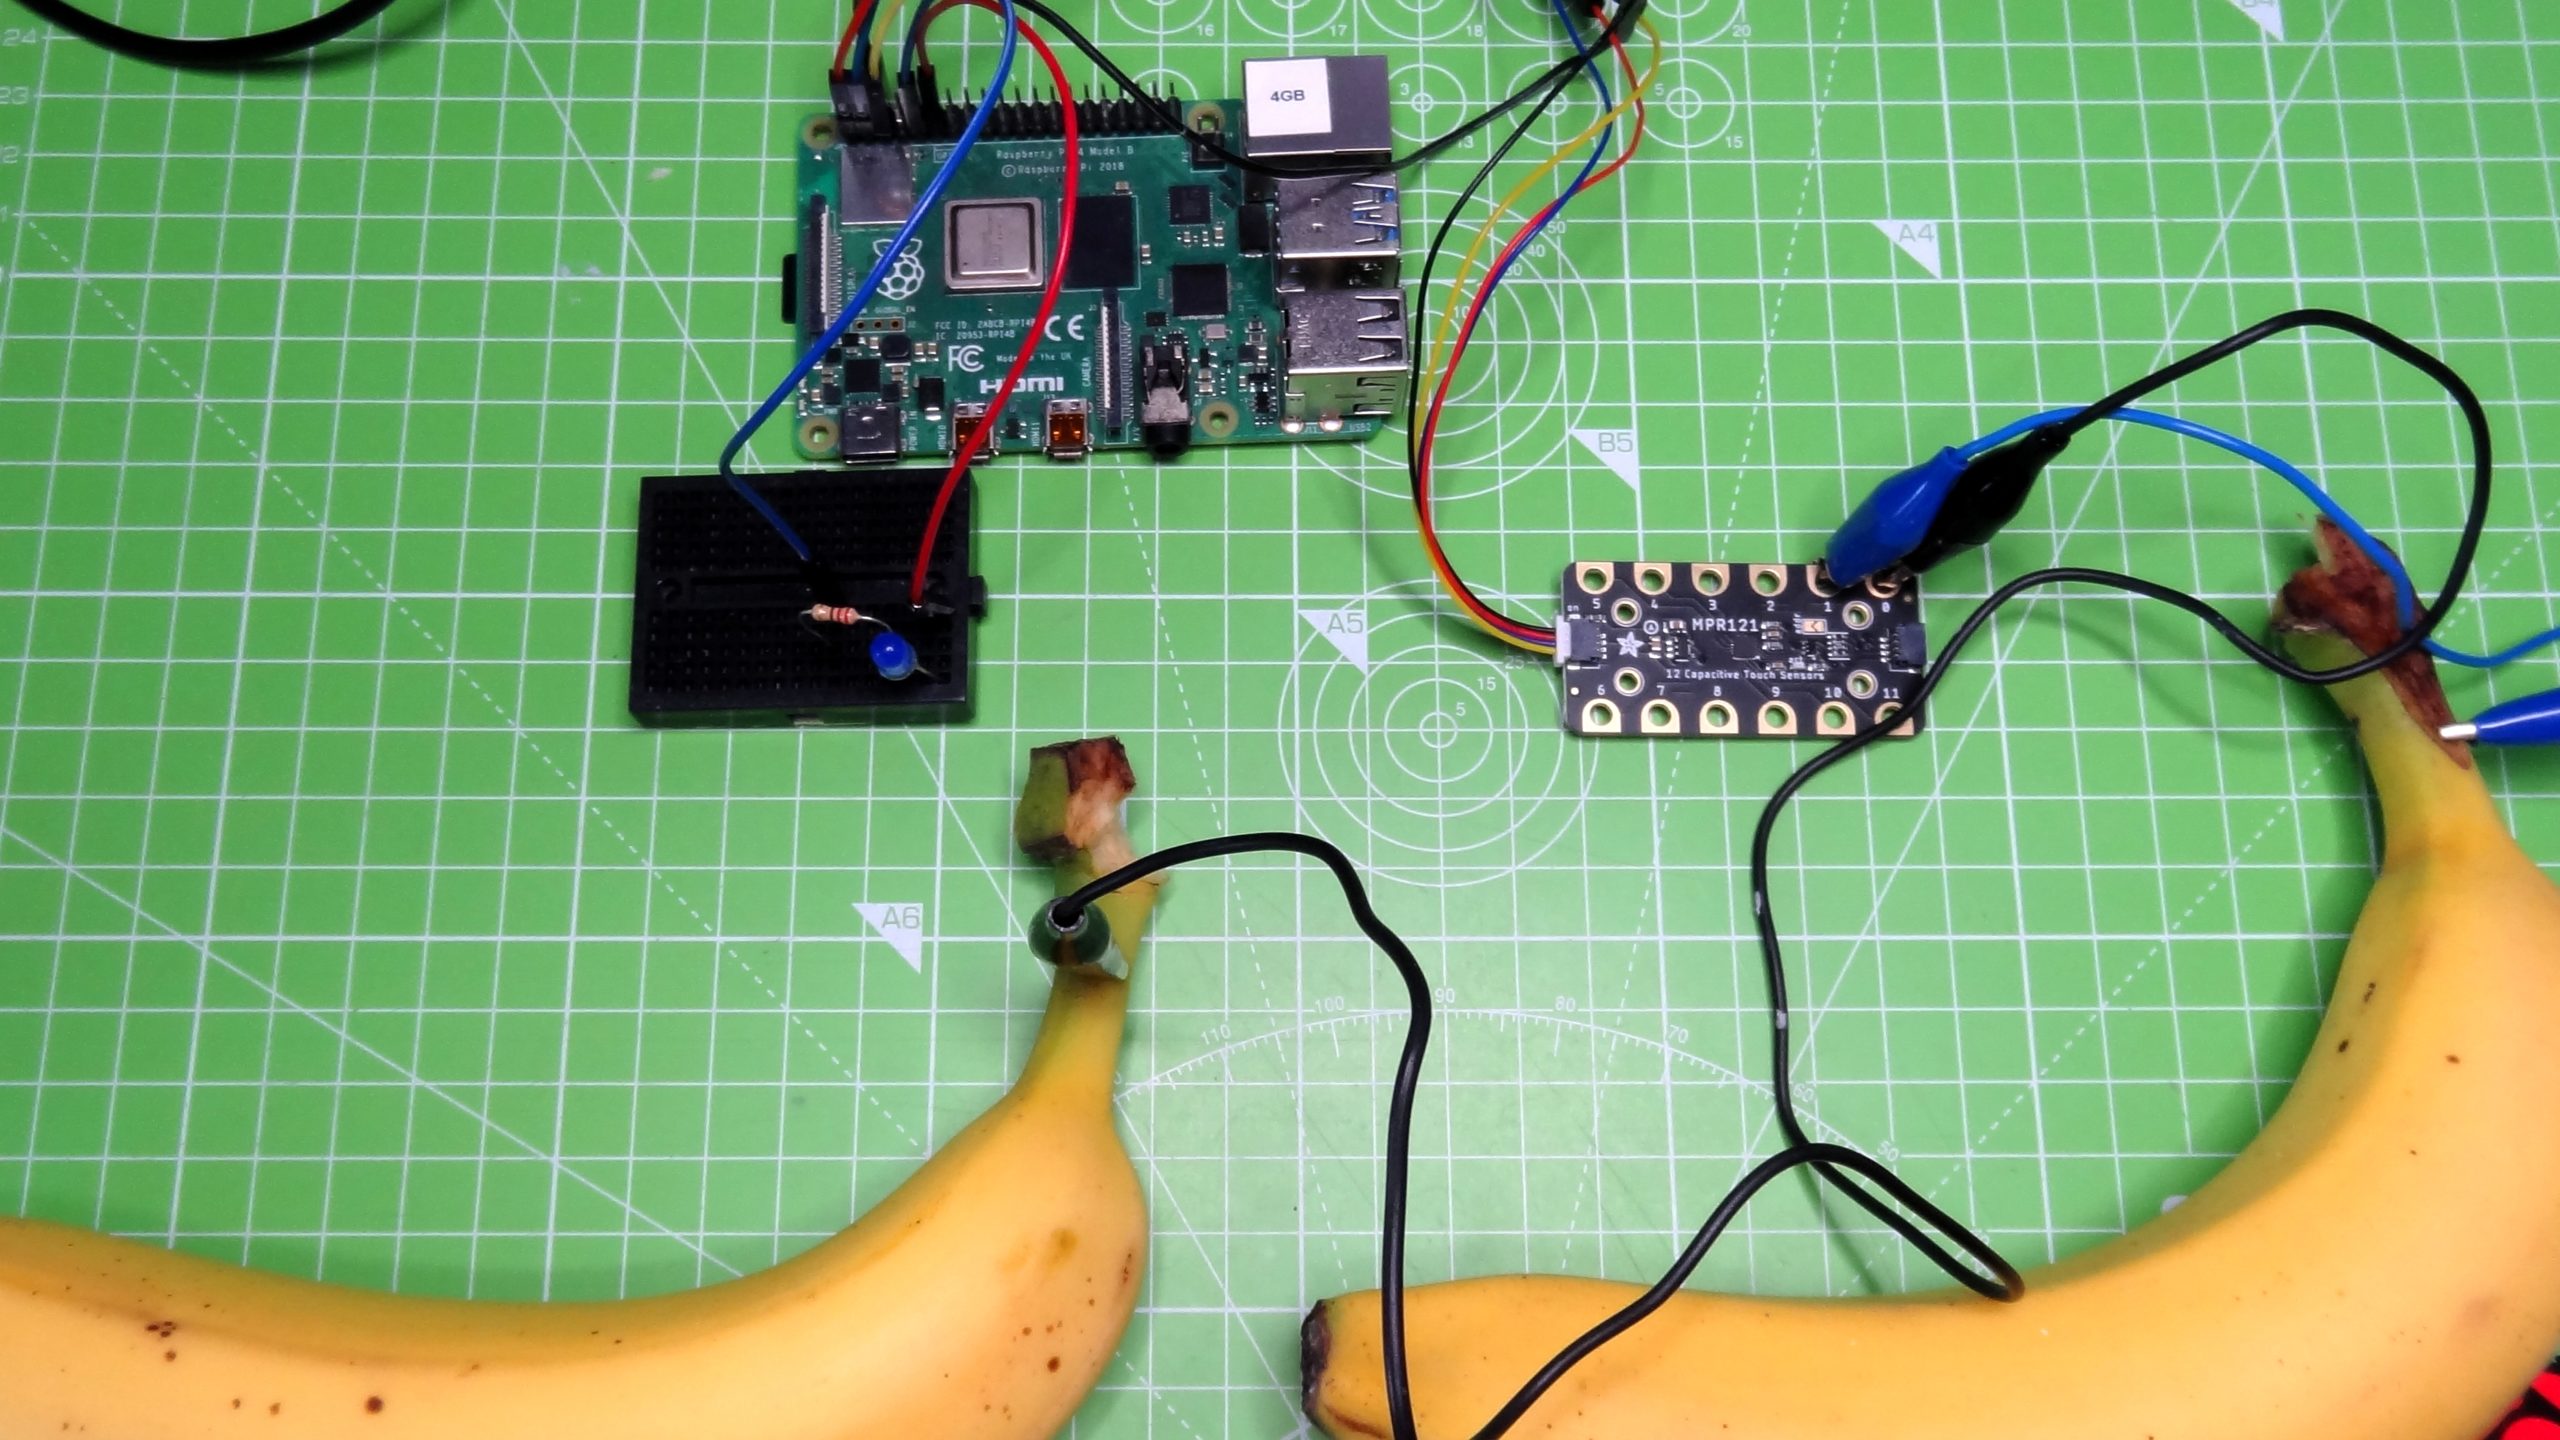
The MPR121 board uses a StemmaQT connector, to use with a Raspberry Pi we need to use the breakout lead that gives us four jumper wires. They are colour coded as follows. Red to 3V, Black to GND, Yellow to SCL (GPIO3) and Blue to SDA (GPIO2). Connect the MPR121 to the Raspberry Pi using female to female jumper wires.

(Image credit: Tom’s Hardware)

Using crocodile clips, connect a banana to input 0 of the MPR121, attach the other banana to input 1. Any conductive objects will work, aluminium foil and card is a cheap and easy way to make fun touch interfaces.

Open Thonny and create a new file.

1.  Import the three libraries of code. The first is “time” and this is used to control the pace of our code. The next two, “board” and “digitalio” are CircuitPython specific libraries. Board enables us to interact with the GPIO, digitalio is used to control the state of a GPIO pin.

import time
import board
import digitalio

2. Import two extra libraries for use with the MPR121 The first “busio” enables our code to access the I2C interface that the MPR121 uses for communication. The second clearly enables the use of the MPR121 in our code. 

import busio
import adafruit_mpr121

3. Using an object, led, we tell CircuitPython which GPIO pin we are using, and that it is an output. Our LED is connected to GPIO 17, which in CircuitPython is board.D17.

led = digitalio.DigitalInOut(board.D17)
led.direction = digitalio.Direction.OUTPUT

4. Create an object, i2c, that contains the GPIO pins that are used to connect the MPR121 via I2C. Then connect to the MPR121. CircuitPython has two references for the SCL (clock) and SDA (data) pins used in I2C. These references use the default pins for I2C no matter the device. So using these references on a Raspberry Pi, QT Py RP2040 and Raspberry Pi Pico all use the default I2C pins. 

i2c = busio.I2C(board.SCL, board.SDA)
mpr121 = adafruit_mpr121.MPR121(i2c)

5. Create a loop that will continually check the status of input 0, connected to a banana. If the banana is the function will return True, and then the code to print a message to the Python Shell and turn the LED on (led.value = True) will activate. 

while True:
    if mpr121.is_touched(0) ==  True:
        print("This banana turns light on")
        led.value = True

6. Enter a  second check to read the status of input 1 which is connected to the banana used to turn off the LED. If this is pressed the function returns True and triggers the code to print a message to the Python Shell and to turn the LED off. 

 elif mpr121.is_touched(1) == True:
        print("This banana turns the light off")
        led.value = False
    time.sleep(0.5)

With the code complete we can save the file as touch-test.py and click on Run to start the code. Now press the bananas to turn the LED on and off.

Your code should look like this

import time
import board
import digitalio
import busio
import adafruit_mpr121

led = digitalio.DigitalInOut(board.D17)
led.direction = digitalio.Direction.OUTPUT
i2c = busio.I2C(board.SCL, board.SDA)
mpr121 = adafruit_mpr121.MPR121(i2c)

while True:
    if mpr121.is_touched(0) ==  True:
        print("This banana turns light on")
        led.value = True
    elif mpr121.is_touched(1) == True:
        print("This banana turns the light off")
        led.value = False
    time.sleep(0.5)

CircuitPython provides the easiest way to get started on a project, thanks to a large community of makers using the language and creating libraries for components. CircuitPython is available for over 200 boards, and despite only being with us since 2018, it has been the base of many projects.

This article originally appeared in an issue of Linux Format magazine.

xiaomi-mi-11-lite-5g-review:-chic-and-unique

Xiaomi Mi 11 Lite 5G review: Chic and unique

(Pocket-lint) – The Xiaomi Mi 11 range spans a significant spectrum from top-tier flagship, in the Mi 11 Ultra, to the standard Mi 11, down to the more entry level – which is where this, the Mi 11 Lite 5G, finds itself.

Despite plonking ‘Lite’ into its name, however, the Mi 11 Lite 5G really is not a low-power phone by any means. It’s just not as crazy-powerful as the upper echelons in the range. The second clue to that regard is the ‘5G’ aspect of the name – because, yes, there’s also speedy connectivity.

So if you’re not looking to spend a fortune on a phone, want 5G connectivity, and having a slimmer and easier-to-manage handset is high up your list of appeals, the Xiaomi Mi 11 Lite 5G ticks a lot of boxes. But then so do a bunch of competitors. So can this entry-level 5Ger deliver?

Design & Display

  • Display: 6.55-inch AMOLED panel, 90Hz refresh, 1080 x 2400 resolution
  • Finish options: Truffle Black, Mint Green, Citrus Yellow
  • Dimensions: 160.5 x 75.7 x 6.8mm / Weight: 157g
  • Side-mounted fingerprint scanner
  • No 3.5mm jack

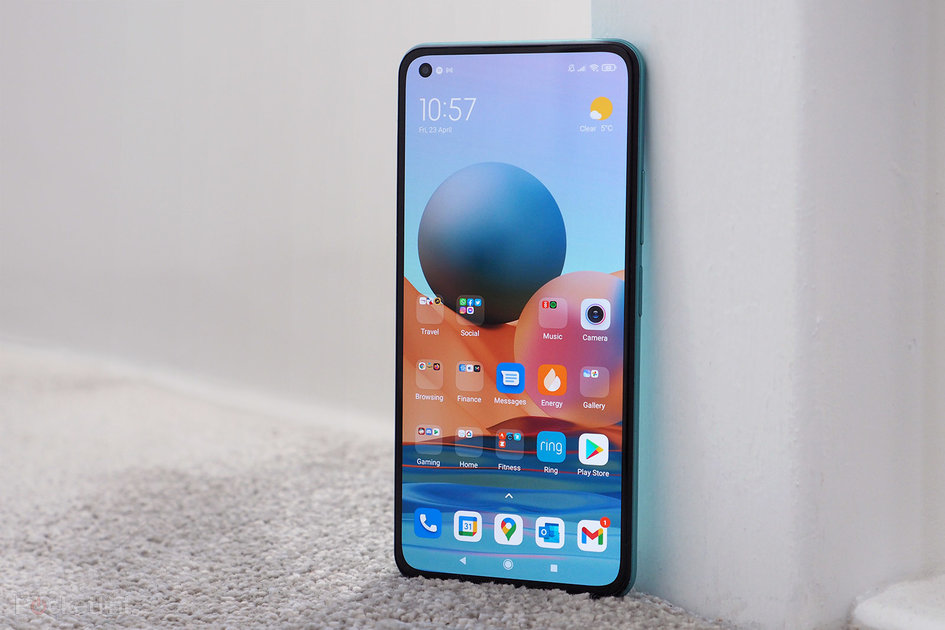
Upon pulling the Mi 11 Lite 5G from its box we let out a rare gasp. Because, shown here in its apparent ‘Mint Green’ finish – it looks more ‘Bubblegum’ to us, which is the name for the non-5G variant – this handset looks really fresh and standout. Very dapper indeed.

That’s partly because Xiaomi has redesigned the range, so the Mi 11 Lite looks way more evolved than the previous 10T Lite version. Look at those side-by-side and the older model looks rather dated – it’s quite a stark difference. Yet there’s mere months between them in terms of release cycle.

That said, the Mi 11 Lite 5G is only a little like other Mi 11 handsets in terms of design. The cameras are far different to the Ultra’s “megabump”, arranged in a really neat format that, although similar to the Mi 11, doesn’t protrude to the same degree from the rear.

The rear finish is good at resisting fingerprints too, which is a breath of fresh air (minty fresh, eh!), while the branding is subtle and nicely integrated.


Motorola’s new Moto G9 Plus is a stunner of a phone – find out why, right here


By Pocket-lint Promotion
·

But above all else, it’s the Mi 11 Lite 5G’s thickness that’s its biggest take-away point. By which we mean thinness: because this handset is far slimmer than, well, pretty much anything we’ve used for months and months. We can’t think of a slimmer 5G smartphone. That, for us, has bags of appeal – it’s been really refreshing not carting a brick around in the pocket for the couple of weeks we’ve been using this phone.

Such a svelte design means the 3.5mm headphone jack has been binned, though, so it’s wireless connectivity only in that regard. But we can take that – it makes the design look more enclosed and complete anyway. There’s also no under-display fingerprint scanner here, with a side-mounted one in the power button a perfectly acceptable alternative – that operates speedily and we’ve got very much used to using it.

The display, at 6.55-inches, is still large despite the phone’s overall trim frame. It’s flat, with the phone body curving gently at the edges to make it really comfortable to hold. And there’s no teardrop notch to cry about this time around either – it’s a single punch-hole one to the upper corner, which is fairly inconspicuous.

That screen, an AMOLED panel, delivers on colour, brightness and verve, while a 90Hz refresh rate can deliver a little added smoothness to proceedings. There’s not a 120Hz option here – kind-of odd, as the 10T Lite did have that – but, really, most eyes aren’t going to tell the difference. We’d take the battery life gains every time instead, thanks.

Performance & Battery

  • Processor: Qualcomm Snapdragon 780G, 8GB RAM
  • Software: MIUI 12 over Google Android 11 OS
  • Battery: 4250mAh, 33W fast-charging
  • Storage: 128GB/256GB, microSD

Speaking of battery, that’s the first thing we assumed would be poor in the Mi 11 Lite 5G – because of how slim it is. But how wrong we were. For starters the 4,250mAh capacity cell is pretty capacious – and in our hands was easily able to deliver 16 hours a day with around 25 per cent battery or more remaining.

That’s been irrelevant of what we’ve asked the phone to do in a given day. Strava tracking for an hour and an hour of gaming in the evening, in addition to hours of screen time, calls and so forth. It’s no problem for this device. Note, however, that we’ve been unable to locate a 5G signal area during testing – lockdown and all that – so whether that would adversely affect battery life is for debate. What we do see in the settings, however, is a 5G option to toggle the connectivity off when it’s not needed, to further extend battery life.

However, while battery life ticks along just fine, part of the reason is down to the rather hardcore software approach. Xiaomi’s MIUI 12 – skinned over the top of Google’s Android 11 operating system – by default has a lot of “off” switches selected. Seriously, MIUI is hell-bent on ensuring battery lasts and lasts – sometimes to the detriment of the experience and use of apps.

As such, you’ll need to investigate individual apps within the settings and permit them to self wake as and when they need, removing any automated battery restrictions from the important ones that you have and would, say, expect push notifications from. In the past we’ve had MIUI cause delays with notifications in other Xiaomi phones. In the Mi 11 Lite 5G, however, that’s been no problem whatsoever – perhaps because we’re so used to it and in setting the software in how we want to conduct our business; or, perhaps, because Xiaomi has sorted that issue out in an incremental update!

Otherwise the software is pretty robust. There are some oddities, such as an additional Xiaomi store as an addition to Google Play, but the two hardly interfere too much. And having copied over a bumper crop of apps, it’s clear to see that there are Xiaomi pre-install favourites and various not-needed staples – browsers, calendars, that kind of stuff – that just clogs up the home screen to start with, but is easily replaced with Chrome and your other favourites.

Regarding the phone’s innards, there’s a Qualcomm Snapdragon 780G platform handling proceedings, putting the Mi 11 Lite 5G one step down from the top-tier 800 series platform. Does that really matter? We’ve not found it to at all. From general user interface use, to app opening time, fluidity has been high throughout.

Besides, a 700 series chipset is more than good enough to run your more demanding favourites too. We’ve been plugging away at South Park: Phone Destroyer and PUBG: Mobile without hindrance, showing just how good the balance of power and battery life can be in devices such as this.

Cameras

  • Triple rear cameras:
    • Main: 64-megapixel, f/1.8 aperture, 0.7µm pixel size, phase detection autofocus (PDAF)
    • Wide-angle (0.5x):  8MP, f/2.2, 1.12µm, 119-degree angle of view
    • Macro: 5MP, f/2.4
  • Single front-facing punch-hole selfie camera: 20MP, f/2.2

Buy a ‘Lite’ phone and you’re never going to expect too much from the cameras, right? However, Xiaomi has done a reasonable job here of balancing things out. For starters all three lenses are actually useful – there’s not a lens here for the sake of number count, like with so much of the competition.

The main 64-megapixel sensor uses four-in-one processing to output 16-megapixel shots as standard, which hold enough colour and detail. Even in low-light conditions we’ve found the quality to hold up fairly well, too, so this sensor delivers the goods.

It’s a shame that there’s no optical stabilisation on the main lens, because holding it steady – especially when shooting Night Mode shots – is tricky and can result in a little softeness in dim conditions if you’re not careful.

Pocket-lint

: Wide-angle – full shotWide-angle – full shot

The wide-angle, however, is a weaker sensor. It’s just 8-megapixels in resolution, can’t deliver the fidelity of the main one by any means, and displays some blur to the edges. That’s pretty common for wide-angle cameras, sure, but there are better iterations around. Still, there’s practical use from a sensor such as this, so it’s a positive to have it rather than not.

Last up out of the trio is a macro sensor. Now, typically, these are throwaway afterthoughts. But, actually, the one on this Mi handset is acceptable – probably because it’s a 5-megapixel sensor, not the 2-megapixel type that too many other budget handsets opt for. That means images are of a usable scale, and you’ll get a little extra something out of super close-up shots from this sensor. We doubt you’ll use it a lot, though, as it’s hardly a practical everydayer, plus its activation is tucked away in settings – but there’s fun to be had from it nonetheless.

What we like about the Mi 11 Lite 5G’s camera setup is that it’s not trying to oversell you a bunch of pointless lenses. It doesn’t protrude five miles from the back of the phone, either, delivering a neat-looking handset that, while hardly reaching for the stars in what it can do, is perfectly capable. And, compared to the likes of the Moto G100, for example, the Xiaomi actually has the upper hand in its image quality delivery.

Verdict

Although the Xiaomi Mi 11 Lite 5G looks and feels different to the rest of the Mi 11 family, there’s something refreshing about its design. It’s really slim, light, and that colour finish looks super. We can’t think of a slimmer, tidier-looking 5G handset – which makes this something of a unique proposition.

Despite being called a ‘Lite’ phone, it shouldn’t be seen entirely in that regard either. With the Qualcomm Snapdragon 780G handling everything, there’s ample power to keep that 90Hz AMOLED screen ticking along, for battery life to last surprisingly long – we didn’t expect it, given the trim design – and software that, if you tend to it with a bit of pruning from the off, has been more robust here than many other Xiaomi handsets we’ve seen in the recent past.

However, forego the 5G need, and there are lots of cheaper competitors that might also appeal, such as the Redmi Note 10 Pro. Similar grade handsets, such as the Moto G100, may also appeal – but, as far as we understand it, the Xiaomi undercuts that device’s price point, asserting its position as one of the top dogs in the affordable 5G market.

Also consider

Moto G100

A near-ish comparison in that there’s 5G and gaming-capable power for less than a flagship price. We prefer the Moto’s software, but the Xiaomi’s design has the upper hand in our view.

  • Read our review

squirrel_widget_4340899

Writing by Mike Lowe.

luminar’s-lidar-will-take-flight-in-new-partnership-with-airbus

Luminar’s LIDAR will take flight in new partnership with Airbus

Luminar, the newly public LIDAR company, is teaming up with the largest aircraft manufacturer in the world to bring its laser-guided mapping and perception technology to new heights.

LIDAR, the laser sensor that sends millions of laser points out per second and measures how long they take to bounce back, is seen as a key ingredient to autonomous driving. But it hasn’t seen as much traction in the world of aviation. Luminar and its new partner, the French aerospace giant Airbus, are out to fix that by applying the laser sensor’s 3D mapping capabilities to the aerospace company’s helicopters and fixed-wing aircraft in the hopes of making flying a lot safer.

Specifically, Luminar’s work with Airbus will fall under the aircraft manufacturer’s two innovation-focused projects: its UpNext subsidiary and FlightLab, which uses flight testing as the “principal means of achieving proof of concept for a variety of future technologies developed at Airbus.” Engineers from both companies will work together to “enhance sensing, perception, and system-level capabilities to ultimately enable safe, autonomous flight,” the companies said.

This will be Luminar’s first foray into anything outside the world of autonomous vehicles, Austin Russell, the founder and CEO of Luminar, told The Verge. Russell said he sees linking up with Airbus as an extension of his mission of “making overall transportation safe and autonomous — it’s the same exact story.”

While the number of airplanes that crash every year has been steadily dropping, helicopter crashes — like the one that killed NBA star Kobe Bryant in 2020 — are becoming more common. The rate of fatal helicopter accidents per 100,000 flight hours jumped from 2016 to 2018, according to data released in March 2019 by the US Helicopter Safety Team, a volunteer team of government and industry leaders. The number of fatalities per 100,000 hours also rose.

Russell is convinced that Luminar can help prevent some of those fatal crashes. “A double-digit percentage of helicopter crashes happen by just landing on things like wires that are totally avoidable,” he said. “If you can actually just have a 3D map and see what’s going on hidden underneath you would be an improvement. Even some of the best pilots have a hard time being able to see these kinds of things.”

Luminar was founded by a then 17-year-old Russell in 2012 and counts among its backers Peter Thiel and Volvo, which will begin using Luminar technology to power autonomous driving in its cars beginning in 2022. Luminar also supplies Audi and the Toyota Research Institute, and it has announced partnerships with Mobileye and Daimler’s trucking division.

In addition to making giant passenger planes, Airbus also has an interest in small, battery-powered air taxis that are commonly referred to as “urban air mobility.” These would essentially be small helicopters with electric powertrains that could be used for short-hop flights within cities, such as Manhattan to JFK airport.

The aerospace company has funded several electric vertical takeoff and landing (eVTOL) projects over the years, including Vahana and CityAirbus. The former was an egg-shaped single-pilot eVTOL demonstrator, while the latter can carry four passengers and has a range of 60 miles.

Pixel 5A camera sample leaks, hints at similar specs to the Pixel 5

Google seems to have accidentally shared a photo sample from its upcoming Pixel 5A, giving us some hints about what to expect from the barely announced device. The photo appeared in an album posted alongside a blog post about Google’s HDR+ Bracketing technology, which aims to reduce noise in HDR photos (via Android Police). The EXIF data for most of the photos said they were captured by existing Pixel phones including the Pixel 5, Pixel 4A 5G, Pixel 4, and Pixel 4 XL, but in among them was one image apparently taken with a Pixel 5A.

Google recently confirmed the existence of the Pixel 5A 5G in response to rumors that the device had been cancelled. However, beyond confirming that the device will be available later this year in the US and Japan, it didn’t offer any more details about the phone’s specs or cameras.

The image labeled as coming from a Pixel 5A has since been removed from the album, but offered several details about the camera performance of the upcoming device while it was up. First is that it appears to have been taken with an ultrawide camera, which corroborates previous reports that the 5A will have two rear cameras — a main camera and an ultrawide. That’s similar to the Pixel 4A 5G, while the Pixel 4A had just the one rear camera.

A screenshot of the photo’s EXIF data before it was removed.
Screenshot: Google Photos

Its resolution is also listed as 12.2 megapixels, which is similar to the photos we saw from the Pixel 5. Although the sensor in the Pixel 5’s ultrawide camera is technically 16 megapixels, it produces 12.2-megapixel shots by default. The 5A’s EXIF data also shows it has the same f/2.2 aperture as the 5. Given that the photo was attached to a blog post about HDR+ Bracketing, it seems likely that the 5A will also offer support for the technology.

Combined with previous rumors, it looks like the Pixel 5A could be a very similar device to last year’s Pixel 5. Reports suggest it’ll use the same Snapdragon 765G processor, and have a similar design with a 6.2-inch OLED display with a hole-punch selfie camera. Like Google’s previous A-series devices, however, the rear panel is expected to be made of plastic rather than glass, and the phone will also reportedly feature a 3.5mm headphone jack.

According to the leaked photo’s EXIF data, the photo itself was taken last October just before the Pixel 5 was released. Without official confirmation from Google there’s no guarantee it’s representative of the 5A’s final camera hardware, but the fact that the photo has now been removed suggests it wasn’t a simple labeling mistake.

samsung-galaxy-a52-5g-review:-a-midrange-phone-that-will-last

Samsung Galaxy A52 5G review: a midrange phone that will last

If you buy something from a Verge link, Vox Media may earn a commission. See our ethics statement.

If a $100 budget phone is the fast-food dollar menu and a $1,000 flagship is a steakhouse dinner, then the Samsung Galaxy A52 5G sits comfortably halfway between the two: the laid-back all-day cafe with surprisingly tasty food.

It’s good. More importantly, it’s good where it matters. Sure, you have to order your food at the counter and get your own water refills, but it’s worth it because brunch is fantastic and the prices are reasonable.

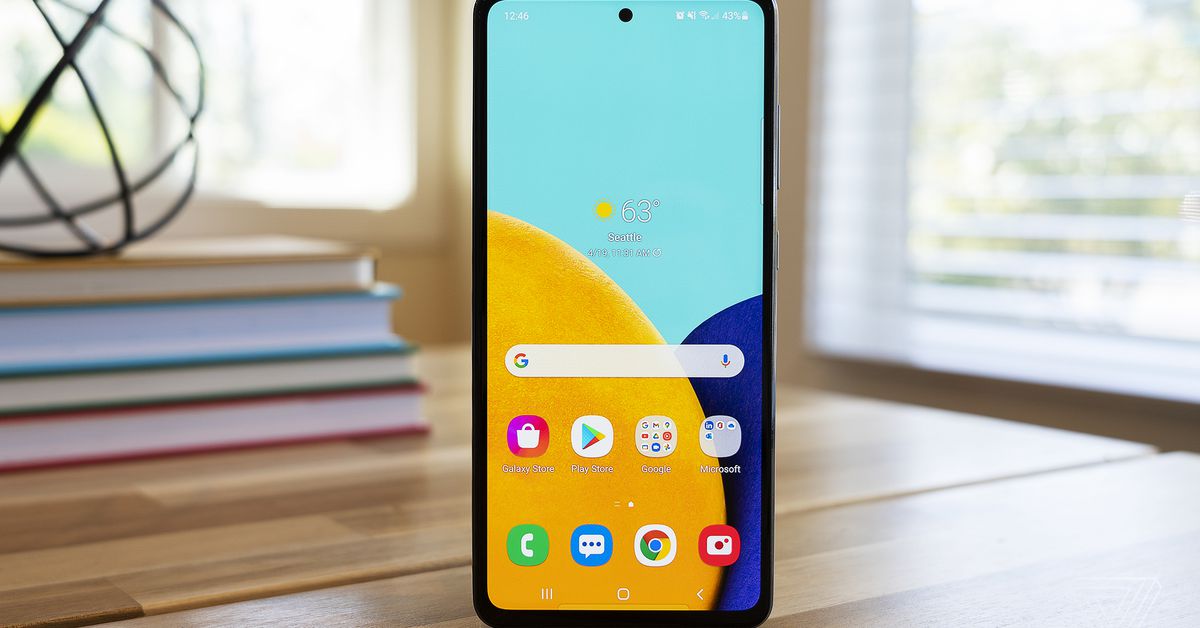
The A52 5G is the highest-specced of the budget A-series Galaxy phones we’ll see in the US this year, offering all of the basics for its $499 price tag along with a few good extras. Its 6.5-inch screen comes with a fast 120Hz refresh rate that’s scarce at this price point. Its main camera includes optical image stabilization, something I missed when I used the more expensive OnePlus 9. The A52 5G is rated IP67 waterproof for some extra peace of mind. And hey, there’s still a headphone jack! In this economy!

Still, this isn’t a flagship, and costs had to be cut somewhere. The device’s frame and back panel are plastic, and while I like the matte finish on the back, there’s a certain hollowness when you tap on it that’s not very reassuring. There’s also no telephoto to complement the wide and ultrawide cameras, just digital zoom plus a depth sensor and macro camera of dubious usefulness.

The important stuff is here, though. Samsung has the A52 5G on its list for monthly OS updates currently, and it says it will offer three years of major Android OS updates and at least some security support for four years. That will go a long way toward making the most out of your investment in this phone, and it will help you take advantage of its headline feature: 5G — Sub-6GHz, specifically, with hardware-level support for the C-band frequencies carriers will start using in 2022.

It’s getting more common to see 5G offered in midrange and budget phones, but in this country, it’ll be a couple more years before our 5G networks are truly good. Healthy device support for the next few years makes it more likely that the A52 5G will actually last long enough to make it to that 5G promised land.

The A52 5G offers solid everyday performance with a Snapdragon 750G chipset and 6GB of RAM.

Samsung Galaxy A52 5G performance and screen

The A52 5G uses a Snapdragon 750G processor with 6GB of RAM, and the combination feels like a good fit here. You can certainly push it out of its comfort zone with heavier tasks like webpages with JavaScript, and I noticed it hesitating a moment too long when opening the camera app from the lock screen. But for day-to-day tasks and social media scrolling, it keeps up well.

As in last year’s model, the screen is where the A52 5G (and Samsung generally) really stand out. This is a 6.5-inch 1080p OLED panel that’s rich, bright, and generally lovely to look at. Plus, it offers all of the velvety smoothness that comes with its 120Hz refresh rate. Swiping between home screens, opening apps, scrolling through Twitter — it all just feels nicer with a fast refresh rate.

Even considering the additional power needed for the 120Hz screen, the A52 5G’s 4,500mAh battery consistently lasted well into the next day in my use. I managed to get two full days out of it when I forgot to charge it overnight and decided to embrace chaos and just plow through on the remaining charge. This was with light to moderate use, and I was down to low double-digit battery percentage by the end of day two, but my gamble paid off.

One feature I continue to fight a losing battle with on the A52 5G is the in-display optical fingerprint sensor. I’ve been chastised by the phone many times for not leaving my finger on the sensor long enough, and I almost always need at least two tries to get it to register. That hit rate goes down significantly outside in bright light.

These problems aren’t unique to this device, and you can just opt to use (less secure) facial recognition or a plain old PIN to lock and unlock the phone. But there are nicer in-display fingerprint readers in pricier phones like the OnePlus 9 and Samsung’s own S21, so it’s a trade-off to be aware of.

The Galaxy A52 5G ships with Android 11, which is great. The less good news is, as we saw in the S21 devices earlier this year, Samsung’s latest take on the OS stuffs a lot of unwanted apps, ads, and general clutter into the UI. I see enough ads throughout my day as it is, and I do not appreciate seeing one more when I check the weather on my phone’s own weather app.

If there’s a positive way to look at this situation, it’s that it feels more forgivable on a budget phone than on a $1,000-plus flagship. But I’d rather not have the ads at all. If you buy the similarly priced Pixel 4A 5G, you give up a lot of other features from the A52 5G, but you get an ad-free experience.

Housed in the rear camera bump are a standard wide, ultrawide, macro, and depth sensor.

Samsung Galaxy A52 5G camera

The A52 5G includes three rear cameras, plus a 5-megapixel depth sensor. You get a 64-megapixel standard wide with OIS, 12-megapixel ultrawide, and the seemingly obligatory 5-megapixel macro camera. There’s also a front-facing 32-megapixel selfie camera.


  • Taken with 2x digital zoom


  • Taken with ultrawide


  • Taken with ultrawide


The 64-megapixel main camera produces 16-megapixel images in its standard photo mode that are bright with the very saturated colors you’d expect from a Samsung phone. Sometimes the look is pleasant, but more often than not, it’s a little much for my taste. The good news is that this sensor is capable of capturing lots of fine detail in good lighting, and it even does well in dim to very low-light conditions.

I put its night mode up against the Google Pixel 4A, which is still the low-light champ in the midrange class. There’s more noise visible in the A52 5G’s night mode shot, and details have a watercolory look, but while the 4A hangs on to its title, the A52 5G is quite close behind.

Left: Galaxy A52 night mode. Right: Pixel 4A night mode.“,”image_left”:{“ratio”:”*”,”original_url”:”https://cdn.vox-cdn.com/uploads/chorus_asset/file/22465175/samsung_night_crop.jpg”,”network”:”verge”,”bgcolor”:”white”,”pinterest_enabled”:false,”caption”:null,”credit”:null,”focal_area”:{“top_left_x”:0,”top_left_y”:0,”bottom_right_x”:2040,”bottom_right_y”:1580},”bounds”:[0,0,2040,1580],”uploaded_size”:{“width”:2040,”height”:1580},”focal_point”:null,”asset_id”:22465175,”asset_credit”:null,”alt_text”:””},”image_right”:{“ratio”:”*”,”original_url”:”https://cdn.vox-cdn.com/uploads/chorus_asset/file/22465178/pixel_night_crop.jpg”,”network”:”verge”,”bgcolor”:”white”,”pinterest_enabled”:false,”caption”:null,”credit”:null,”focal_area”:{“top_left_x”:0,”top_left_y”:0,”bottom_right_x”:2040,”bottom_right_y”:1580},”bounds”:[0,0,2040,1580],”uploaded_size”:{“width”:2040,”height”:1580},”focal_point”:null,”asset_id”:22465178,”asset_credit”:null,”alt_text”:””},”credit”:null}” data-cid=”apps/imageslider-1619271003_9454_116978″>

Left: Galaxy A52 night mode. Right: Pixel 4A night mode.

The Pixel 4A is still the better camera in good lighting, too, but the differences are more subjective here. The 4A goes for more subdued color rendering, and the A52 5G’s images lack a little contrast in comparison.

Left: Galaxy A52 5G. Right: Pixel 4A.“,”image_left”:{“ratio”:”*”,”original_url”:”https://cdn.vox-cdn.com/uploads/chorus_asset/file/22465190/samsung_goodlight.jpg”,”network”:”verge”,”bgcolor”:”white”,”pinterest_enabled”:false,”caption”:null,”credit”:null,”focal_area”:{“top_left_x”:0,”top_left_y”:0,”bottom_right_x”:2040,”bottom_right_y”:1530},”bounds”:[0,0,2040,1530],”uploaded_size”:{“width”:2040,”height”:1530},”focal_point”:null,”asset_id”:22465190,”asset_credit”:null,”alt_text”:””},”image_right”:{“ratio”:”*”,”original_url”:”https://cdn.vox-cdn.com/uploads/chorus_asset/file/22465193/pixel_goodlight.jpg”,”network”:”verge”,”bgcolor”:”white”,”pinterest_enabled”:false,”caption”:null,”credit”:null,”focal_area”:{“top_left_x”:0,”top_left_y”:0,”bottom_right_x”:2040,”bottom_right_y”:1530},”bounds”:[0,0,2040,1530],”uploaded_size”:{“width”:2040,”height”:1530},”focal_point”:null,”asset_id”:22465193,”asset_credit”:null,”alt_text”:””},”credit”:null}” data-cid=”apps/imageslider-1619271003_1919_116979″>

Left: Galaxy A52 5G. Right: Pixel 4A.

So the A52 5G can’t beat the generation-old imaging tech in the 4A, but that might say more about the Pixel than anything else. Aside from that, the A52 5G turns in good all-around camera performance. Images from the ultrawide sometimes have a little cooler color cast but are generally good. The selfie camera offers two zoom settings: a slightly cropped-in standard wide view and an ever-so-slightly wider angle. The “focal length” difference between the two is almost laughably small.

At its default settings, the selfie camera does a fair amount of face smoothing and brightening. I don’t think it quite crosses the line into hamcam territory, but it certainly has that telltale “maybe it’s AI, maybe it’s Maybelline” smoothed look to it.

If you want to go full hamcam, there’s a new mode just labeled “fun” in the camera app with AR face filters brought to you by Snapchat. There’s a different selection of them every day, and you don’t need a Snapchat account to use or share them.

I’m tempted to dismiss them as “for the youths,” but maybe this is really for the olds like me who would rather not join another social platform if I can possibly avoid it, thank you very much. At last, I can transform my face into a piece of broccoli and share it with the world without logging in to Snapchat — three years after the kids have all moved on to something else. Anyway, it’s there, it works, and you can indeed turn your face into broccoli.

Good hardware and healthy software support make the A52 5G worth spending a little more on.

There’s a lot that the Galaxy A52 5G gets right. Maybe the most important feature is one that sounds much less exciting than cool headline specs: security updates for at least the next few years. At $500, this is the higher end of the budget market, but a few extra hundred dollars is likely easier to swallow if you know you’ll get a couple more years out of your investment.

Samsung has invested in hardware in all the right places: the 120Hz screen makes for an elevated user experience, battery life is good, camera performance is strong, and a healthy processor / chipset combination handles daily tasks well.

What I didn’t love — the cluttered software, fussy fingerprint sensor, a tendency toward oversaturated color in photos — feels more forgivable when the phone gets the nonnegotiable stuff right. The Pixel 4A 5G is probably this device’s closest competition, and it beats the A52 5G on camera quality and a cleaner UI, but it’s a smaller device without a fancy fast refresh rate screen. Depending on how you feel about either of those things, the 4A 5G might be the better pick for you.

In any case, the A52 5G is a good midrange phone today. But just as importantly, it will be a good phone a few years from now. With solid hardware and a software support system to back it up, this is a pricier budget phone that’s worth budgeting a little extra for.

Photography by Allison Johnson / The Verge

stemma,-qwiic-and-grove-connectors:-which-is-right-for-you?

Stemma, Qwiic and Grove Connectors: Which is Right for You?

(Image credit: Tom’s Hardware)

Electronics is a world of protocols, technologies and connections. From the humble jumper wire, the most basic of connections where individual wires are used to connect the GPIO to a device, to specialist connectors often polarized or keyed for use with a specific interface. If you are new to electronics then wiring up your first circuit may seem daunting.

Companies such as Adafruit, Seeed and SparkFun have come up with their own solutions to this problem. Each solution is a system that has polarized connectors that make connecting compatible projects easier, with no soldering required. Using these connectors makes constructing electronics projects as easy as building with Lego. But what exactly is the difference between Adafruit’s Stemma / Stemma QT, SparkFun’s Qwiic and Seed’s Grove connectors? Read on to find out.

What are Stemma and Stemma QT?

(Image credit: Tom’s Hardware)

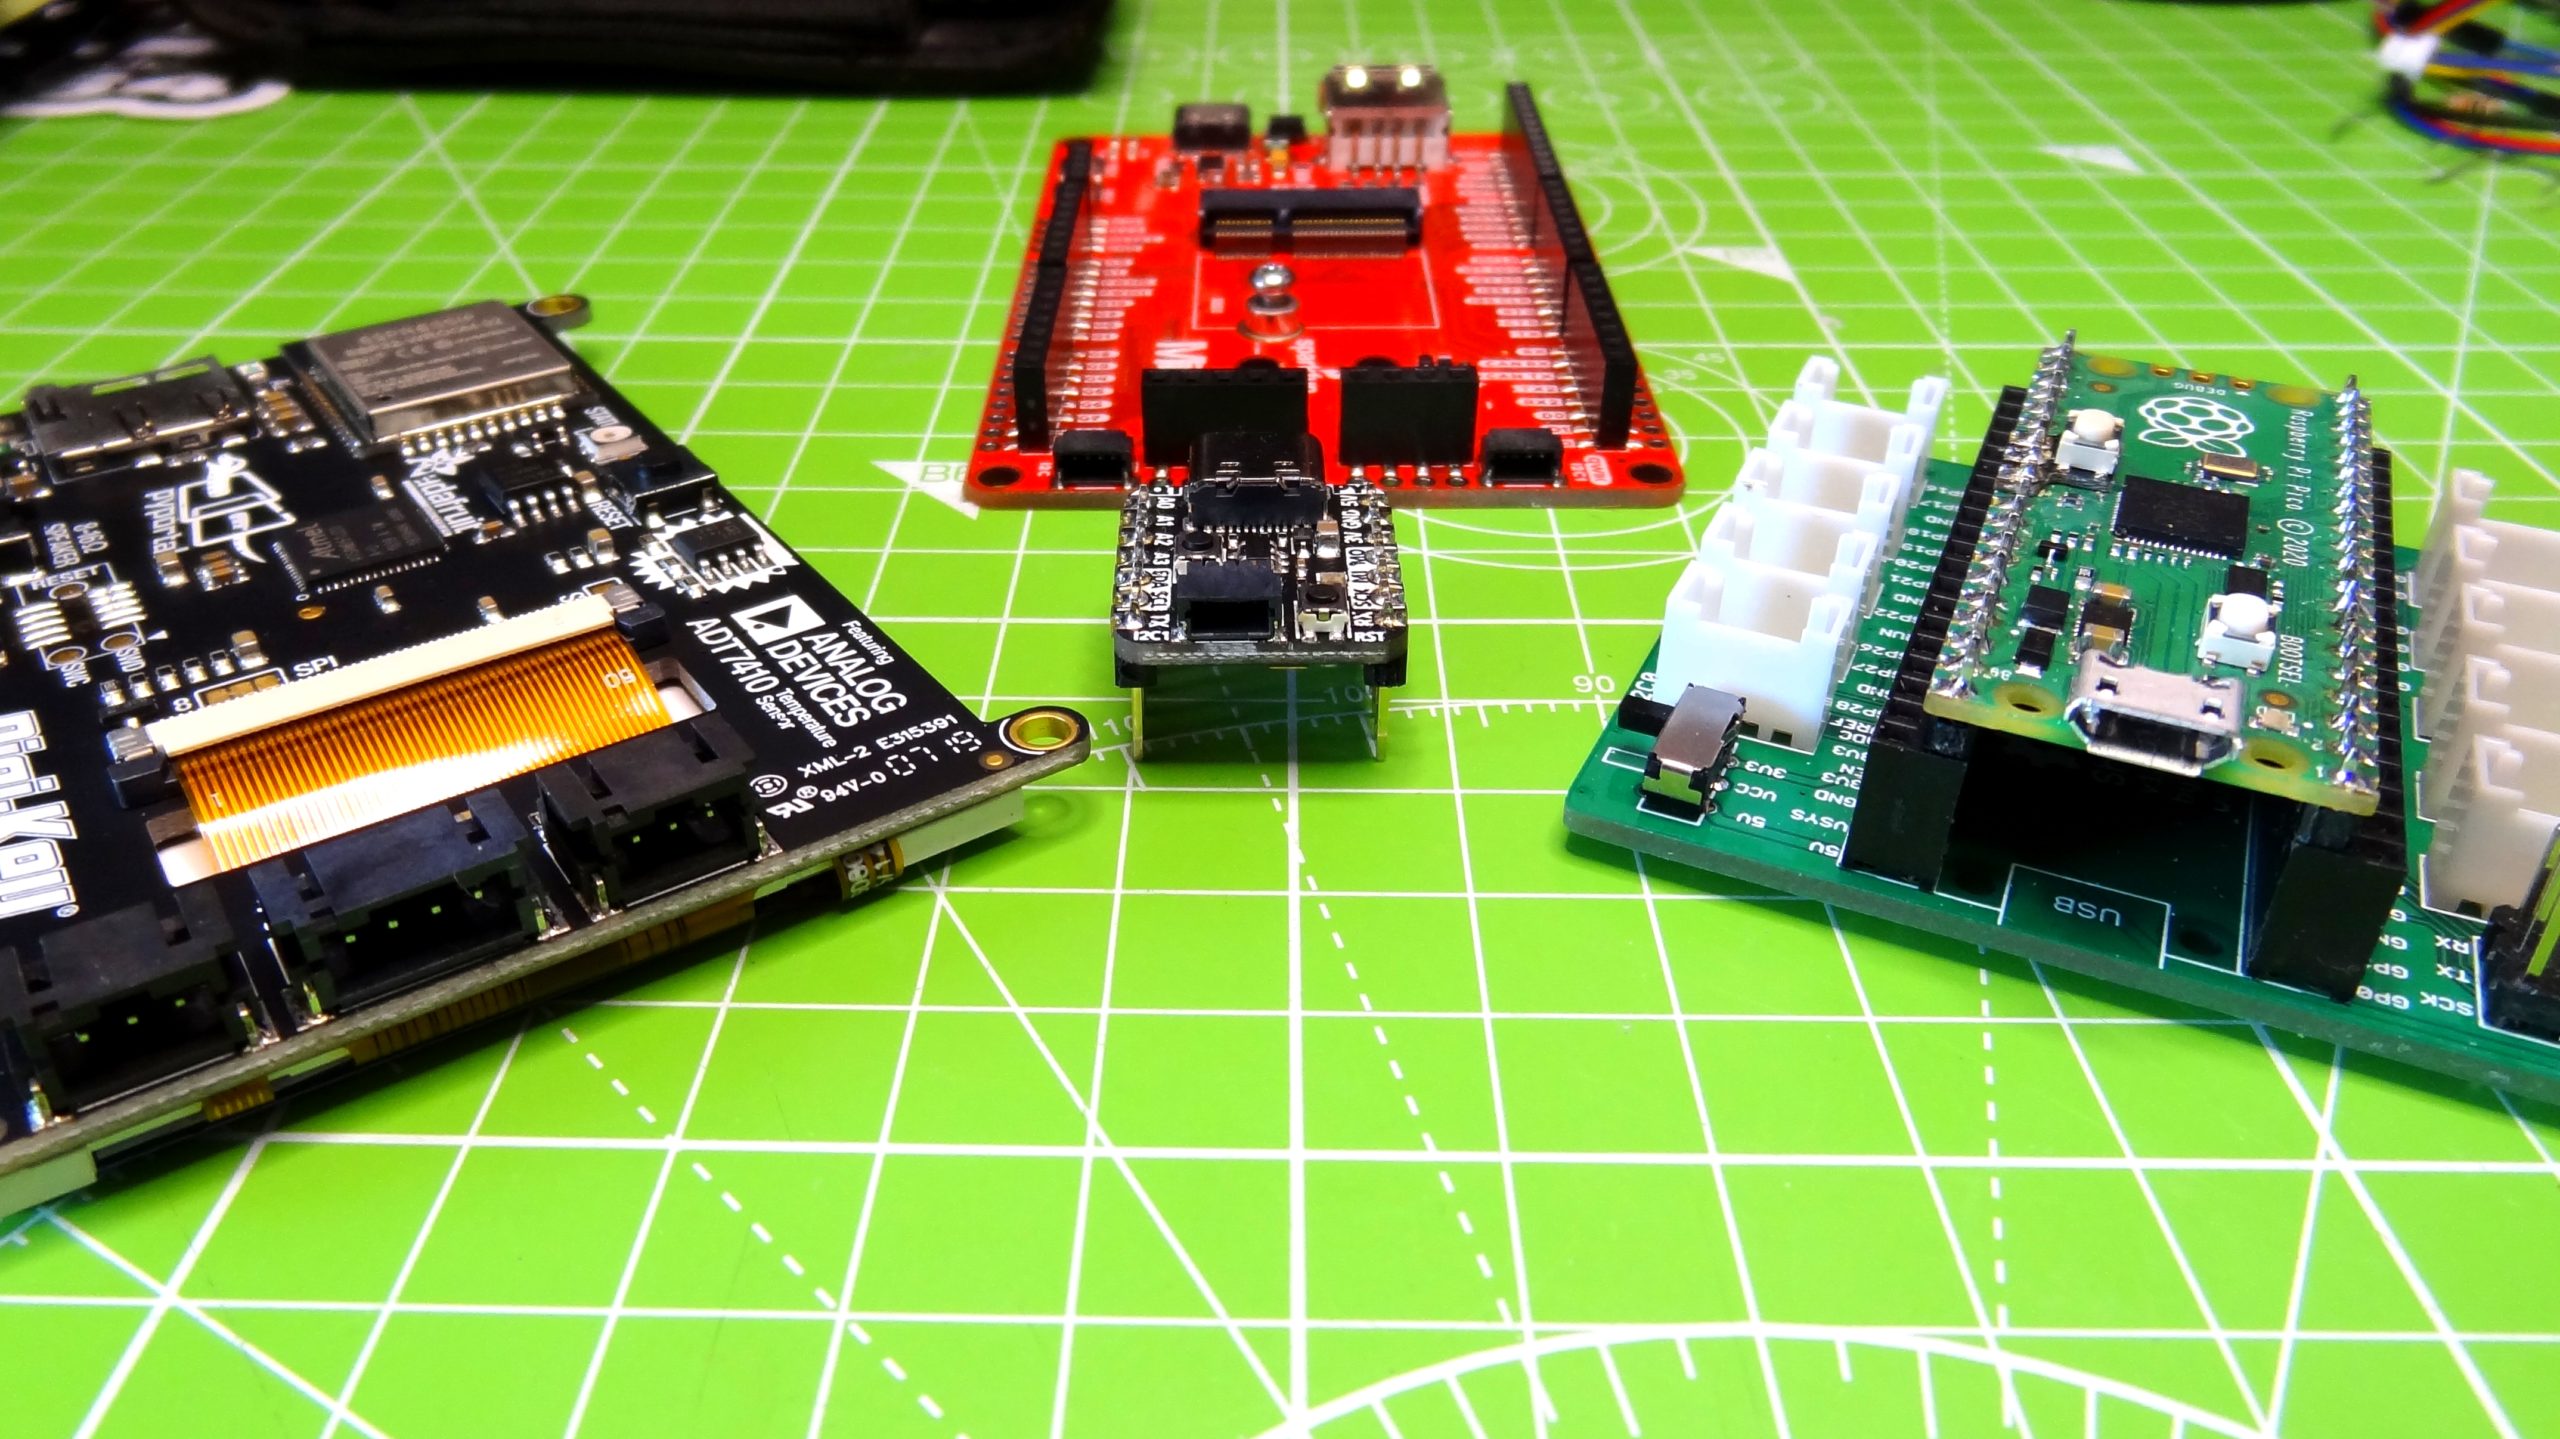
Adafruit’s Stemma connector arrived in 2018 and essentially it is three or four pin JST PH with 2.00 mm pitch, a connector which is keyed so that it cannot be inserted incorrectly. Stemma is seen on larger boards such as PyPortal which has plenty of space for multiple three and four pin connectors.

There are two forms of Stemma connectors, a three or four pin connector. The three pin connector is used for Pulse Width Modulation, Analog and Digital IO. Using this connector we can control Neopixels, read analog sensors and use digital IO devices such as LEDs and buttons. The four-pin connector is for I2C (Inter-Integrated Circuit) components, enabling the use of multiple sensors / devices on a single bus thanks to devices having an address which can be read from / written to.

Stemma is a great connector, but for smaller boards, such as Adafruit’s QT Py RP2040 we need something smaller and that is where Stemma QT (‘cutie’) comes in. Stemma QT is a smaller version of the four pin Stemma format, roughly half the size of Stemma, with a 1.0 mm pitch. Stemma QT is only for use with I2C components. Analog, PWM and digital IO connections are made via the traditional GPIO.

The pin order for QT is designed to match the pin order for SparkFun’s Qwiic enabling the use of Qwiic add-ons with Stemma QT boards and for the reverse to also be true.

Examples of Stemma QT boards are Adafruit’s MPR121 capacitive touch sensor, SGP40 air quality sensor, aBME680 temperature / humidity / pressure sensor and AMG8833 IR thermal camera.

What is Qwiic?

(Image credit: Tom’s Hardware)

SparkFun’s Qwiic Connect System was released in 2017 and is for use with I2C components. It is compatible with Adafruit’s Stemma and Stemma QT as Qwiic uses the same pin ordering. Qwicc, like Stemma, uses the I2C protocol and enables components to be daisy chained together.

(Image credit: Tom’s Hardware)

Qwiic connectors can be found on many of SparkFun’s boards such as the MicroMod ATP carrier board which uses an M.2 slot, the MicroMod standard, for interchangeable processor boards such as the ESP32, Artemis and the new RP2040. There are also adapters for using Qwiic components on the Raspberry Pi via a HAT and pHAT and for the Arduino range of boards.

With SparkFun’s Qwiic connector we can easily connect sensors such as the HC-SR04 ultrasonic sensor, soil moisture sensor and even a NEO-M9N GPS breakout.

What is Seeed Studio’s Grove Connector?

(Image credit: Tom’s Hardware)

Seeed Studio’s Grove connector is a proprietary connector for its range of boards and boards made in partnership with Arduino. The Grove connector is a 4-pin cable which can be used with analog, PWM, digital IO and I2C.

Grove is compatible with Stemma components, but only for I2C devices as analog, PWM and digital IO are not compatible. If you are unsure, just take a look at the component. If it has SDA / SCL pins, then it is an I2C device.

If you have never used Grove connections before, then the Grove Beginner Kit is worth your investment. In the kit we get an OLED screen, DHT11 temperature sensor, microphone, light sensor and a bonus Arduino compatible board.

Connector Comparison

Device Connector Voltage / Logic Protocols
Stemma JST PH 3 / 4 Pin 2.0mm pin pitch 3-5V DC 4 Pin I2C, 3 Pin Analog / Digital / PWM
Stemma QT JST SH 4 pin 1.0mm pin pitch 3-5V DC I2C
Qwiic JST SH 4 pin 1.0mm pin pitch 3V DC I2C
Grove Proprietary 4 pin 2.0mm pin pitch, Compatible with Stemma I2C only 3-5V DC 4 Pin I2C / Analog / Digital / PWM

Which Connector is Right For You?

The answer is based on what boards you already have and what you want to achieve. If you have Adafruit’s boards, then you will most likely have some form of Stemma / Stemma QT connector and so the entire range of add-ons is available to you. You will also have access to SparkFun’s Qwiic range of add ons which opens up a plethora of options for your projects. This is also true if you have any of SparkFun’s boards with Qwiic connectors. 

Seeed’s Grove connectors work with Arduino, Raspberry Pi and now the Raspberry Pi Pico. So buying one set of Grove components is good value for those that wish to use them across multiple platforms.

Ultimately the choice is yours. What projects you wish to build will dictate the choices that you make. But no matter what choice you make, all of these connectors make electronics a breeze and give you the confidence to learn new skills without worrying about your wiring.